GitLab CI流水线配置文件.gitlab-ci.yml详解 文章转载自:梅朝辉的博客 ,
本文讲解在GitLab的汉化与CI持续集成gitlab-runner的配置 的基础上,对GitLab CI流水线配置文件 .gitlab-ci.yml进行详细的介绍。
实验环境
server服务端: 操作系统为CentOS 7.6,IP:192.168.56.14, git:2.16.5。
查看server服务端信息:
[root@server ~]
GitLab用户信息:
1 2 3 账号 密码
GitLab WEB网站地址: http://192.168.56.14
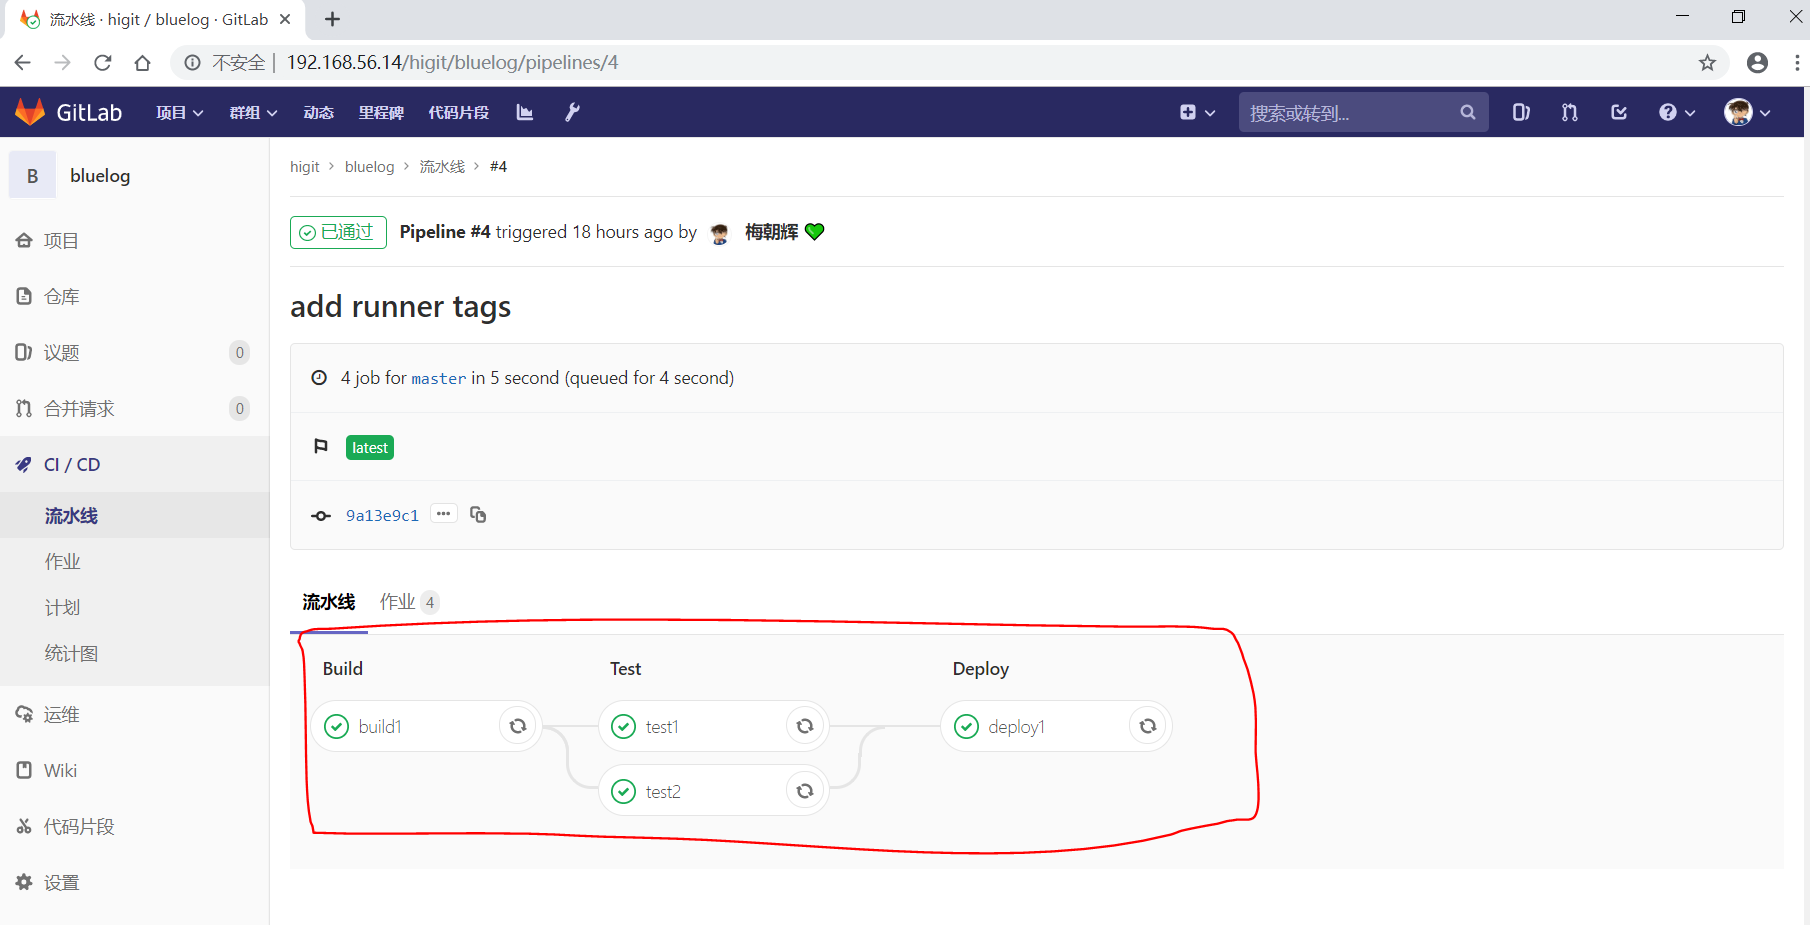
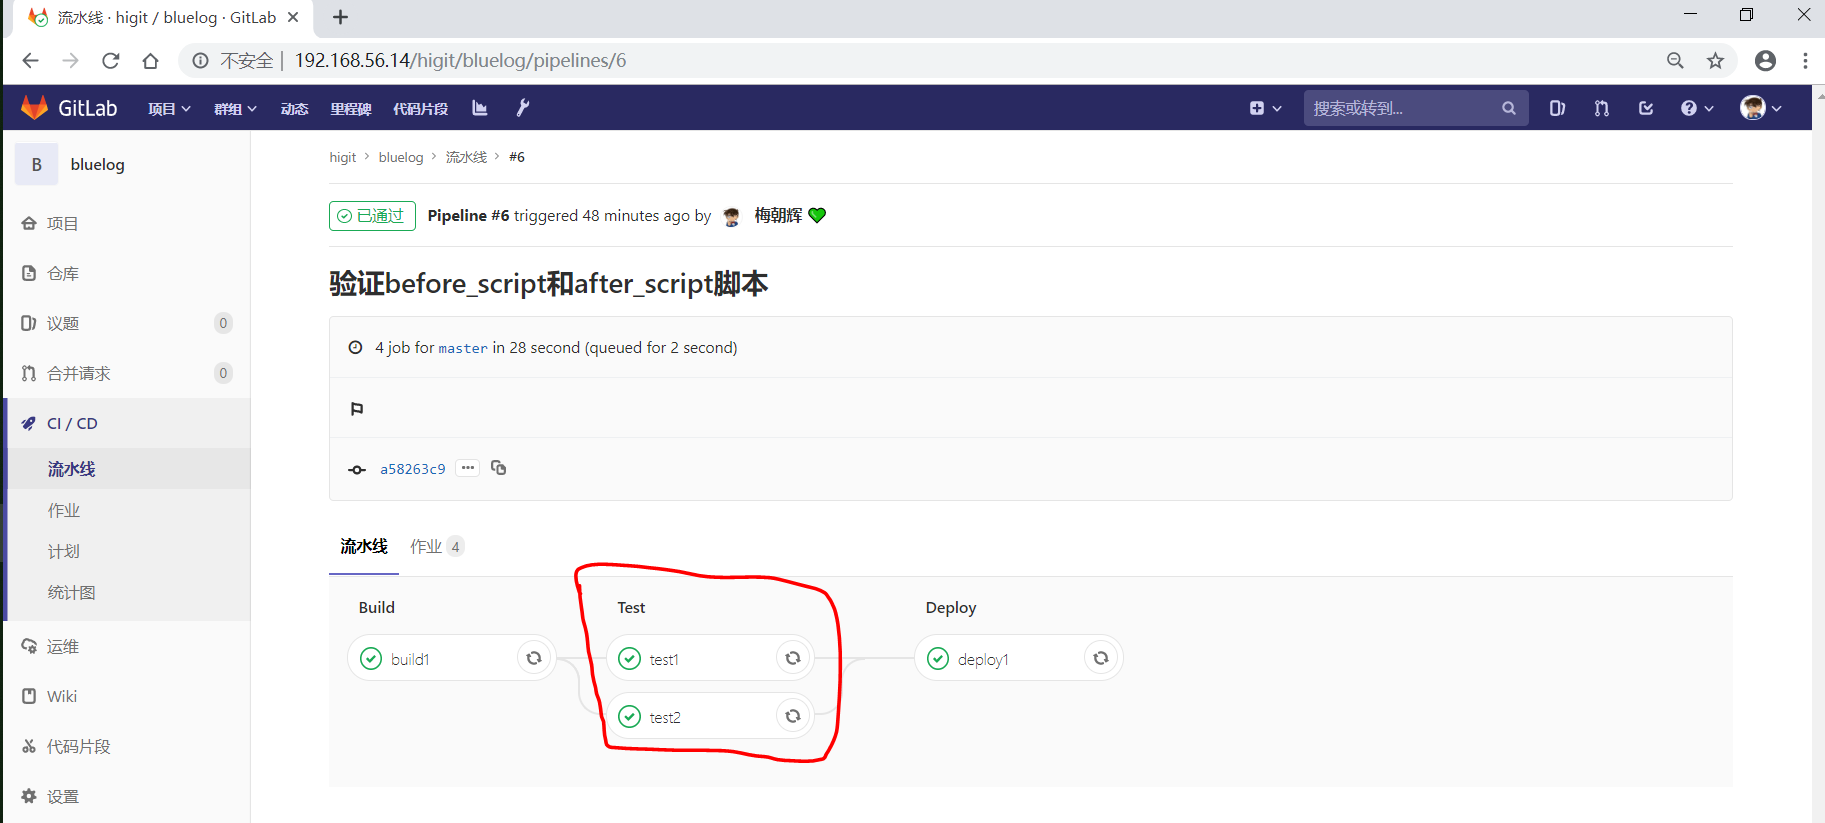
之前我们配置的bluelog的4#流水线已经已通过 了:
可以发现其 build 、Test 、Deploy三个阶段的任务都执行成功!
而流水线执行的具体过程都是由.gitlab-ci.yml配置文件定义的,本文详细讲解.gitlab-ci.yml配置文件的使用。
GitLab CI介绍
GitLab提交持续集成服务,当你在项目根目录中添加 .gitlab-ci.yml文件,并配置项目的运行器( GitLab Runner),那么后续的每次提交都会触发CI流水线(pipeline)的执行。
.gitlab-ci.yml文件告诉运行器需要做哪些事情,默认情况下,流水线有build 、test 、deploy三个阶段,即构建、测试、部署,未被使用的阶段将会被自动忽略。如果一切运行正常(没有非零返回值),您将获得与提交相关联的漂亮绿色复选标记(如下图所示)。这样可以在查看代码之前轻松查看提交是否导致任何测试失败。
大多数项目使用GitLab的CI服务来运行测试套件,以便开发人员在破坏某些内容时可以立即获得反馈。使用持续交付和持续部署将测试代码自动部署到模拟环境和生产环境的趋势越来越明显。
由于将 .gitlab-ci.yml文件存放在仓库中进行版本控制,使用单一的配置文件来控制流水线,具有读访问权限的每个人都可以查看内容,从而使其更有吸引力地改进和查看构建脚本。旧的版本也能构建成功,forks项目也容易使用CI,分支可以有不同的流水线和作业。
.gitlab-ci.yml定义每个项目的流水线的结构和顺序,由以下两个因素决定:
GiTlab Runner运行器使用的执行器( executor),执行器常用的 Shell 、 Docker 、Kubernets , 我们当前仅使用 Shell执行器,后续再使用其他执行器。
遇到进程成功或失败时等条件时做出的决定。
可以在 Getting started with GitLab CI/CD 查看到流水线的简单示例。
可以在 GitLab CI/CD Examples 查看更多的流水线示例。
在流水线脚本中可以使用预定义的全局变量,详细可查看 GitLab CI/CD Variables 。
企业级的.gitlab-ci.yml示例可查看https://gitlab.com/gitlab-org/gitlab-ce/blob/master/.gitlab-ci.yml
Job作业是.gitlab-ci.yml文件的基本元素,每个作业至少有 script脚本子句,在流水线中可以定义任意多个作业。
每个作业必须具有唯一的名称,但有一些保留的关键字不能用作作业名称,保留关键字(reserved keywords)有image、 services、stages、types、before_script、 after_script、variables、cache。
.gitlab-ci.yml配置参数
关键字
描述
script
必须参数,运行器需要执行的脚本
image
使用Docker image镜像
services
使用Docker services镜像
before_script
作业执行前需要执行的命令
after_script
作业执行后需要执行的命令
stages
定义流水线所有的阶段
stage
定义作业所处流水线的阶段(默认test阶段)
only
限制作业在什么时候创建
except
限制作业在什么时候不创建
tags
作用使用的Runner运行器的标签列表
allow_failure
允许作业失败,失败的作业不影响提交的状态
when
什么时候运行作业
environment
作用部署的环境名称
cache
指定需要在job之间缓存的文件或目录
artifacts
归档文件列表,指定成功后应附加到job的文件和目录的列表
dependencies
当前作业依赖的其他作业,你可以使用依赖作业的归档文件
coverage
作业的代码覆盖率
retry
作业失败时,可以自动执行多少次
parallel
指定并行运行的作业实例
trigger
定义下游流水线的触发器
include
作业加载其他YAML文件
extends
控制实体从哪里继承
pages
上传GitLab Pages的结果
retry
作业失败时,可以自动执行多少次
variables
定义环境变量
参数详解 scriptscript是作业中唯一必须的关键字参数,是运行器需要执行的脚本,如:
1 2 3 4 build1: script: - echo "Do your build here" - uname -a
表示build1作业需要执行的命令是输出”Do your build here”。
Sometimes, script commands will need to be wrapped in single or double quotes. For example, commands that contain a colon (😃 need to be wrapped in quotes so that the YAML parser knows to interpret the whole thing as a string rather than a “key: value” pair. Be careful when using special characters: :, {, }, [, ], ,, &, *, #, ?, |, -, <, >, =, !, %, @, `. 即使用冒号时应使用引号包裹起来,使用特殊字符时需要特别注意!!!注意如果要输出冒号字符,冒号后面不能紧接空格!!!
imageimage指定使用Docker镜像。如iamge:name,暂时忽略。
servicesservices 指定使用Docker镜像服务。如 services:name,暂时忽略。
before_scriptbefore_script用于定义在所有作业之前需要执行的命令,比如更新代码、安装依赖、打印调试信息之类的事情。
示例:
1 2 3 4 before_script: - echo "Before script section" - echo "For example you might run an update here or install a build dependency" - echo "Or perhaps you might print out some debugging details"
after_scriptafter_script用于定义在所有作业(即使失败)之后需要执行的命令,比如清空工作空间。
示例:
1 2 3 after_script: - echo "After script section" - echo "For example you might do some cleanup here"
重要说明
before_script和script在一个上下文中是串行执行的,after_script是独立执行的,即after_script与before_script/script的上下文环境不同。after_script会将当前工作目录设置为默认值。由于after_script是分离的上下文,在after_script中无法看到在before_script和script中所做的修改:
在before_script和script中的命名别名、导出变量,对after_script不可见;
before_script和script在工作树之外安装的软件,对after_script不可见。
你可以在作业中定义before_script,after_script,也可以将其定义为顶级元素,定义为顶级元素将为每一个任务都执行相应阶段的脚本或命令。作业级会覆盖全局级的定义。
示例:
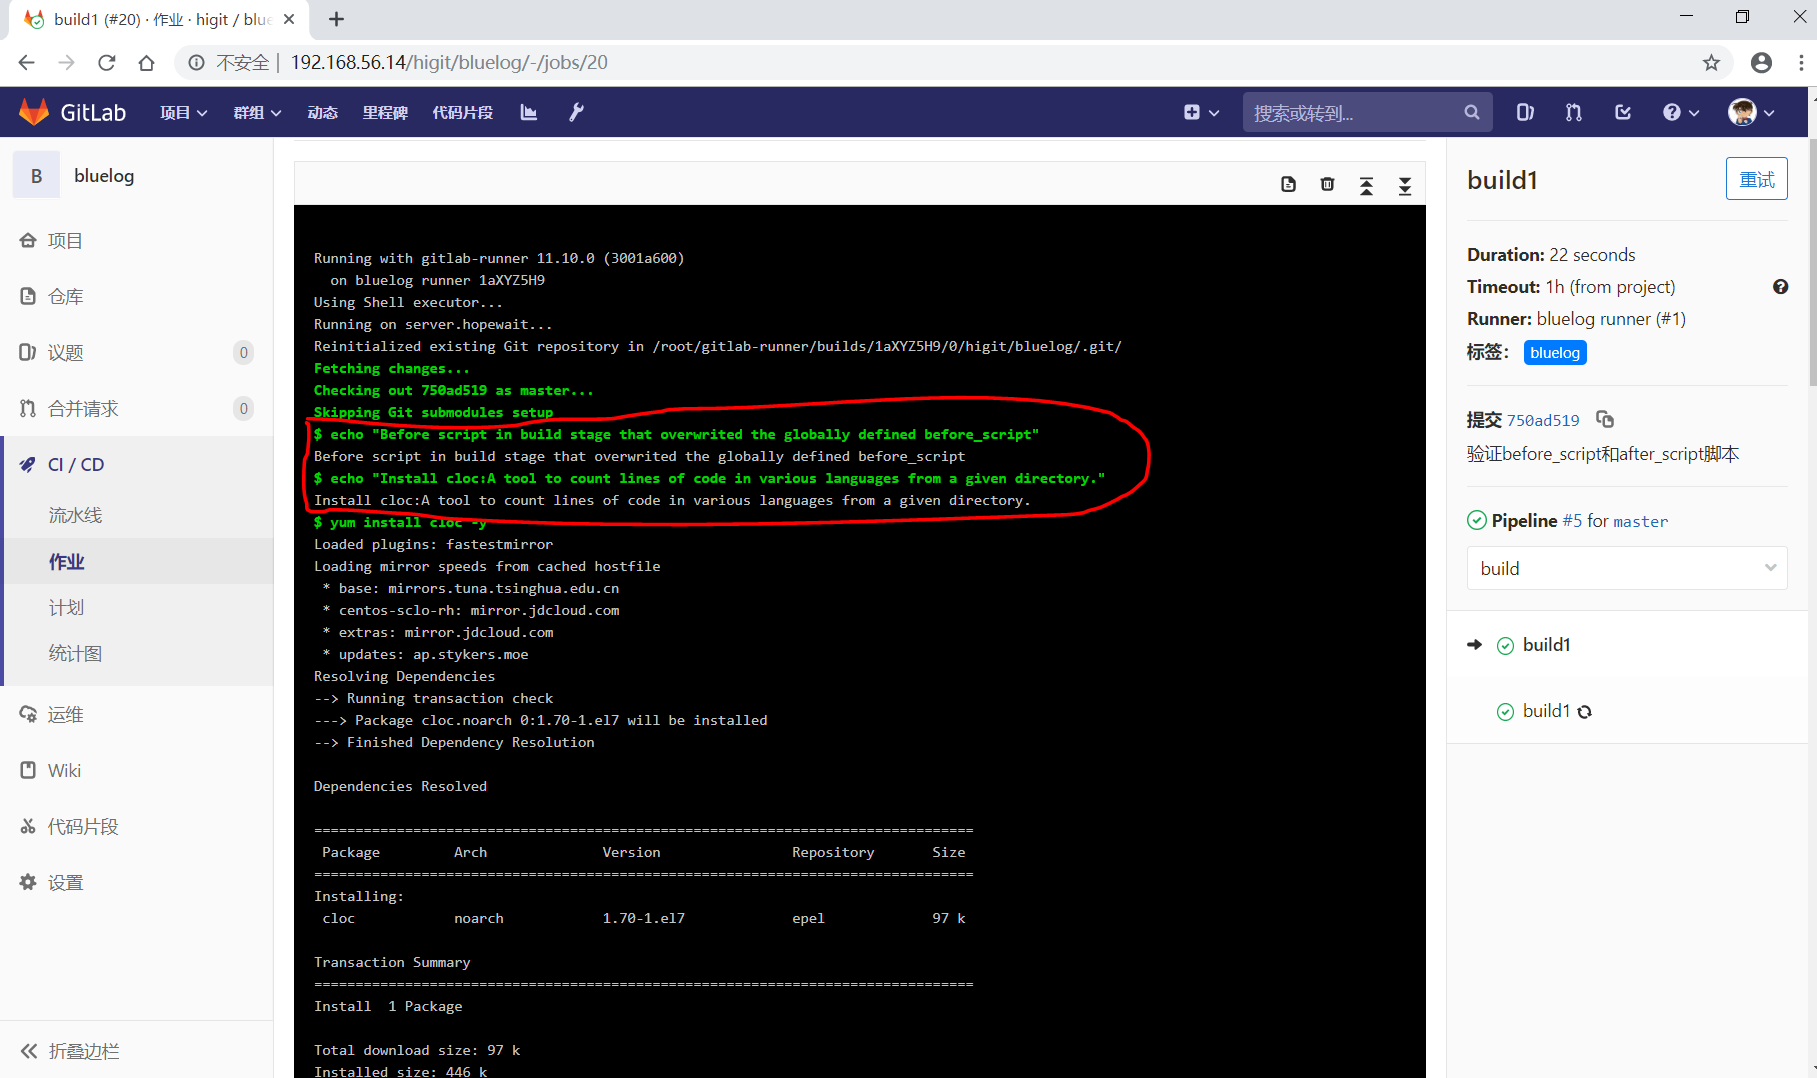
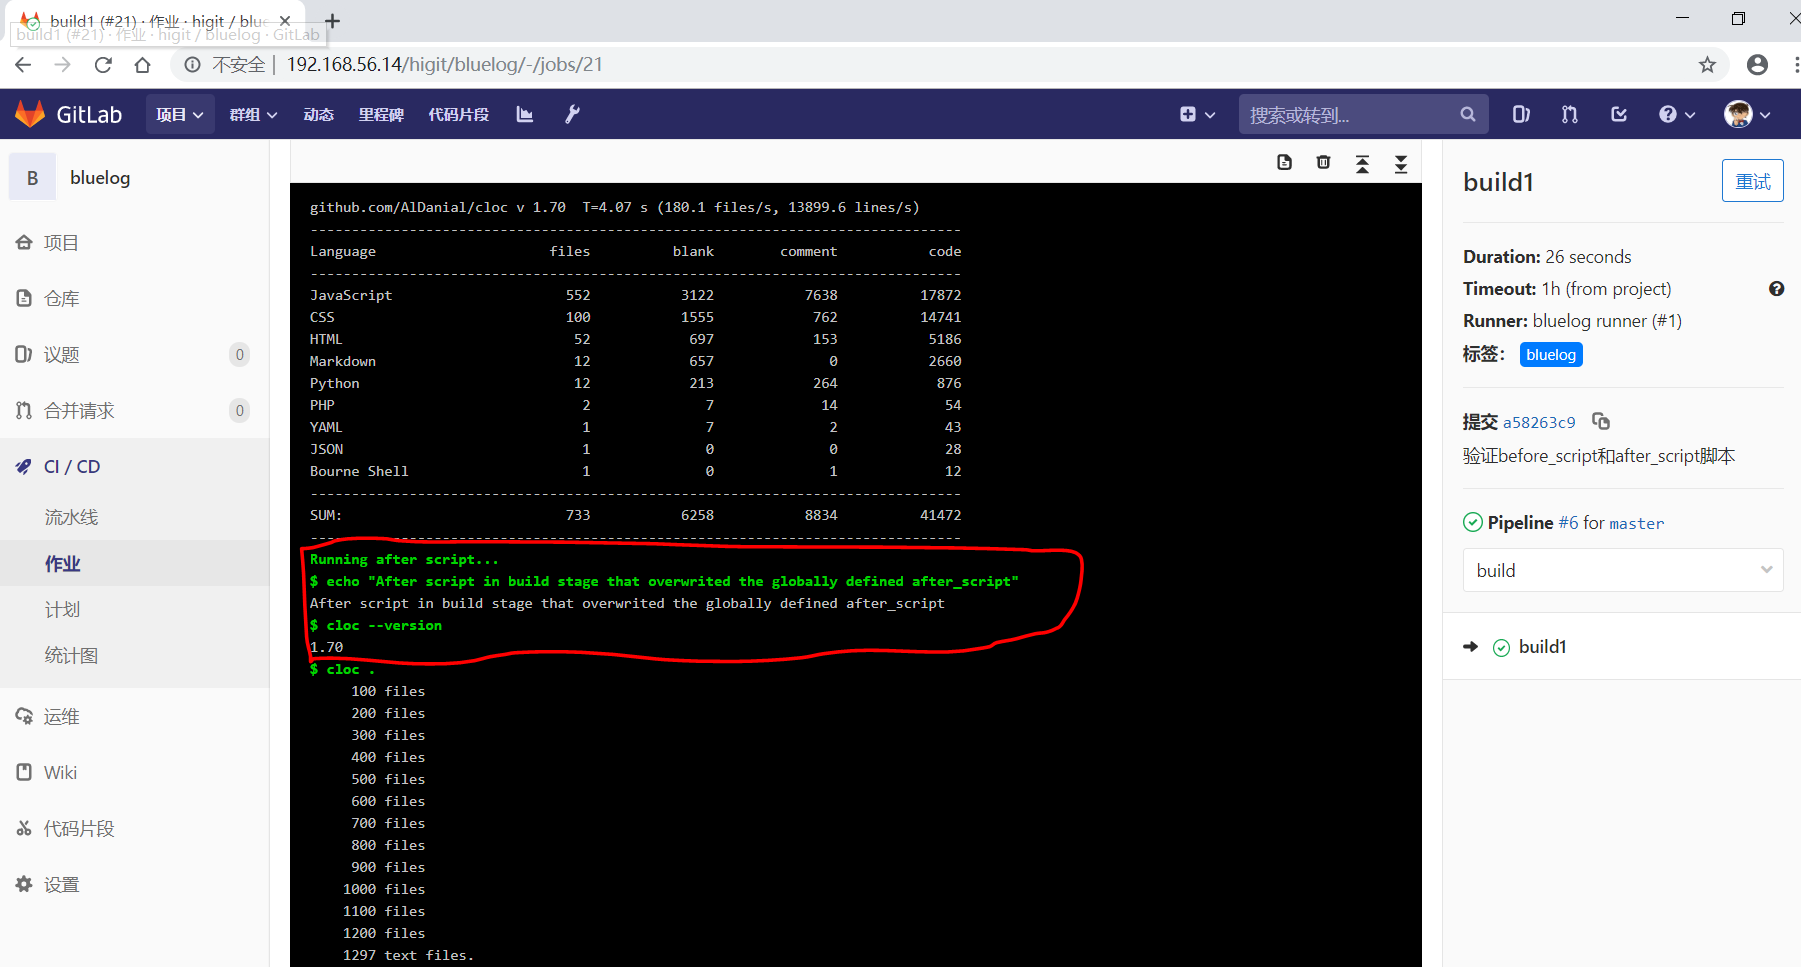
1 2 3 4 5 6 7 8 9 10 11 12 13 14 15 16 17 18 19 20 21 22 23 24 25 before_script: - echo "Before script section" - echo "For example you might run an update here or install a build dependency" - echo "Or perhaps you might print out some debugging details" after_script: - echo "After script section" - echo "For example you might do some cleanup here" build1: stage: build before_script: - echo "Before script in build stage that overwrited the globally defined before_script" - echo "Install cloc:A tool to count lines of code in various languages from a given directory." - yum install cloc -y after_script: - echo "After script in build stage that overwrited the globally defined after_script" - cloc --version - cloc . script: - echo "Do your build here" - cloc --version - cloc . tags: - bluelog
将修改上传提交,查看作业build1的控制台输出:
可以发现build1作业的before_script和after_script将全局的before_script和after_script覆盖了。
stagesstages定义流水线全局可使用的阶段,阶段允许有灵活的多级管道,阶段元素的排序定义了作业执行的顺序。
相同 stage阶段的作业并行运行。
默认情况下,上一阶段的作业全部运行成功后才执行下一阶段的作业。
默认有三个阶段, build 、test、deploy三个阶段,即 构建、测试、部署 。
如果一个作业未定义 stage阶段,则作业使用 test测试阶段。
默认情况下,任何一个前置的作业失败了,commit提交会标记为failed并且下一个stages的作业都不会执行。
stagestage定义流水线中每个作业所处的阶段,处于相同阶段的作业并行执行。
示例:
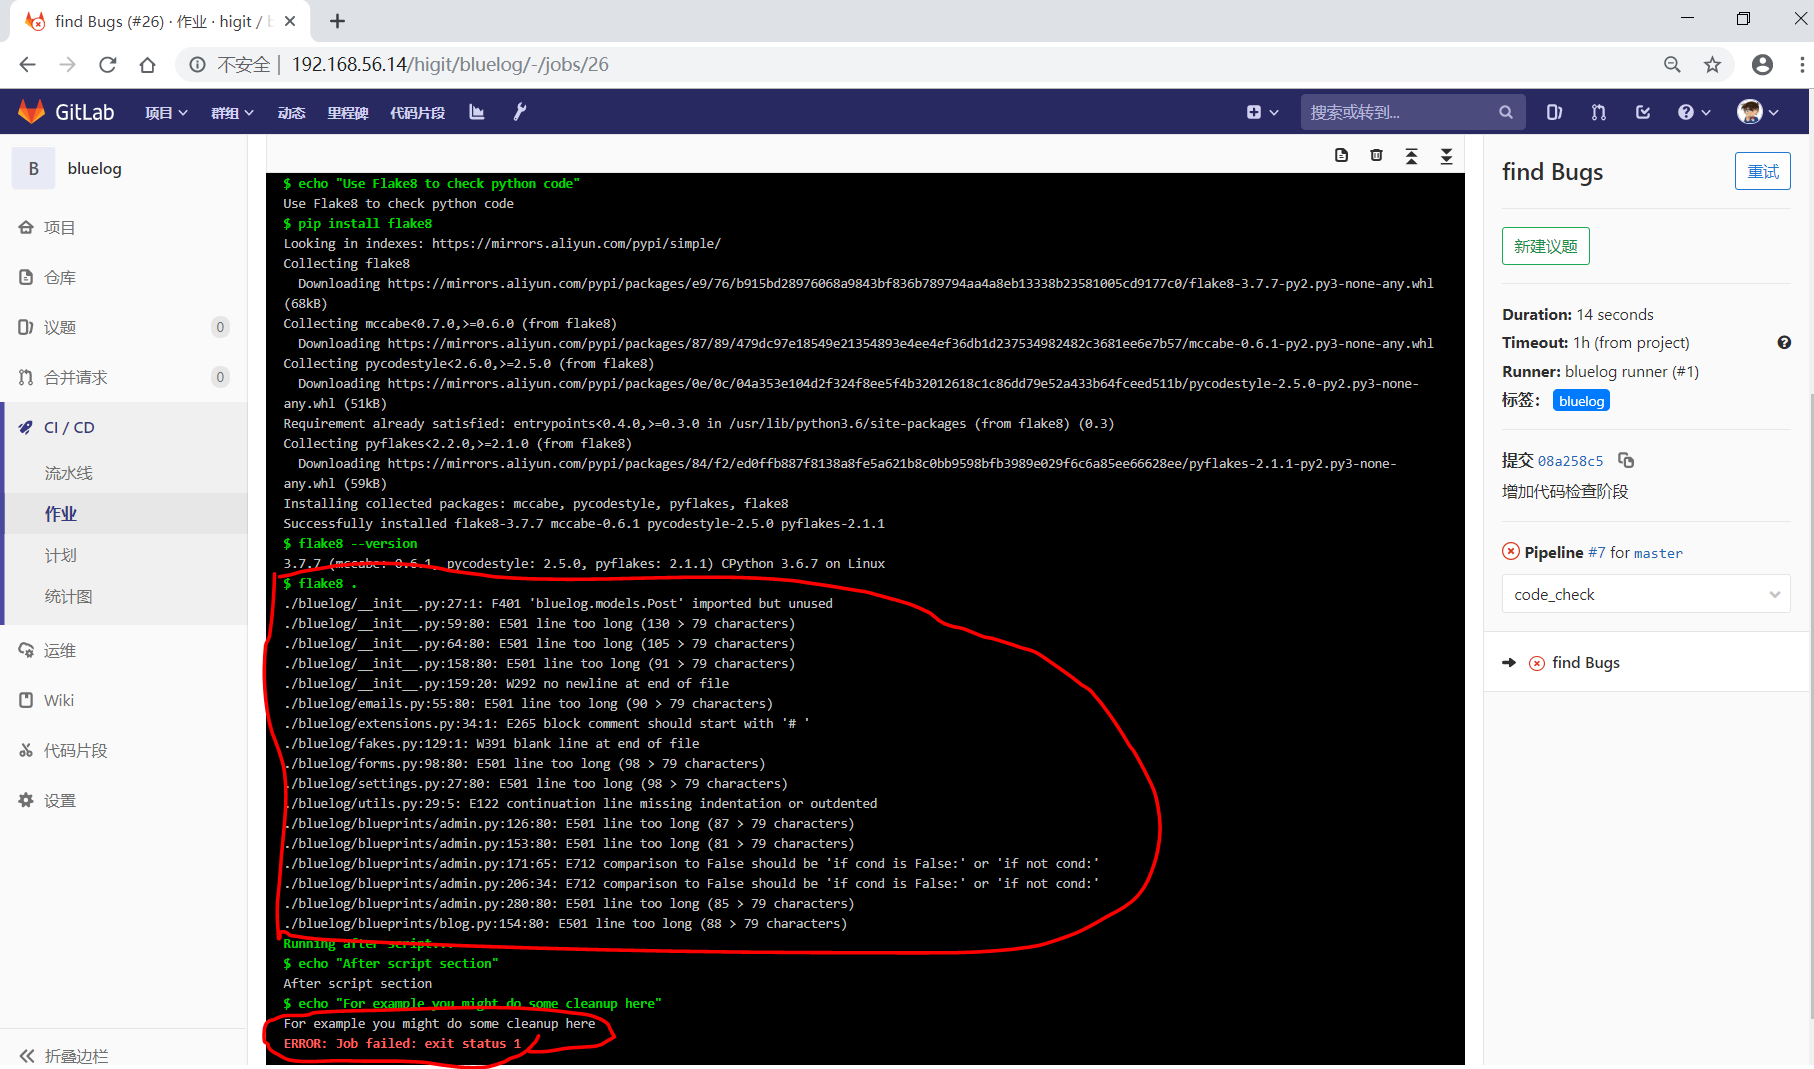
1 2 3 4 5 6 7 8 9 10 11 12 13 14 15 16 17 18 19 20 21 22 23 24 25 26 27 28 29 30 31 32 33 34 35 36 37 38 39 40 41 42 43 44 45 46 47 48 49 50 51 52 53 54 55 56 57 58 59 60 61 before_script: - echo "Before script section" - echo "For example you might run an update here or install a build dependency" - echo "Or perhaps you might print out some debugging details" after_script: - echo "After script section" - echo "For example you might do some cleanup here" stages: - build - code_check - test - deploy build1: stage: build before_script: - echo "Before script in build stage that overwrited the globally defined before_script" - echo "Install cloc:A tool to count lines of code in various languages from a given directory." - yum install cloc -y after_script: - echo "After script in build stage that overwrited the globally defined after_script" - cloc --version - cloc . script: - echo "Do your build here" - cloc --version - cloc . tags: - bluelog find Bugs: stage: code_check script: - echo "Use Flake8 to check python code" - pip install flake8 - flake8 --version - flake8 . tags: - bluelog test1: stage: test script: - echo "Do a test here" - echo "For example run a test suite" tags: - bluelog test2: stage: test script: - echo "Do another parallel test here" - echo "For example run a lint test" tags: - bluelog
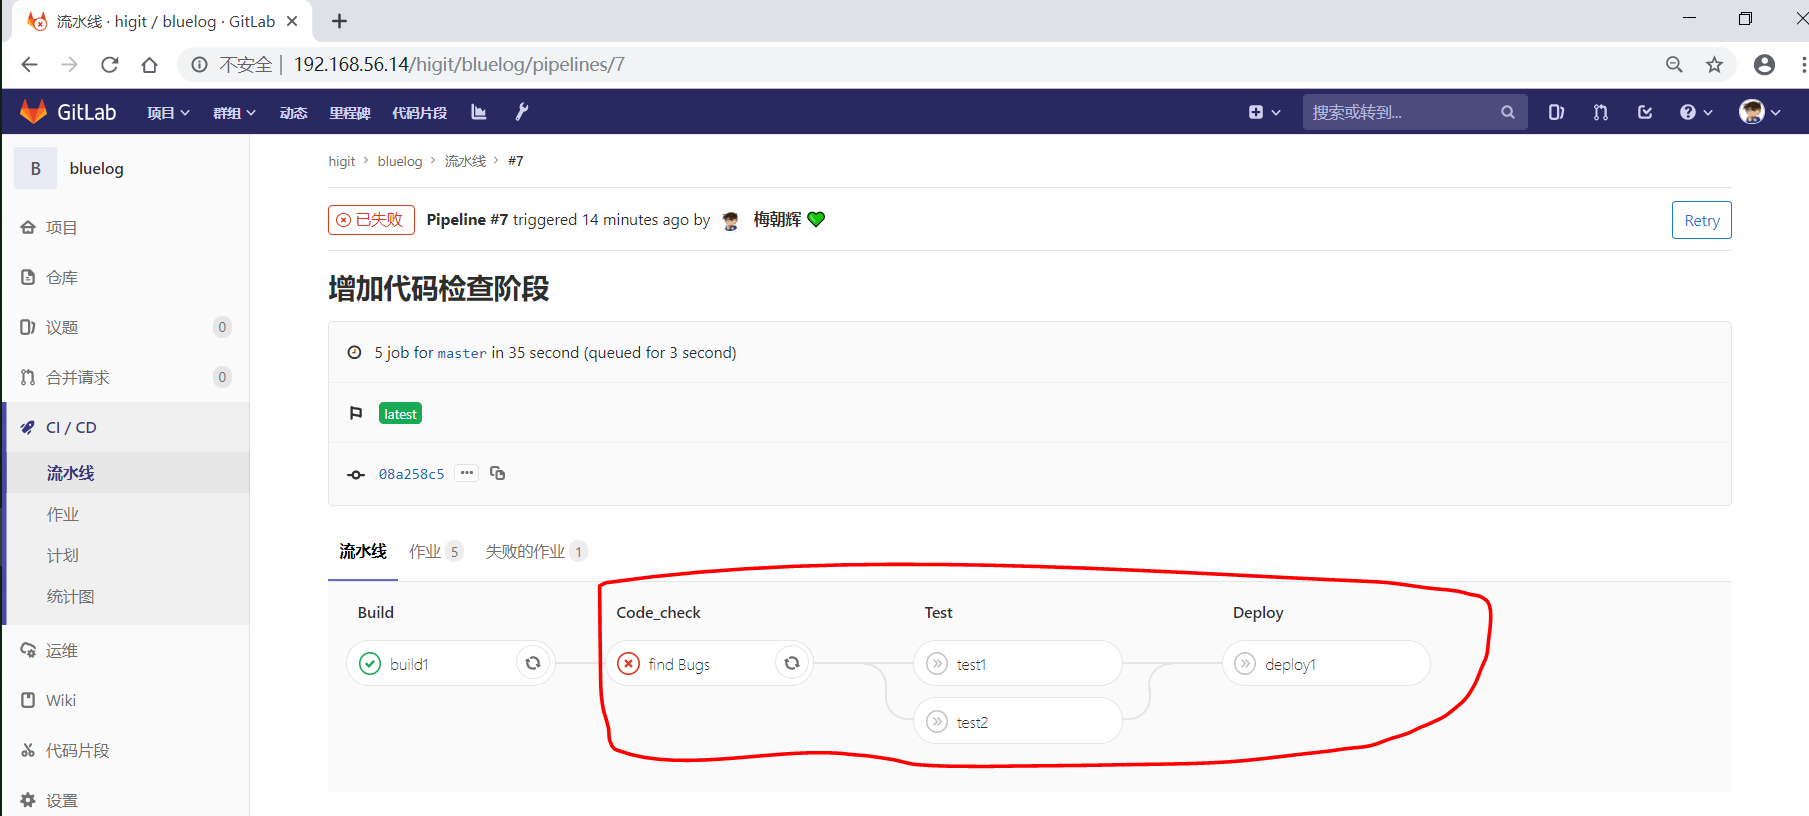
我们增加一个 code_check阶段,该阶段有一个作业find Bugs,该作业主要是先安装Flake8,然后使用Flake8对Python代码进行规范检查。
由于Flake8检查到了Python代码中的缺陷,导致find Bugs作业失败!这样可以控制开发人员提交有坏味道的代码到仓库中。
另外,在上一个流水线中,Test阶段的作业test1和test2是并行执行的,如下图所示:
本次(pipeline #7)流水线由于在作业find Bugs检查不通过,导致整个流水线运行失败,后续的作业不会执行:
说明
默认情况下,GitLab Runner运行器每次只执行一个作业,只有当满足以下条件之一时,才会真正的并行执行:
作业运行在不同的运行器上;
你修改了运行器的concurrent设置,默认情况下concurrent = 1。
only和exceptonly和except用于在创建作业时对作业的限制策略。
only定义了哪些分支或标签(branches and tags)的作业会运行except定义了哪些分支或标签(branches and tags)的作业不会运行
下面是策略规则:
only和except可同时使用,如果在一个作业中同时定义了only和except,则only和except同时进行过滤(注意,不是忽略 except条件) 。only和except可以使用正则表达式。only和except允许指定用于过滤forks作业的存储库路径。only和except中可以使用特殊的关键字,如branches、tags、api、external、pipelines、pushes、schedules、triggers、web、merge_requests、chats等。
only和except中可以使用特殊的关键字:
关键字
描述释义
branches
当一个分支被push上来
tags
当一个打了tag标记的Release被提交时
api
当一个pipline被第二个piplines api所触发调起(不是触发器API)
external
当使用了GitLab以外的外部CI服务,如Jenkins
pipelines
针对多项目触发器而言,当使用CI_JOB_TOKEN,
并使用gitlab所提供的api创建多个pipelines的时候
pushes
当pipeline被用户的git push操作所触发的时候
schedules
针对预定好的pipline计划而言(每日构建一类)
triggers
用触发器token创建piplines的时候
web
在GitLab WEB页面上Pipelines标签页下,按下run pipline的时候
merge_requests
当合并请求创建或更新的时候
chats
当使用GitLab ChatOps 创建作业的时候
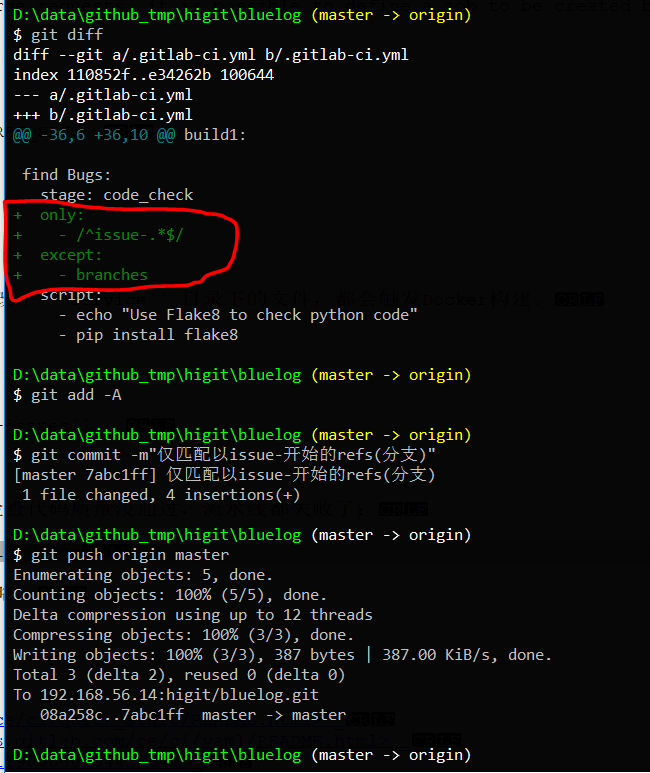
在下面这个例子中,job将只会运行以issue-开始的refs(分支),然而except中指定分支不能执行,所以这个job将不会执行:
1 2 3 4 5 6 7 job: only: - /^issue-.*$/ except: - branches
匹配模式默认是大小写敏感的(case-sensitive),使用i标志,如/pattern/i可以使匹配模式大小写不敏感:
1 2 3 4 5 6 7 job: only: - /^issue-.*$/i except: - branches
下面这个示例,仅当指定标记的tags的refs引用,或者通过API触发器的构建、或者流水线计划调度的构建才会运行:
1 2 3 4 5 6 job: only: - tags - triggers - schedules
仓库的路径(repository path)只能用于父级仓库执行作业,不能用于forks:
1 2 3 4 5 6 job: only: - branches@gitlab-org/gitlab-ce except: - master@gitlab-org/gitlab-ce - /^release/.*$/@gitlab-org/gitlab-ce
上面这个例子,将会在所有分支执行,但不会在master主干以及以release/开头的分支上执行。
当一个作业没有定义only规则时,其默认为only: ['branches', 'tags']。
如果一个作业没有定义except规则时,则默认except规则为空。
下面这个两个例子是等价的:
1 2 job: script: echo 'test'
转换后:
1 2 3 job: script: echo 'test' only: ['branches' , 'tags' ]
说明
关于正则表达式使用的说明:
因为@用于表示ref的存储库路径的开头,所以在正则表达式中匹配包含@字符的ref名称需要使用十六进制字符代码\x40。
仅标签和分支名称才能使用正则表达式匹配,仓库路径按字面意义匹配。
如果使用正则表达式匹配标签或分支名称,则匹配模式的整个引用部分都是正则表达式。
正则表达式必须以/开头和结尾,即/regular expressions/,因此,issue-/.*/不会匹配以issue-开头的标签或分支。
可以在正则表达式中使用锚点^$,用来匹配开头或结尾,如/^issue-.*$/与/^issue-/等价,但 /issue/却可以匹配名称为severe-issues的分支,所以正则表达式的使用要谨慎!
only和except高级用法
only和except支持高级策略,refs、variables、changes、kubernetes四个关键字可以使用。如果同时使用多个关键字,中间的逻辑是逻辑与AND。
only:refs/except:refs
refs策略可以使用only和except基本用法中的关键字。
下面这个例子中,deploy作业仅当流水线是计划作业或者在master主干运行:
1 2 3 4 5 deploy: only: refs: - master - schedules
only:kubernetes/except:kubernetes
kubernetes策略仅支持active关键字。
下面这个例子中,deploy作业仅当kubernetes服务启动后才会运行:
1 2 3 deploy: only: kubernetes: active
only:variables/except:variables
variables关键字用来定义变量表达式,你可以使用预定义变量、项目、组、环境变量来评估一个作业是否需要创建或运行。
下面这个例子使用了变量表达式:
1 2 3 4 5 6 7 8 deploy: script: cap staging deploy only: refs: - branches variables: - $RELEASE == "staging" - $STAGING
下面这个例子,会根据提交日志信息来排除某些作业:
1 2 3 4 5 end-to-end: script: rake test:end-to-end except: variables: - $CI_COMMIT_MESSAGE =~ /skip-end-to-end-tests/
only:changes/except:changes
changes策略表明一个作业只有在使用git push事件使文件发生变化时执行。
下面这个例子中,deploy作业仅当流水线是计划作业或者在master主干运行:
1 2 3 4 5 6 7 8 docker build: script: docker build -t my-image:$CI_COMMIT_REF_SLUG . only: changes: - Dockerfile - docker/scripts/* - dockerfiles/**/* - more_scripts/*.{rb,py,sh}
上面这个例子中,一旦Dockerfile文件发生变化,或者docker/scripts/目录下的文件发生变化,或者dockerfiles/目录下的文件或目录发生变化,或者more_scripts/目录下rb,py,sh等脚本文件发生变化时,就会触发Docker构建。
也可以使用glob模式匹配来匹配根目录下的文件,或者任何目录下的文件。
如下示例:
1 2 3 4 5 6 test: script: npm run test only: changes: - "*.json" - "**/*.sql"
强调
在上面的示例中,glob模式匹配的字符串需要使用双引号包裹起来,否则会导致.gitlab-ci.yml解析错误。
下面这个例子,当md文件发生变化时,会忽略CI作业:
1 2 3 4 5 build: script: npm run build except: changes: - "*.md"
警告
记录一下官网说明中使用change时需要注意的两点:
Using changes with new branches and tags:When pushing a new branch or a new tag to GitLab, the policy always evaluates to true and GitLab will create a job. This feature is not connected with merge requests yet and, because GitLab is creating pipelines before a user can create a merge request, it is unknown what the target branch is at this point.
Using changes with merge_requests:With pipelines for merge requests, it is possible to define a job to be created based on files modified in a merge request.
在合并请求中使用change策略:
1 2 3 4 5 6 7 8 docker build service one: script: docker build -t my-service-one-image:$CI_COMMIT_REF_SLUG . only: refs: - merge_requests changes: - Dockerfile - service-one/**/*
上面这个例子中,一旦合并请求中修改了Dockerfile文件或者修改了service-one目录下的文件,都会触发Docker构建。
only和except综合示例我们将bluelog项目的描述和主题进行修改:
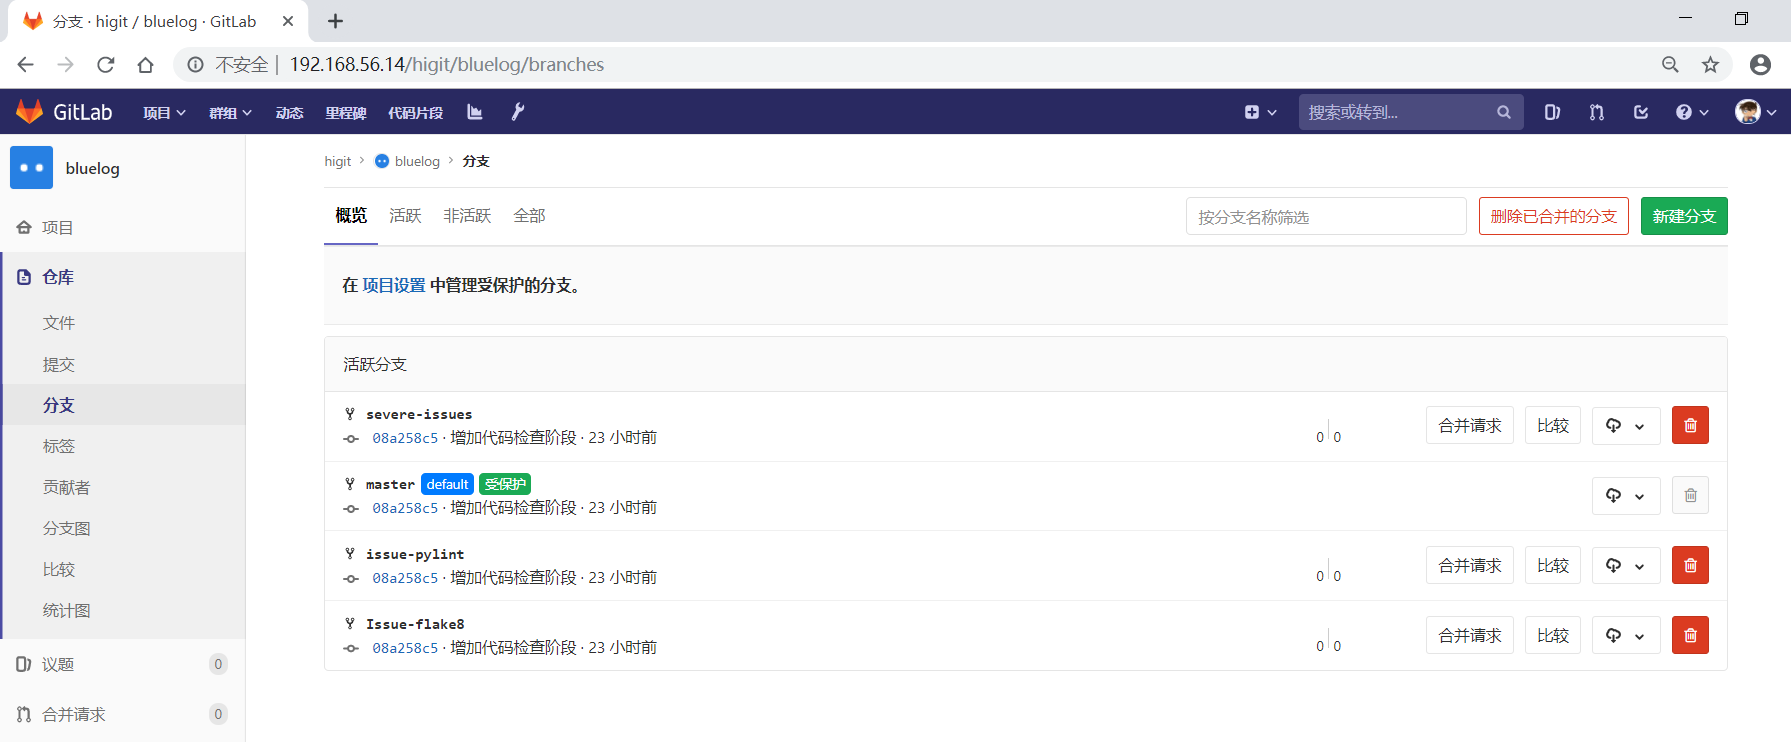
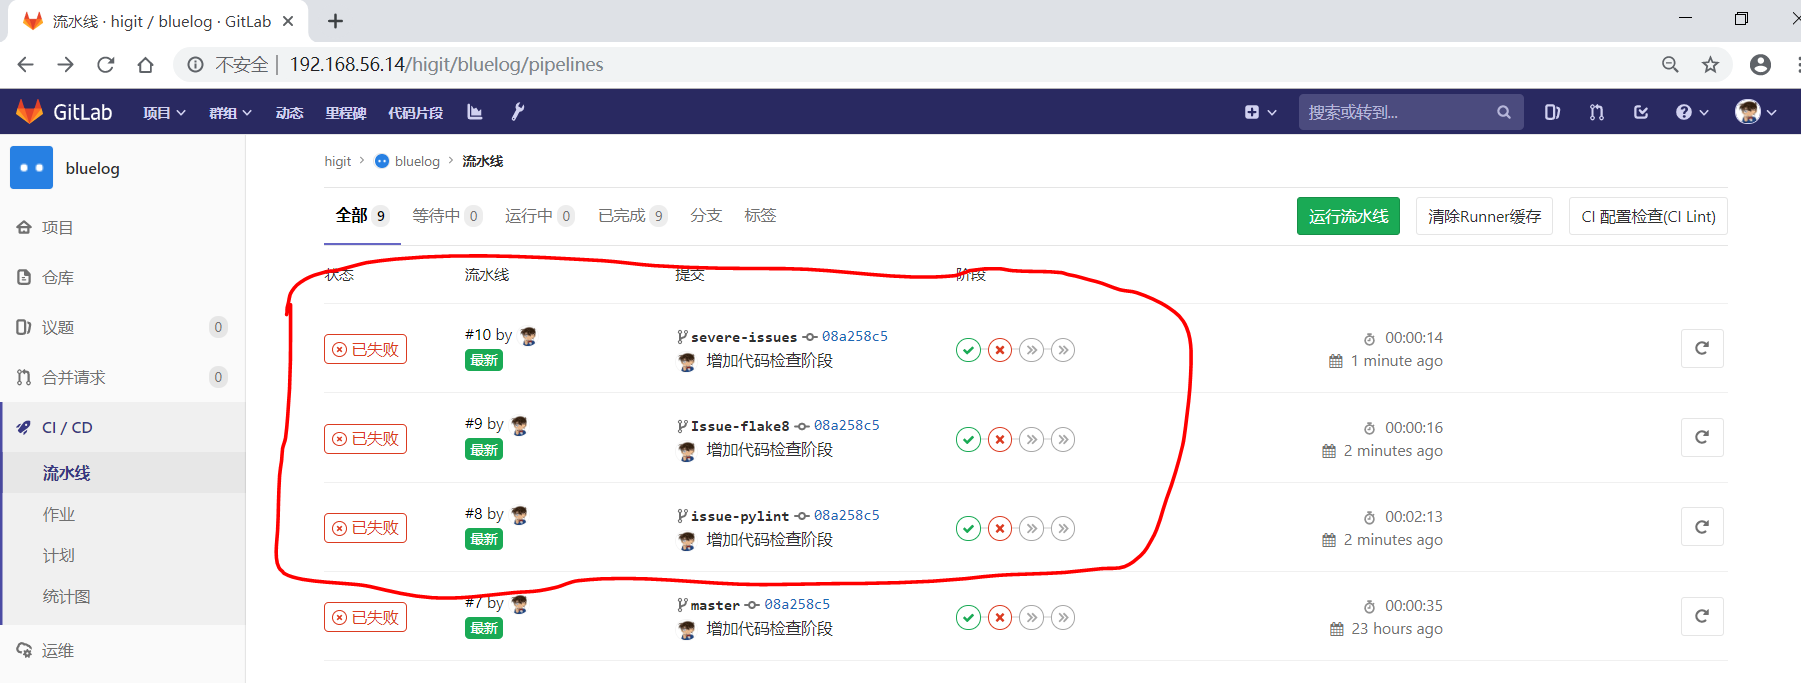
并创建三个分支issue-pylint、Issue-flake8和severe-issues:
刚新增的三个分支,自动继承了master主干的CI RUNNER,因为Flake8检查代码质量没通过,流水线都失败了:
为了便于测试,将”meizhaohui”账号设置为bluelog项目的主程序员!
现在朝.gitlab-ci.yml文件中增加only和except策略。
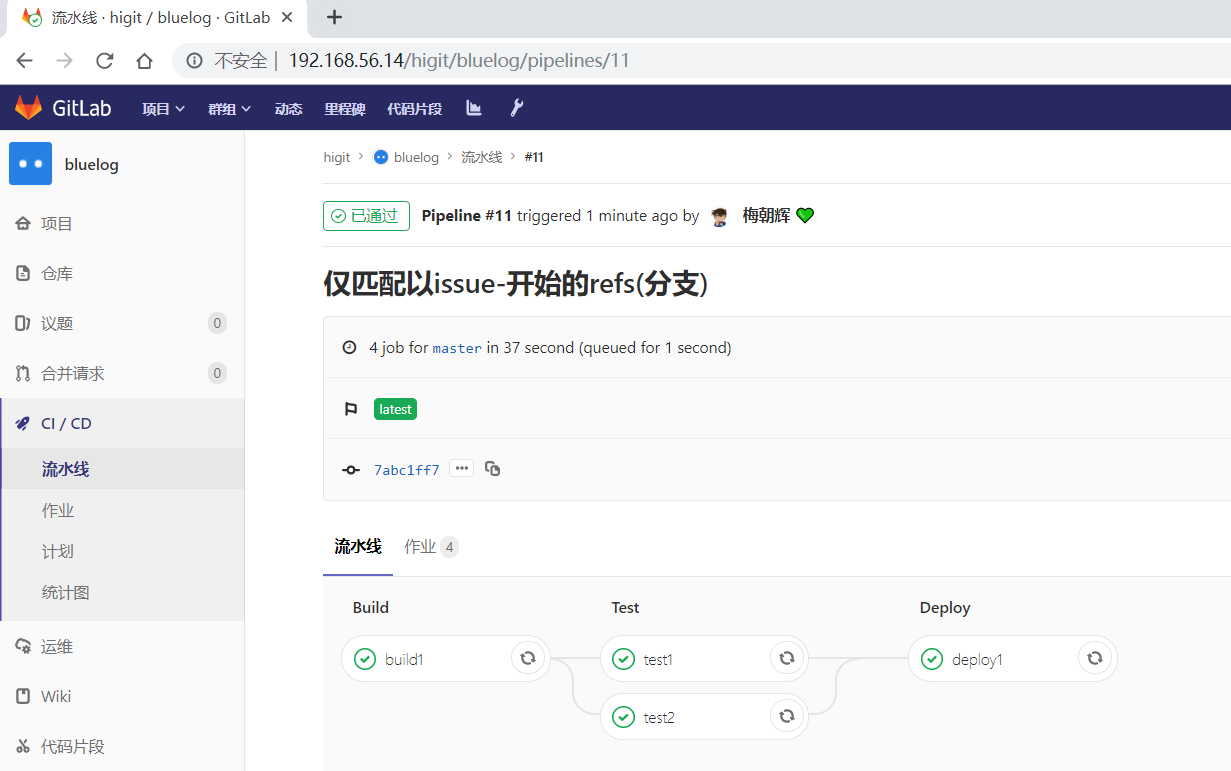
匹配issue-开头的分支 创建仅匹配issue-开头的分支:
可以发现master主干没有执行find Bugs作业:
为了快速测试,我们对这个作业都使用 only和except策略:
1 2 3 4 5 6 7 8 9 10 11 12 13 14 15 16 17 18 19 20 21 22 23 24 25 26 27 28 29 30 31 32 33 34 35 36 37 38 39 40 41 42 43 44 45 46 47 48 49 50 51 52 53 54 55 56 57 58 59 60 61 62 63 64 65 66 67 68 69 70 71 72 73 74 75 76 77 78 79 80 81 82 83 84 85 86 87 88 before_script: - echo "Before script section" - echo "For example you might run an update here or install a build dependency" - echo "Or perhaps you might print out some debugging details" after_script: - echo "After script section" - echo "For example you might do some cleanup here" stages: - build - code_check - test - deploy build1: stage: build before_script: - echo "Before script in build stage that overwrited the globally defined before_script" - echo "Install cloc:A tool to count lines of code in various languages from a given directory." - yum install cloc -y after_script: - echo "After script in build stage that overwrited the globally defined after_script" - cloc --version only: - /^issue-.*$/ except: - master script: - echo "Do your build here" - cloc --version tags: - bluelog find Bugs: stage: code_check only: - /^issue-.*$/ except: - branches script: - echo "Use Flake8 to check python code" - pip install flake8 - flake8 --version tags: - bluelog test1: stage: test only: - /^issue-.*$/ except: - /issue-pylint/ script: - echo "Do a test here" - echo "For example run a test suite" tags: - bluelog test2: stage: test only: - /^issue-.*$/ except: - /Issue-flake8/ script: - echo "Do another parallel test here" - echo "For example run a lint test" tags: - bluelog deploy1: stage: deploy only: - /^issue-.*$/ except: - /severe-issues/ script: - echo "Do your deploy here" tags: - bluelog
提交后,直接入库,检查master主干,并没有触发流水线作业。
统计作业流水线作业情况:
分支
流水线
build1
find Bugs
test1
test2
deploy1
master
未触发
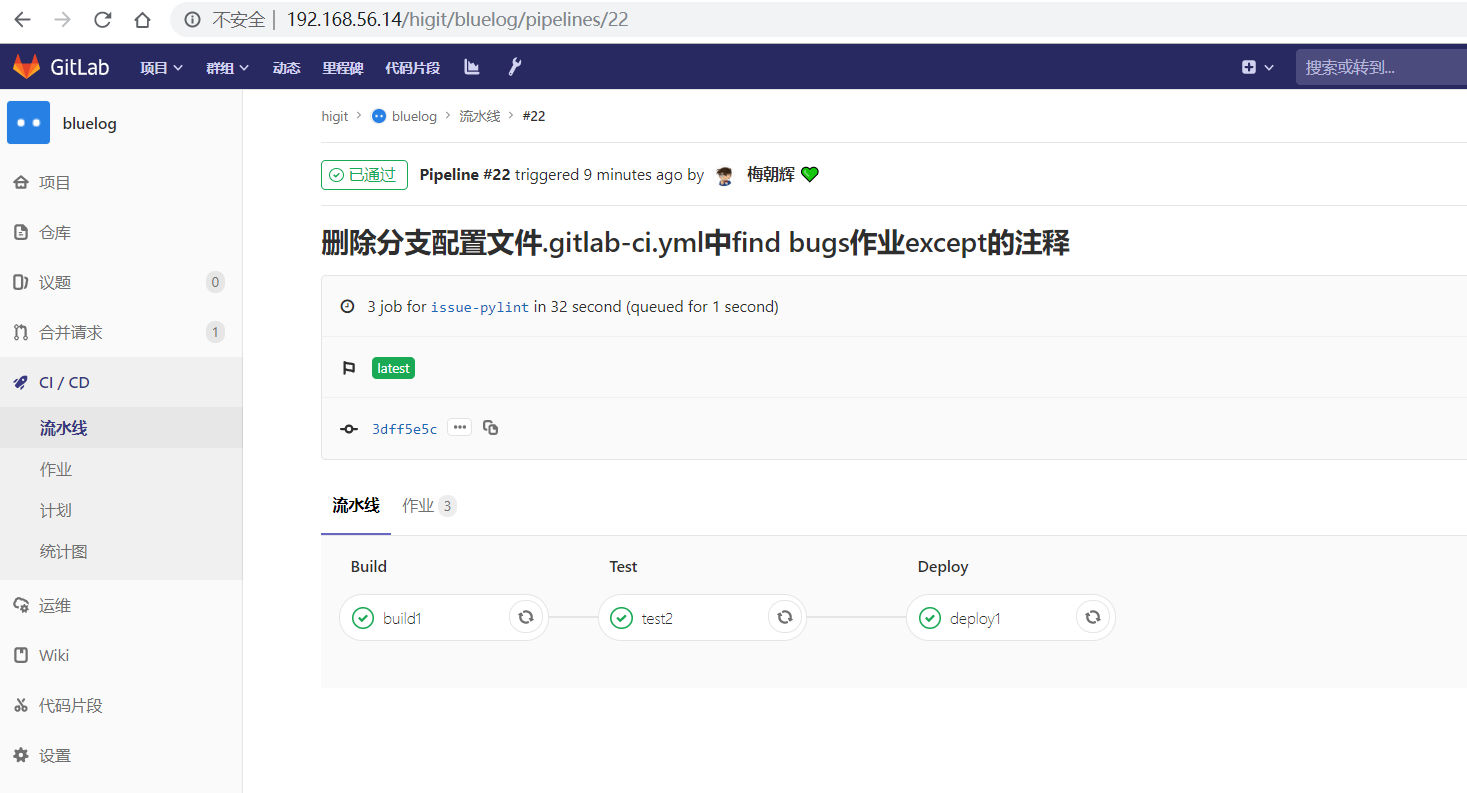
issue-pylint
#22
Yes
No
No
Yes
Yes
Issue-flake8
未触发
severe-issues
未触发
解释上面的流水作业策略:
作业
规则定义
规则解释
build1
only: - /^issue-.*$/ except: - master只在以issue-开头的分支执行,不在master主干执行
find Bugs
only: - /^issue-.*$/ except: - branches只在以issue-开头的分支执行,不在branches分支执行,
由于issue-pylint也是分支,所以在issue-pylint中也不会执行find Bugs作业
test1
only: - /^issue-.*$/ except: - /issue-pylint/只在以issue-开头的分支执行,不在issue-pylint分支执行,
即会在除了issue-pylint分支以外的issue-开头的分支执行,也即没有分支执行
test2
only: - /^issue-.*$/ except: - /Issue-flake8/只在以issue-开头的分支执行,不在Issue-flake8分支执行,
因此可以issue-pylint分支执行
deploy1
only: - /^issue-.*$/ except: - /severe-issues/只在以issue-开头的分支执行,不在severe-issues分支执行
因此可以issue-pylint分支执行
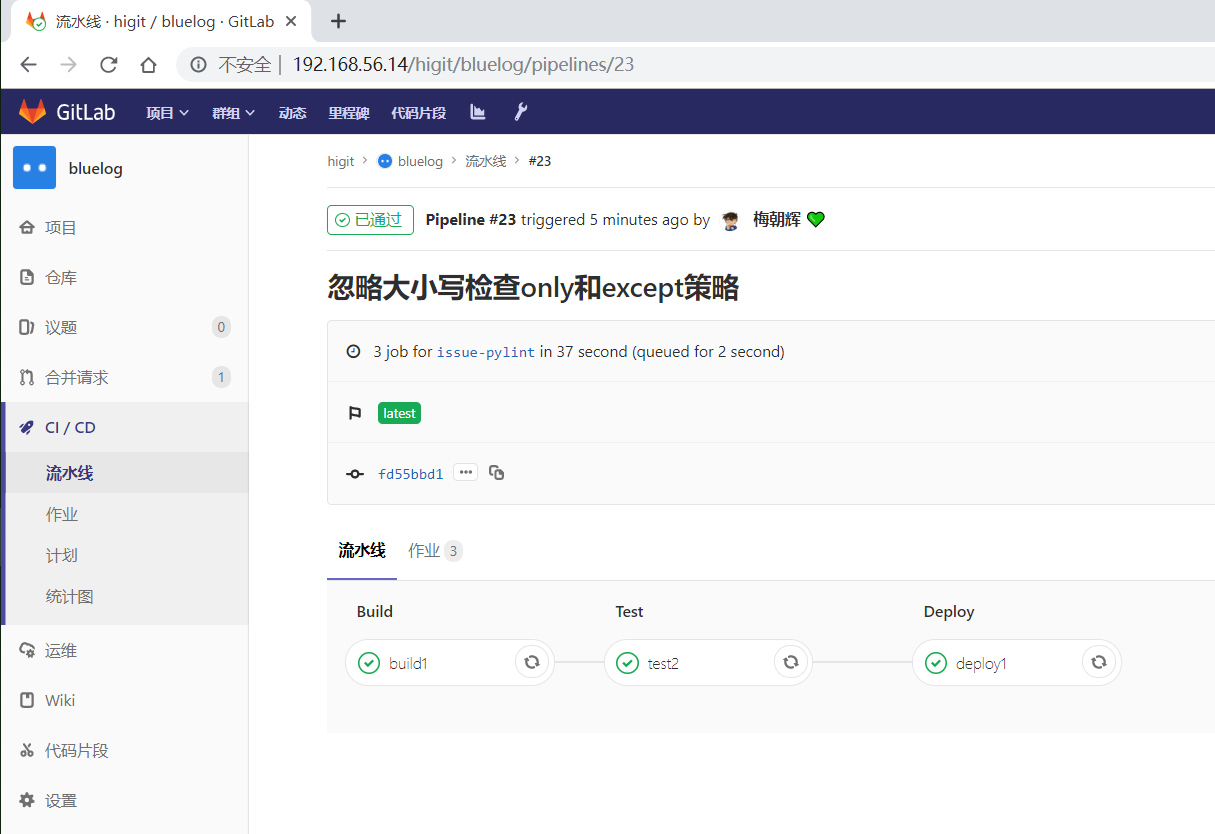
大小写不敏感匹配 好,我们再将only语法中加入语法大小写不敏感的i标志!再来做一次实验,看看最终的效果。
加入语法大小写不敏感的i标志:
1 2 3 4 5 6 7 8 9 10 11 12 13 14 15 16 17 18 19 20 21 22 23 24 25 26 27 28 29 30 31 32 33 34 35 36 37 38 39 40 41 42 43 44 45 46 47 48 49 50 51 52 53 54 55 56 57 58 59 60 61 62 63 64 65 66 67 68 69 70 71 72 73 74 75 76 77 78 79 80 81 82 83 84 85 86 87 88 before_script: - echo "Before script section" - echo "For example you might run an update here or install a build dependency" - echo "Or perhaps you might print out some debugging details" after_script: - echo "After script section" - echo "For example you might do some cleanup here" stages: - build - code_check - test - deploy build1: stage: build before_script: - echo "Before script in build stage that overwrited the globally defined before_script" - echo "Install cloc:A tool to count lines of code in various languages from a given directory." - yum install cloc -y after_script: - echo "After script in build stage that overwrited the globally defined after_script" - cloc --version only: - /^issue-.*$/i except: - master script: - echo "Do your build here" - cloc --version tags: - bluelog find Bugs: stage: code_check only: - /^issue-.*$/i except: - branches script: - echo "Use Flake8 to check python code" - pip install flake8 - flake8 --version tags: - bluelog test1: stage: test only: - /^issue-.*$/i except: - /issue-pylint/ script: - echo "Do a test here" - echo "For example run a test suite" tags: - bluelog test2: stage: test only: - /^issue-.*$/i except: - /Issue-flake8/ script: - echo "Do another parallel test here" - echo "For example run a lint test" tags: - bluelog deploy1: stage: deploy only: - /^issue-.*$/i except: - /severe-issues/ script: - echo "Do your deploy here" tags: - bluelog
预期效果:issue-pylint和Issue-flake8分支会触发流水线执行,master主干和severe-issues分支不会触发流水线执行。
统计作业流水线作业情况:
分支
流水线
build1
find Bugs
test1
test2
deploy1
master
未触发
issue-pylint
#23
Yes
No
No
Yes
Yes
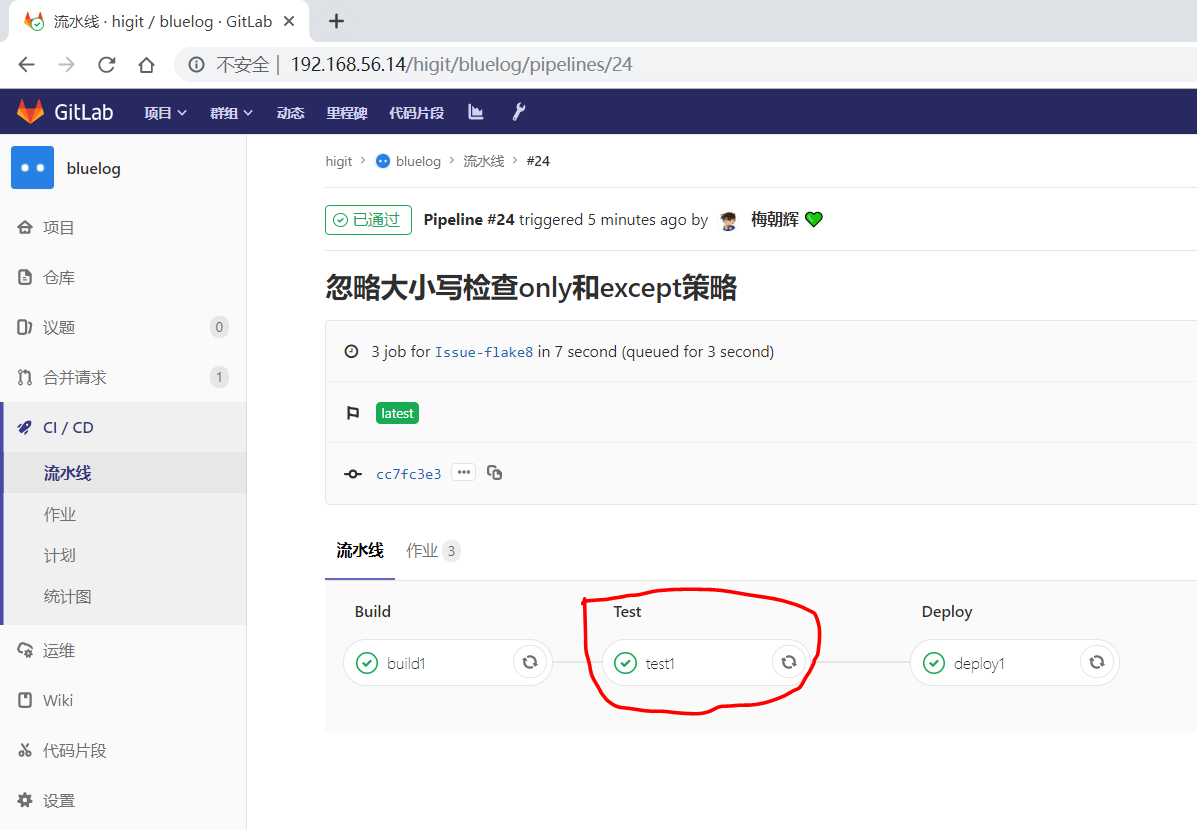
Issue-flake8
#24
Yes
No
Yes
No
Yes
severe-issues
未触发
正如我们预期的一样,issue-pylint和Issue-flake8分支会触发流水线执行,master主干和severe-issues分支不会触发流水线执行:
解释上面的流水作业策略:
作业
规则定义
规则解释
build1
only: - /^issue-.*$/i except: - master只在以issue(不区分大小写)-开头的分支执行,不在master主干执行
可以在issue-pylint和Issue-flake8分支执行
find Bugs
only: - /^issue-.*$/i except: - branches只在以issue(不区分大小写)-开头的分支执行,不在branches分支执行,
由于issue-pylint也是分支,所以在issue-pylint中也不会执行find Bugs作业
test1
only: - /^issue-.*$/i except: - /issue-pylint/只在以issue(不区分大小写)-开头的分支执行,不在issue-pylint分支执行,
即会在除了issue-pylint分支以外的issue-(不区分大小写)开头的分支执行,
可以在Issue-flake8分支执行
test2
only: - /^issue-.*$/i except: - /Issue-flake8/只在以issue(不区分大小写)-开头的分支执行,不在Issue-flake8分支执行,
因此可以issue-pylint分支执行
deploy1
only: - /^issue-.*$/i except: - /severe-issues/只在以issue(不区分大小写)-开头的分支执行,不在severe-issues分支执行
可以在issue-pylint和Issue-flake8分支执行
我们再将only语法中将/^issue-.*$/改为/issue/i!再来做一次实验,看看最终的效果。
不区分大小写匹配issue字符:
1 2 3 4 5 6 7 8 9 10 11 12 13 14 15 16 17 18 19 20 21 22 23 24 25 26 27 28 29 30 31 32 33 34 35 36 37 38 39 40 41 42 43 44 45 46 47 48 49 50 51 52 53 54 55 56 57 58 59 60 61 62 63 64 65 66 67 68 69 70 71 72 73 74 75 76 77 78 79 80 81 82 83 84 85 86 87 88 before_script: - echo "Before script section" - echo "For example you might run an update here or install a build dependency" - echo "Or perhaps you might print out some debugging details" after_script: - echo "After script section" - echo "For example you might do some cleanup here" stages: - build - code_check - test - deploy build1: stage: build before_script: - echo "Before script in build stage that overwrited the globally defined before_script" - echo "Install cloc:A tool to count lines of code in various languages from a given directory." - yum install cloc -y after_script: - echo "After script in build stage that overwrited the globally defined after_script" - cloc --version only: - /issue/i except: - master script: - echo "Do your build here" - cloc --version tags: - bluelog find Bugs: stage: code_check only: - /issue/i except: - branches script: - echo "Use Flake8 to check python code" - pip install flake8 - flake8 --version tags: - bluelog test1: stage: test only: - /issue/i except: - /issue-pylint/ script: - echo "Do a test here" - echo "For example run a test suite" tags: - bluelog test2: stage: test only: - /issue/i except: - /Issue-flake8/ script: - echo "Do another parallel test here" - echo "For example run a lint test" tags: - bluelog deploy1: stage: deploy only: - /issue/i except: - /severe-issues/ script: - echo "Do your deploy here" tags: - bluelog
预期效果:不区分大小写,issue-pylint、Issue-flake8和severe-issues分支分支会触发流水线执行,master主干不会触发流水线执行。
统计作业流水线作业情况:
分支
流水线
build1
find Bugs
test1
test2
deploy1
master
未触发
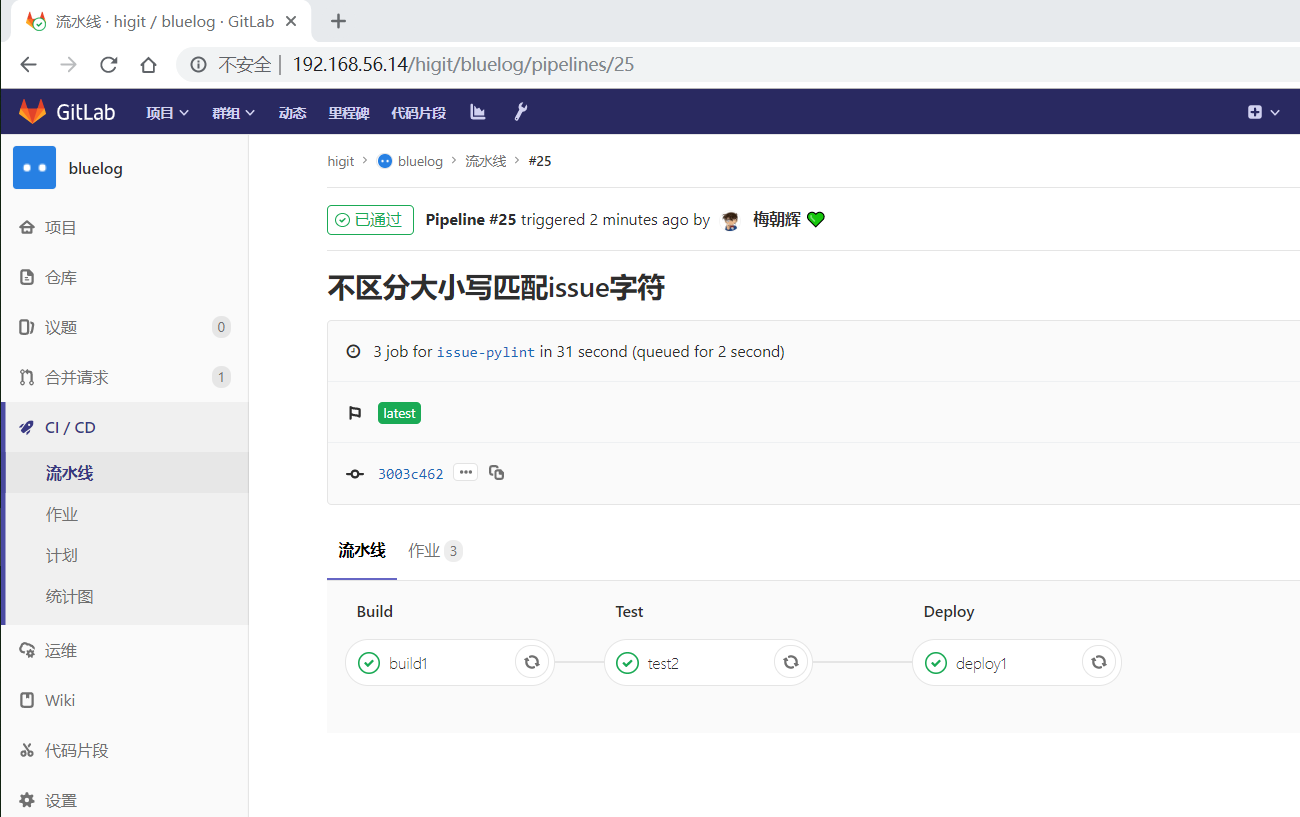
issue-pylint
#25
Yes
No
No
Yes
Yes
Issue-flake8
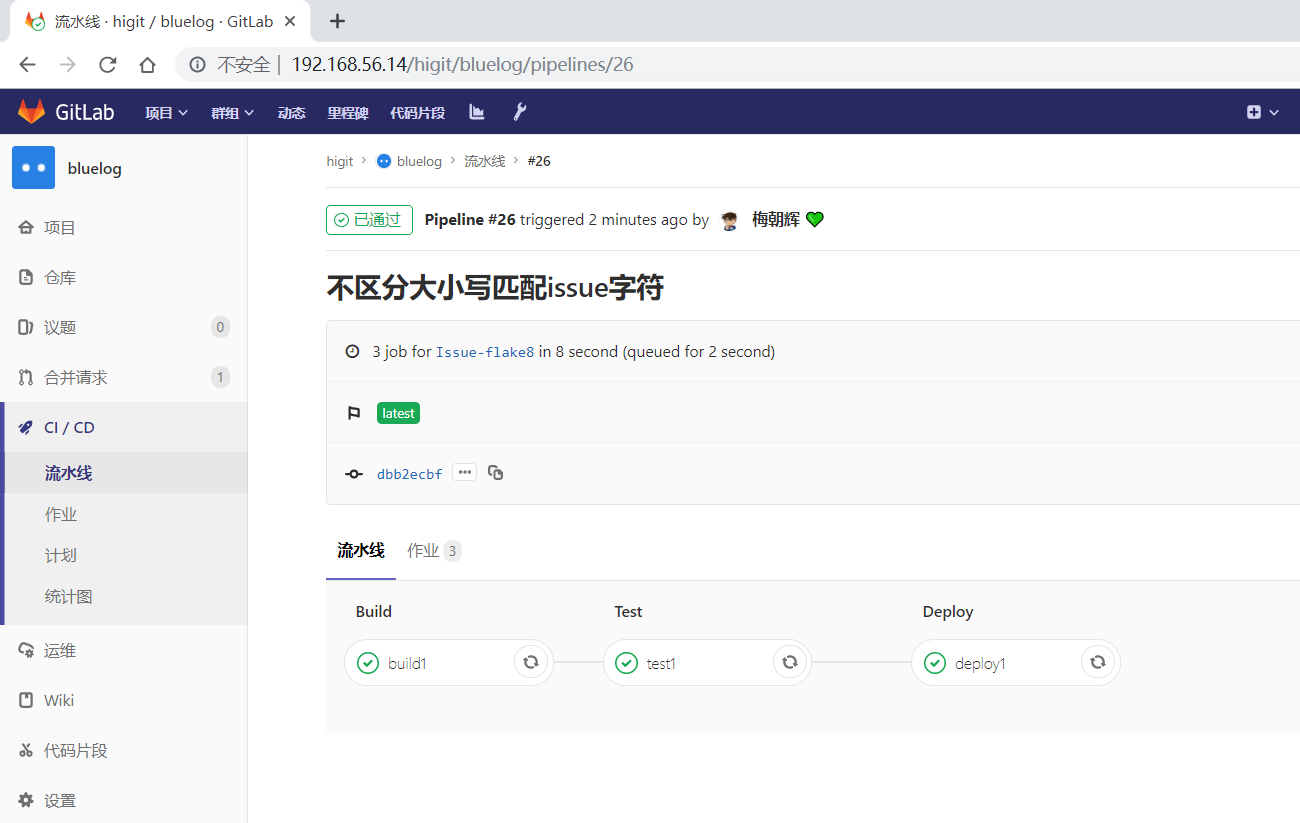
#26
Yes
No
Yes
No
Yes
severe-issues
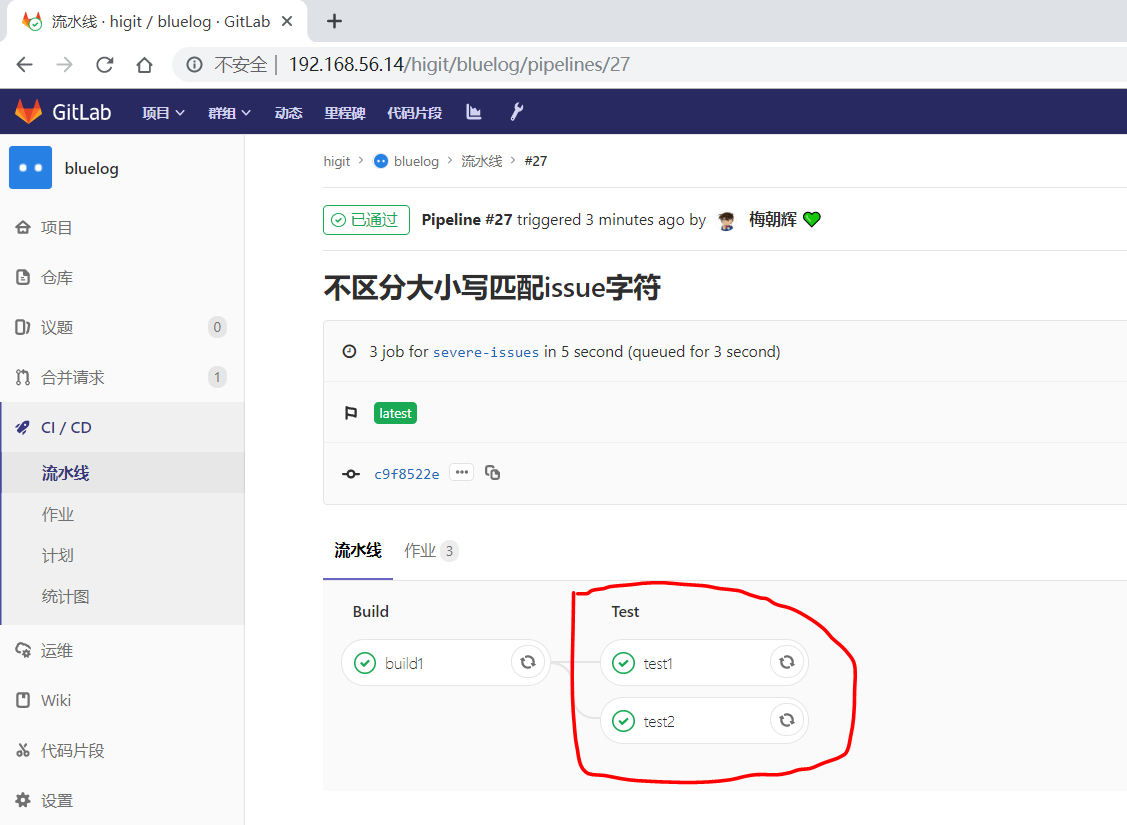
#27
Yes
No
Yes
Yes
No
正如我们预期的一样,issue-pylint、Issue-flake8和severe-issues分支会触发流水线执行,master主干不会触发流水线执行:
解释上面的流水作业策略:
作业
规则定义
规则解释
build1
only: - /issue/i except: - master只在包含issue(不区分大小写)字符的分支执行,不在master主干执行
因此在issue-pylint、Issue-flake8、severe-issues分支执行
find Bugs
only: - /issue/i except: - branches只在包含issue(不区分大小写)字符的分支执行,不在branches分支执行,
所以find Bugs作业一直不会执行
test1
only: - /issue/i except: - /issue-pylint/只在包含issue(不区分大小写)字符的分支执行,不在包含issue-pylint字符的分支
执行,即会在除了issue-pylint分支以外包含issue(不区分大小写)字符的分支执行,
所以可以在Issue-flake8和severe-issues分支执行
test2
only: - /issue/i except: - /Issue-flake8/只在包含issue(不区分大小写)字符的分支执行,不在包含issue-flake8字符的分支
执行,即会在除了issue-flake8分支以外包含issue(不区分大小写)字符的分支执行,
所以可以在issue-pylint和severe-issues分支执行
deploy1
only: - /issue/i except: - /severe-issues/只在包含issue(不区分大小写)字符的分支执行,不在包含severe-issues字符的分支
执行,即会在除了severe-issues分支以外包含issue(不区分大小写)字符的分支执行,
所以可以在issue-pylint和Issue-flake8分支执行
git tag打标签的使用 使用标签,可以标记提交历史上的特定点为重要提交。
1 $ git tag -a v1.0 -m"Release v1.0"
上面的命令我们成功创建了本地一个版本 V1.0 ,并且添加了附注信息 ‘Release 1.0’。
1 $ git push origin --tags
1 $ git tag push origin :refs/tags/v1.0
1 $ git fetch origin tag v1.0
仅当tag标签提交时,才触发流水线执行 使用标签,可以标记提交历史上的特定点为重要提交,可以标记重要版本,如下图,是GitLab官方的Tag标签列表:
我们将流水线配置文件.gitlab-ci.yml修改为以下内容:
1 2 3 4 5 6 7 8 9 10 11 12 13 14 15 16 17 18 19 20 21 22 23 24 25 26 27 28 29 30 31 32 33 34 35 36 37 38 39 40 41 42 43 44 45 46 47 48 49 50 51 52 53 54 55 56 57 58 59 60 61 62 63 64 65 66 67 68 69 70 71 72 73 74 75 76 77 78 79 80 81 82 83 84 85 86 87 88 before_script: - echo "Before script section" - echo "For example you might run an update here or install a build dependency" - echo "Or perhaps you might print out some debugging details" after_script: - echo "After script section" - echo "For example you might do some cleanup here" stages: - build - code_check - test - deploy build1: stage: build before_script: - echo "Before script in build stage that overwrited the globally defined before_script" - echo "Install cloc:A tool to count lines of code in various languages from a given directory." - yum install cloc -y after_script: - echo "After script in build stage that overwrited the globally defined after_script" - cloc --version only: - tags except: - master script: - echo "Do your build here" - cloc --version tags: - bluelog find Bugs: stage: code_check only: - tags except: - branches script: - echo "Use Flake8 to check python code" - pip install flake8 - flake8 --version tags: - bluelog test1: stage: test only: - tags except: - /issue-pylint/ script: - echo "Do a test here" - echo "For example run a test suite" tags: - bluelog test2: stage: test only: - tags except: - /Issue-flake8/ script: - echo "Do another parallel test here" - echo "For example run a lint test" tags: - bluelog deploy1: stage: deploy only: - tags except: - /severe-issues/ script: - echo "Do your deploy here" tags: - bluelog
查看差异:
1 2 3 4 5 6 7 8 9 10 11 12 13 14 15 16 17 18 19 20 21 22 23 24 25 26 27 28 29 30 31 32 33 34 35 36 37 38 39 40 41 42 43 44 45 46 47 48 49 50 $ git diff test test
提交:
1 2 3 4 5 6 7 8 9 10 11 12 13 14 15 $ git add -A"测试tag标签触发流水线执行" done .done .done .done .
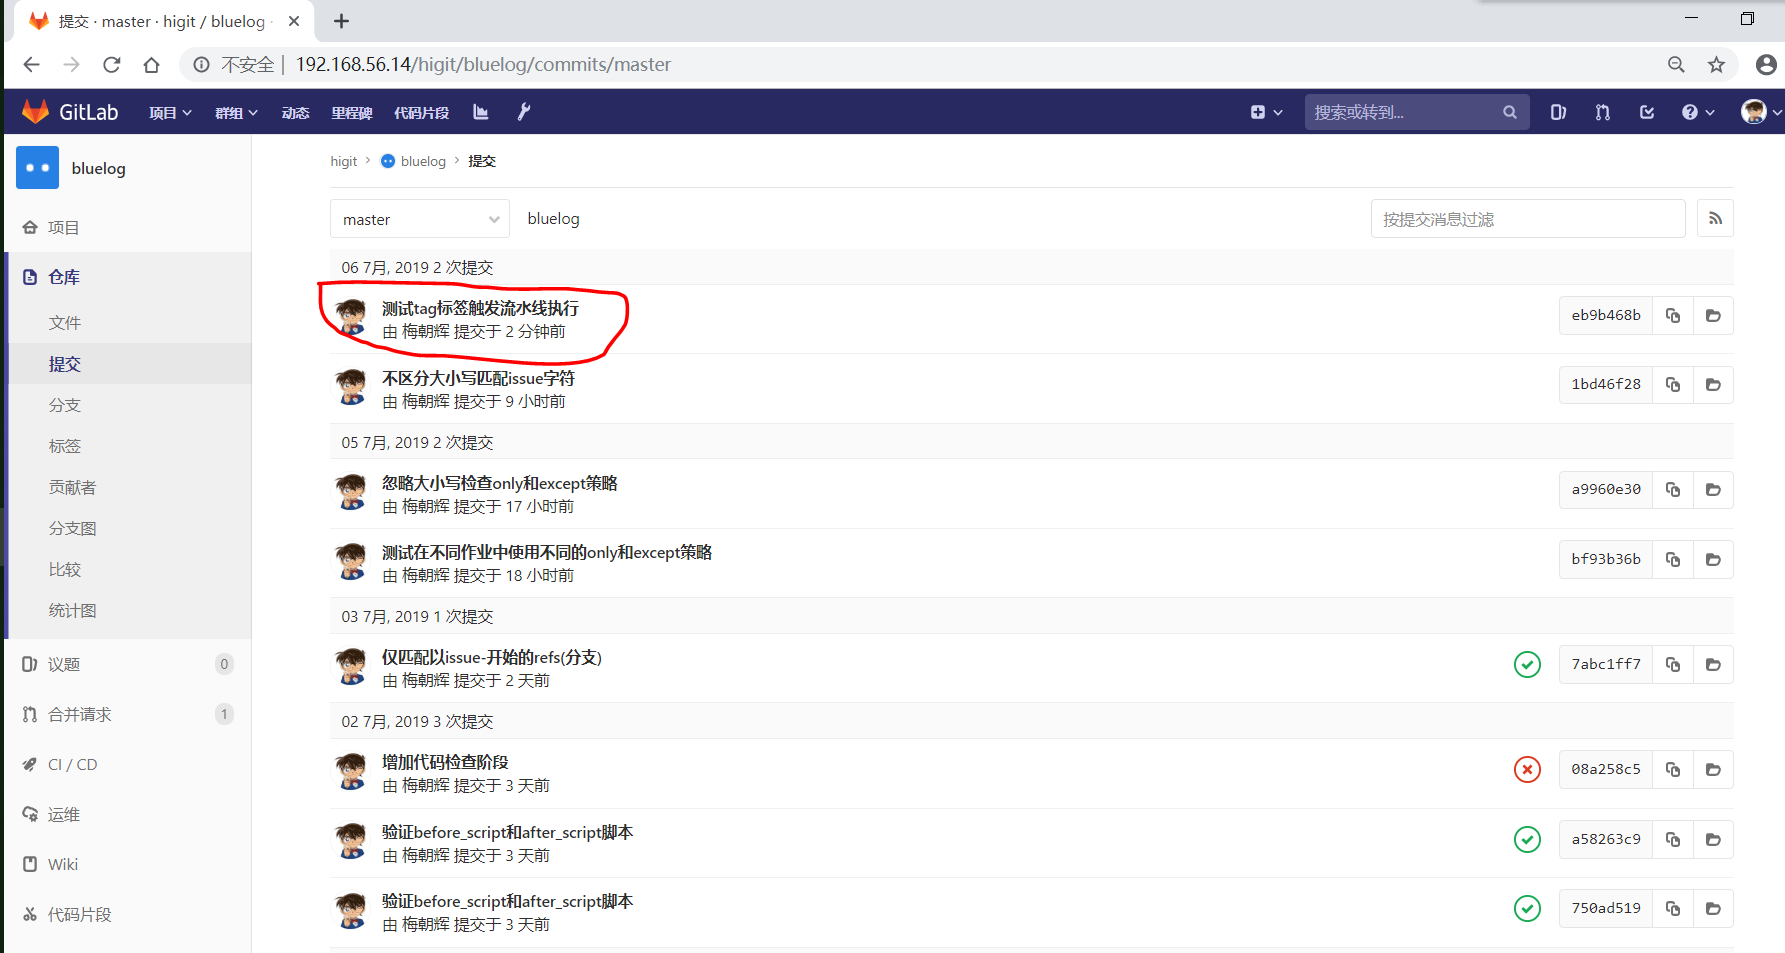
查看是否触发流水线,可以发现没有触发流水线执行:
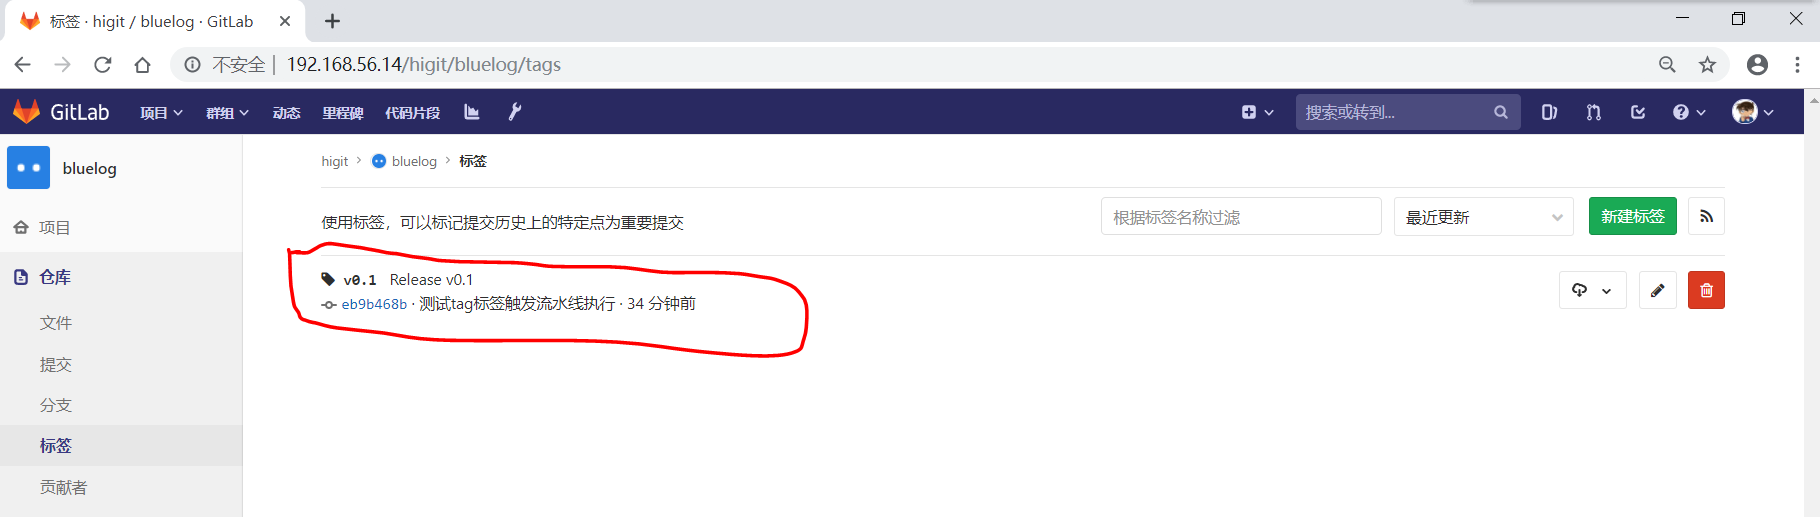
我们给bluelog打个tag标签,标签名称V0.1:
1 2 3 4 5 6 7 8 9 10 11 12 $ git tag v0.1 -m"Release v0.1" done . done . done .
可以发现bluelog已经生成了一个tag版本:
在流水线列表中,也可以看#31号流水线被触发了,并且标签是v0.1:
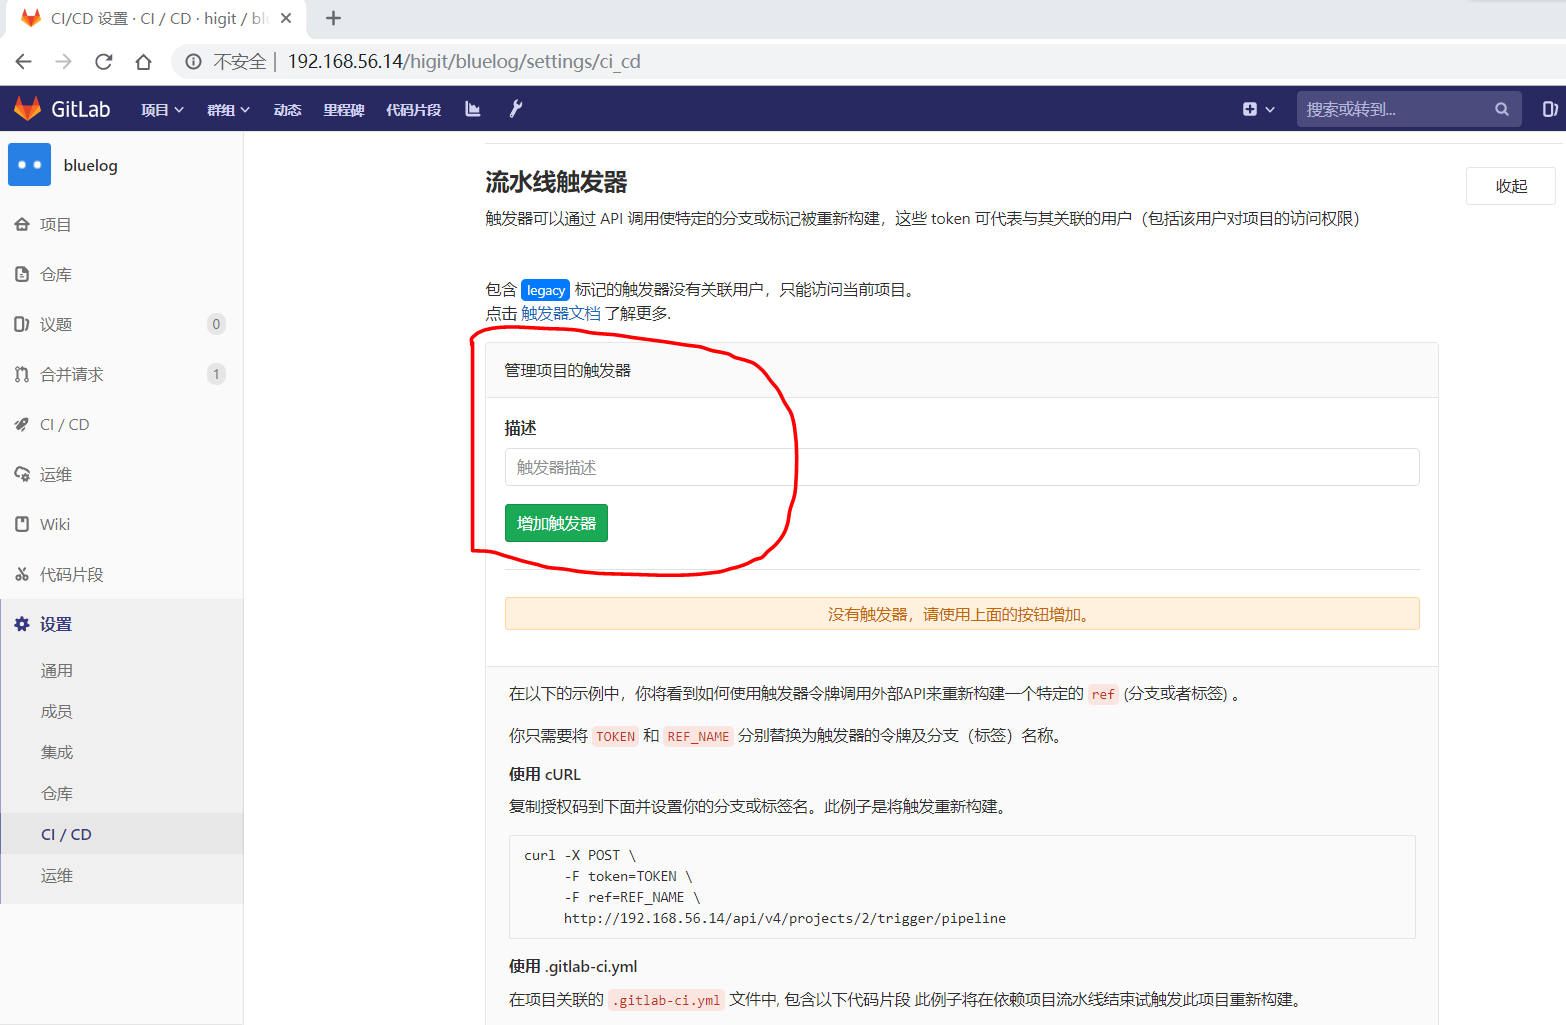
使用流水线触发器触发流水线执行 我们给 bluelog项目创建一个流水线触发器(Trigger),在项目的设置–>CI/CD–>流水线触发器处增加流水线触发器:
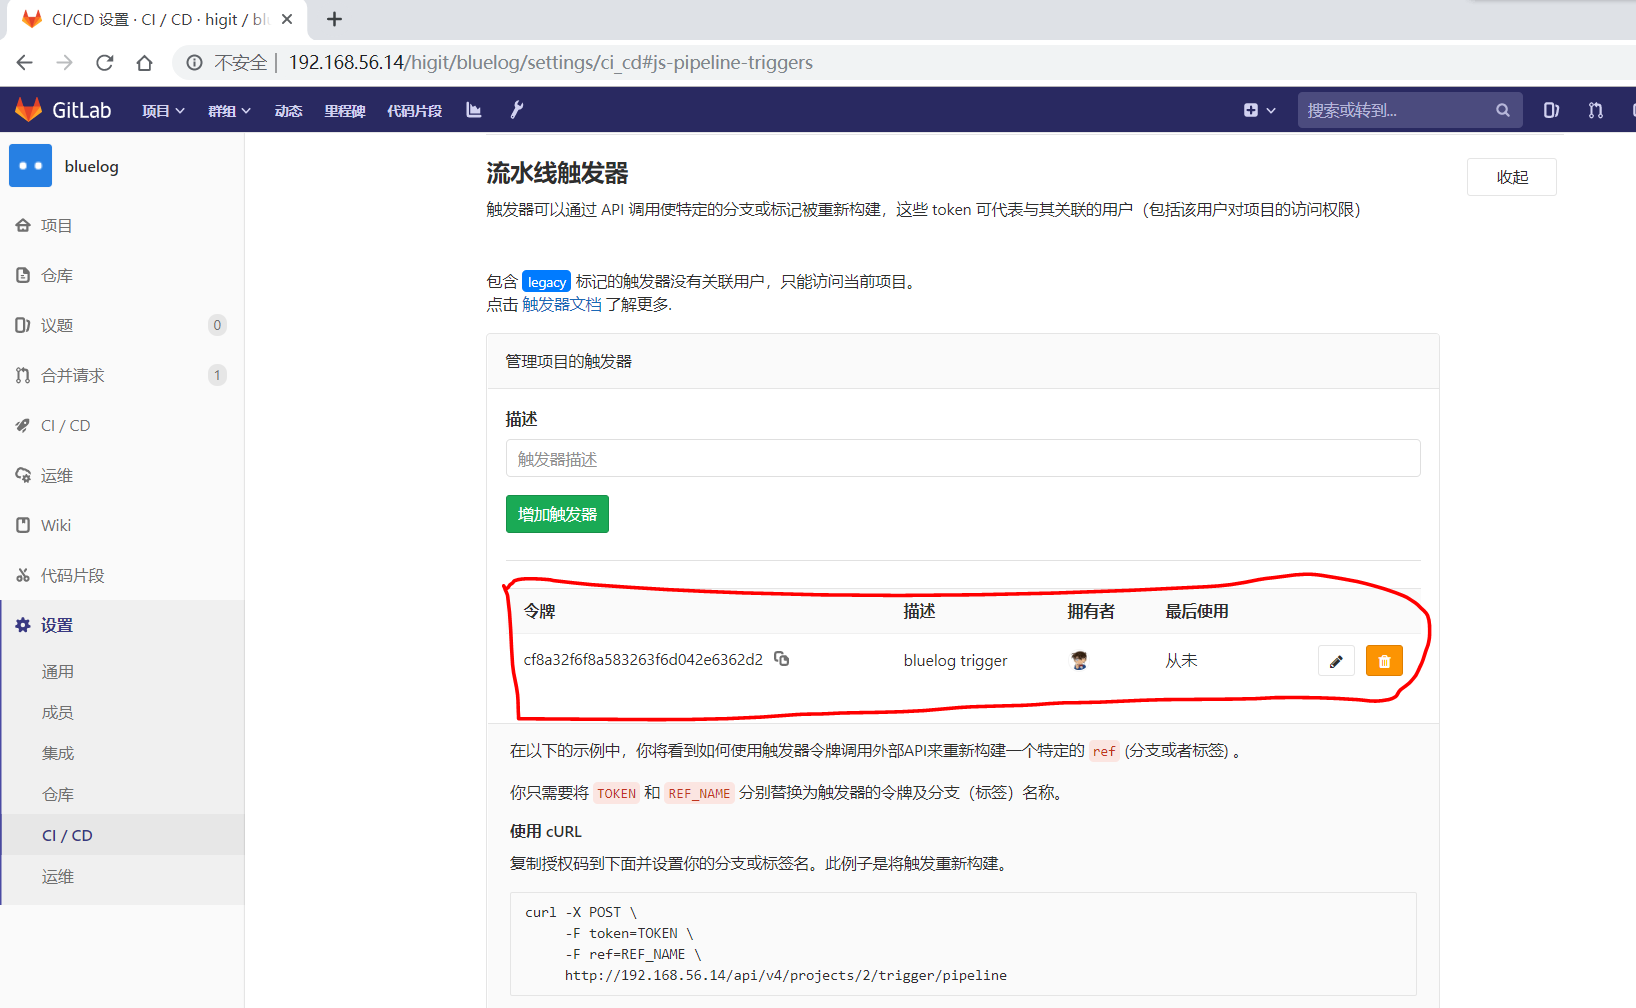
在”触发器描述”处填写”bluelog trigger”,然后点击”增加触发器”按钮,则会新增一个触发器:
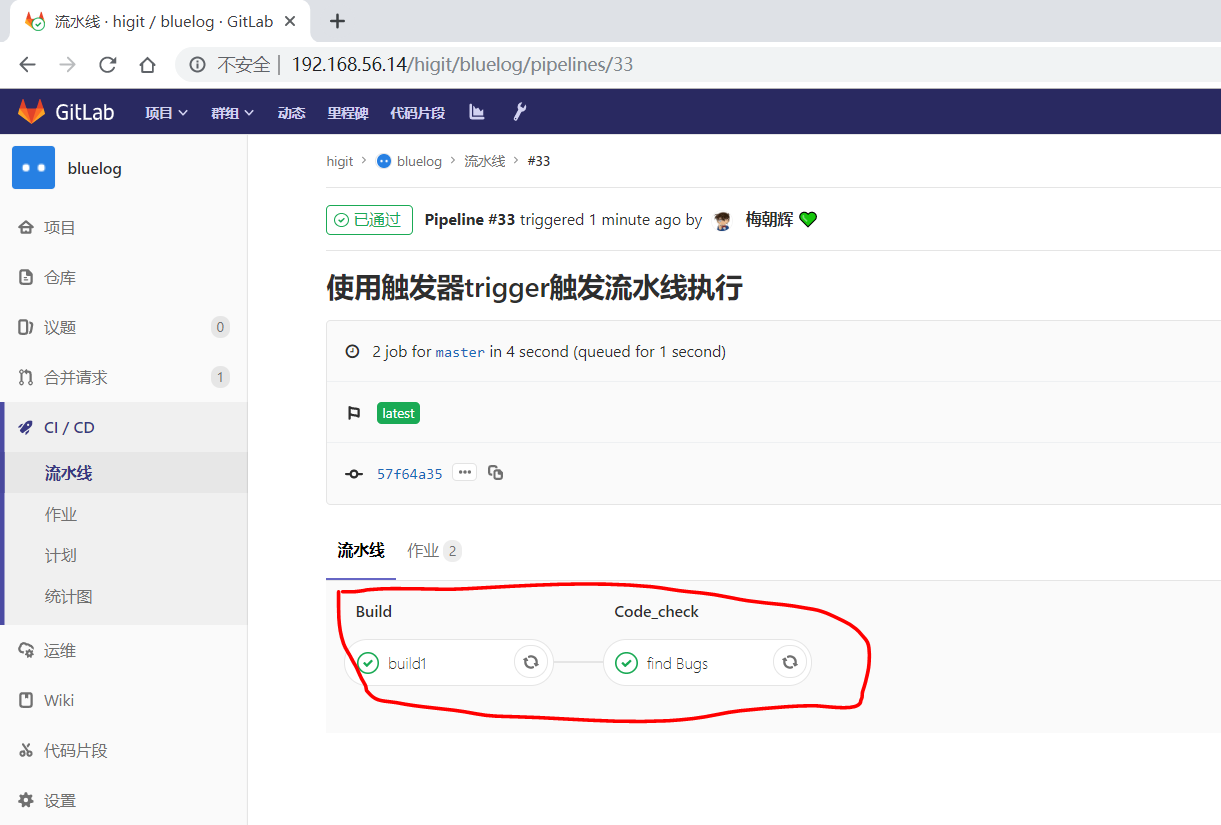
我们修改.gitlab-ci.yml配置文件,将build1和find Bugs作业设置为仅triggers触发器能够触发执行:
1 2 3 4 5 6 7 8 9 10 11 12 13 14 15 16 17 18 19 20 21 22 23 24 25 26 27 28 29 30 31 32 33 34 35 36 37 38 39 40 41 42 43 44 45 46 47 48 49 50 51 52 53 54 55 56 57 58 59 60 61 62 63 64 65 66 67 68 69 70 71 72 73 74 75 76 77 78 79 80 81 82 83 84 before_script: - echo "Before script section" - echo "For example you might run an update here or install a build dependency" - echo "Or perhaps you might print out some debugging details" after_script: - echo "After script section" - echo "For example you might do some cleanup here" stages: - build - code_check - test - deploy build1: stage: build before_script: - echo "Before script in build stage that overwrited the globally defined before_script" - echo "Install cloc:A tool to count lines of code in various languages from a given directory." - yum install cloc -y after_script: - echo "After script in build stage that overwrited the globally defined after_script" - cloc --version only: - triggers script: - echo "Do your build here" - cloc --version tags: - bluelog find Bugs: stage: code_check only: - triggers script: - echo "Use Flake8 to check python code" - pip install flake8 - flake8 --version tags: - bluelog test1: stage: test only: - tags except: - /issue-pylint/ script: - echo "Do a test here" - echo "For example run a test suite" tags: - bluelog test2: stage: test only: - tags except: - /Issue-flake8/ script: - echo "Do another parallel test here" - echo "For example run a lint test" tags: - bluelog deploy1: stage: deploy only: - tags except: - /severe-issues/ script: - echo "Do your deploy here" tags: - bluelog
提交修改:
1 2 3 4 5 6 7 8 9 10 11 12 13 14 15 16 17 18 19 20 21 22 23 24 25 26 27 28 29 30 31 32 33 34 35 36 37 38 39 40 41 42 43 $ git diff echo "Do your build here" echo "Use Flake8 to check python code" "使用触发器trigger触发流水线执行" done . done . done . done .
检查发现并没有触发流水线的执行:
我们现在使用curl发送请求,触发流水线触发器执行:
1 2 [root@server ~]"id" :33,"sha" :"57f64a35cad6d069dc62ddc93f0747296383826e" ,"ref" :"master" ,"status" :"pending" ,"web_url" :"http://192.168.56.14/higit/bluelog/pipelines/33" ,"before_sha" :"0000000000000000000000000000000000000000" ,"tag" :false ,"yaml_errors" :null,"user" :{"id" :2,"name" :"梅朝辉" ,"username" :"meizhaohui" ,"state" :"active" ,"avatar_url" :"http://192.168.56.14/uploads/-/system/user/avatar/2/avatar.png" ,"web_url" :"http://192.168.56.14/meizhaohui" },"created_at" :"2019-07-06T22:08:52.761+08:00" ,"updated_at" :"2019-07-06T22:08:53.026+08:00" ,"started_at" :null,"finished_at" :null,"committed_at" :null,"duration" :null,"coverage" :null,"detailed_status" :{"icon" :"status_pending" ,"text" :"等待中" ,"label" :"等待中" ,"group" :"pending" ,"tooltip" :"等待中" ,"has_details" :false ,"details_path" :"/higit/bluelog/pipelines/33" ,"illustration" :null,"favicon" :"/assets/ci_favicons/favicon_status_pending-5bdf338420e5221ca24353b6bff1c9367189588750632e9a871b7af09ff6a2ae.png" }}
可以发现流水线已经被执行,#33号流水线执行了build1和find Bugs作业,其他作业并未执行,与我们预期的相同:
根据流水线触发器(Trigger)创建处的提示,我们也可以在依赖项目中配置触发器,依赖项目流水线结束时触发此项目重新构建。
only和except其他关键字的使用可参考官网文档https://docs.gitlab.com/ce/ci/yaml/README.html#onlyexcept-basic
,此处暂时不表。
tags关键字用于指定GitLab Runner运行器使用哪一个运行器来执行作业。
下面这个例子中,只有运行器注册时定义了ruby和postgres两个标签的运行器才能执行作业:
1 2 3 4 job: tags: - ruby - postgres
而我们的bluelog项目中,所有的作业都是使用的是标签为bluelog的运行器:
1 2 3 4 5 6 7 8 9 10 11 find Bugs: stage: code_check only: - triggers script: - echo "Use Flake8 to check python code" - pip install flake8 - flake8 --version tags: - bluelog
运行器标签可用于定义不同平台上运行的作业,如Mac OS X Runner使用osx标签,Windows Runner使用windows标签,而Linux Runner使用linux标签:
1 2 3 4 5 6 7 8 9 10 11 12 13 14 15 16 17 18 19 20 21 22 23 windows job: stage: - build tags: - windows script: - echo Hello, %USERNAME%! osx job: stage: - build tags: - osx script: - echo "Hello, $USER!" linux job: stage: - build tags: - linux script: - echo "Hello, $USER!"
allow_failure
allow_failure可以用于当你想设置一个作业失败的之后并不影响后续的CI组件的时候。失败的作业不会影响到commit提交状态。如果允许失败的作业失败了,则相应的作业会显示一个黄色的警告,但对流水线成功与否不产生影响。
下面的这个例子中,job1和job2将会并列进行,如果job1失败了,它也不会影响进行中的下一个阶段,因为这里有设置了allow_failure: true:
1 2 3 4 5 6 7 8 9 10 11 12 13 14 15 job1: stage: test script: - execute_script_that_will_fail allow_failure: true job2: stage: test script: - execute_script_that_will_succeed job3: stage: deploy script: - deploy_to_staging
但是如果上面的job2执行失败,那么job3则会受到影响而不会执行。
whenwhen关键字用于实现在作业失败时或发生故障时运行的作业 (when is used to implement jobs that are run in case of failure or despite the failure.)。
when可以设置以下值:
on_success:只有前面的阶段的所有作业都成功时才执行,这是默认值。on_failure:当前面阶段的作业至少有一个失败时才执行。always: 无论前面的作业是否成功,一直执行本作业。manual:手动执行作业,作业不会自动执行,需要人工手动点击启动作业。delayed: 延迟执行作业,配合start_in关键字一起作用,start_in设置的值必须小于或等于1小时,``start_in设置的值示例:10 seconds、30 minutes、1 hour`,前面的作业结束时计时器马上开始计时。
示例:
1 2 3 4 5 6 7 8 9 10 11 12 13 14 15 16 17 18 19 20 21 22 23 24 25 26 27 28 29 30 31 32 33 34 stages: - build - cleanup_build - test - deploy - cleanup build_job: stage: build script: - make build cleanup_build_job: stage: cleanup_build script: - cleanup build when failed when: on_failure test_job: stage: test script: - make test deploy_job: stage: deploy script: - make deploy when: manual cleanup_job: stage: cleanup script: - cleanup after jobs when: always
说明:
只有在build_job构建作业失败时,才会执行cleanup_build_job作业。
需要在GitLab Web界面手动点击,才能执行deploy_job部署作业。
无论之前的作业是否成功还是失败,``cleanup_job`清理作业一直会执行。
延时处理的示例:
1 2 3 4 5 timed rollout 10 %: stage: deploy script: echo 'Rolling out 10% ...' when: delayed start_in: 30 minutes
上面的例子创建了一个”timed rollout 10%”作业,会在上一个作业完成后30分钟后才开始执行。
如果你点击”Unschedule”按钮可以取消一个激活的计时器,你也可以点击”Play”按钮,立即执行延时作业。
environmentenvironment用于定义作业部署到特殊的环境中。如果指定了environment,并且在运维–>环境界面的环境列表中没有该名称下的环境,则会自动创建新环境。
在最简单的格式中,环境关键字可以定义为:
1 2 3 4 5 deploy to production: stage: deploy script: git push production HEAD:master environment: name: production
上面的示例中,”deploy to production”作业将会部署代码到”production”生产环境中去。
environment:name
在GitLab 8.11之前,环境的名称可以使用environment: production方式定义,现在推荐使用name关键字来定义环境的名称,就像上面的示例一样。
name关键字的参数可以使用任何定义的CI变量,包括预定义的变量、安全变量、以及.gitlab-ci.yml配置文件中定义的变量,但不能使用script中定义的变量(因为这里面的变量是局部变量)。environment环境的名称可以包含:英文字母(letters)、数字(digits)、空格(space)、_、/、$、{、}等。常用的名称有:qa、staging、production。
注意
软件应用开发的经典模型有这样几个环境:开发环境(development)、集成环境(integration)、测试环境(testing)、QA验证,模拟环境(staging)、生产环境(production)。
通常一个web项目都需要一个staging环境,一来给客户做演示,二来可以作为production server的一个”预演”,正式发布新功能前能及早发现问题(特别是gem的依赖问题,环境问题等)。
staging server可以理解为production环境的镜像,QA在staging server上对新版本做最后一轮verification, 通过后才能deploy到产品线上。staging环境 尽最大可能来模拟产品线上的环境(硬件,网络拓扑结构,数据库数据)。
environment:url
environment:url是可选的,用于设置环境的URL地址的按钮,通过点击按钮可以访问环境相应的URL地址。下面这个例子中,如果作业都成功完成,那么会在评审请求和环境部署页面创建一个Button按钮,你点击打开运行中的环境按钮就可以访问环境对应的URL地址https://prod.example.com。
示例:
1 2 3 4 5 6 deploy to production: stage: deploy script: git push production HEAD:master environment: name: production url: https://prod.example.com
environment:on_stop与environment:action
environment:on_stop与environment:action配合使用。可以通过environment:on_stop关键字定义一个关闭(停止)环境的作业。
action关键字在关闭环境的作业中定义。
下面的例子联合使用environment:on_stop与environment:action来关闭环境:
1 2 3 4 5 6 7 8 9 10 11 12 13 14 review_app: stage: deploy script: make deploy-app environment: name: review on_stop: stop_review_app stop_review_app: stage: deploy script: make delete-app when: manual environment: name: review action: stop
在上面的示例中,设置review_app作业用于部署代码到review评审环境中,同时在on_stop中指定了stop_review_app作业。一旦review_app作业成功执行,就会触发when关键字定义的stop_review_app作业。通过设置为manual手动,需要在GitLab WEB界面点击来允许manual action。
stop_review_app作业必须配合定义以下关键字:
when: 何时执行删除或停止环境作业environment:name: 环境名称需要与上面的review_app作业保持一致,即review评审环境environment:action:执行何种执行,stop停止环境stage:与review_app作业的阶段保持一致,都是deploy
运行完成后,在stop_review_app作业界面需要手动点击停止当前环境才能启动stop_review_app作业的执行。stop_review_app作业执行完成后,会停止 review评审环境,在环境–>已停止列表中可以看到review评审环境。
Dynamic environments 动态环境 正如前面讲解的,可以在环境的名称中使用变量,在environment:name和environment:url中使用变量,则可以达到动态环境的目的,动态环境需要底层应用的支持。
我们不详细展开,下面是官方的一个示例的改版:
1 2 3 4 5 6 deploy as review app: stage: deploy script: make deploy environment: name: review/${CI_COMMIT_REF_NAME} url: https://${CI_ENVIRONMENT_SLUG}.example.com/
上面示例中的${CI_COMMIT_REF_NAME},${CI_ENVIRONMENT_SLUG}就是两个变量。
cache
GitLab Runner v0.7.0引入cache缓存机制。cache缓存机制,可以在全局设置或者每个作业中设置。从GitLab 9.0开始,cache缓存机制,可以在不同的的流水线或作业之间共享数据。
从GitLab 9.2开始, 在artifacts工件之前恢复缓存。
cache缓存机制用于指定一系列的文件或文件夹在不同的流水线或作业之间共享数据,仅能使用项目工作空间(project workspace)中的路径作为缓存的路径。如果cache`配置的路径是作业工作空间外部,则说明配置是全局的缓存,所有作业共享。访问 Cache dependencies in GitLab CI/CD
artifacts
artifacts用于指定在作业成功、失败、或者一直等状态下时,一系列的文件或文件夹附加到作业中。artifacts可以称为工件或者归档文件。作业完成后,工件被发送到GitLab,可以在GitLab Web界面下载。
默认情况下,只有成功的作业才会生成工件。
并不是所有的executor执行器都支持工件。
工件的详细介绍可参考 Introduction to job artifacts
artifacts:paths
artifacts:paths用于指定哪些文件或文件夹会被打包成工件,仅仅项目工作空间(project workspace)的路径可以使用。要在不同作业间传递工作,请参数 dependencies
下面示例,将目录binaries/和文件.config打包成工件:
1 2 3 4 artifacts: paths: - binaries/ - .config
要禁用工件传递,请使用空依赖关系定义作业:
1 2 3 4 job: stage: build script: make build dependencies: []
你可以仅为打标记的release发布版本创建工作,这样可以避免临时构建产生大量的存储需求:
1 2 3 4 5 6 7 8 9 10 11 12 13 14 default-job: script: - mvn test -U except: - tags release-job: script: - mvn package -U artifacts: paths: - target/*.war only: - tags
上面的示例中,default-job作业不会在打标记的release发布版本中执行,而release-job只会在打标记的release发布版本执行,并且将target/*.war打包成工件以供下载。
artifacts:name
工件的默认名称是artifacts,当下载时名称是artifacts.zip。
通过artifacts:name关键字可以自定义工件的归档名称,这样你可以为每个工件设置独一无二的名称,归档名称可以使用预定义的变量。
如果分支名称中包含斜杠(比如feature/my-feature),推荐使用$CI_COMMIT_REF_SLUG代替$CI_COMMIT_REF_NAME作为工件名称。
使用作业名称使用工件名称:
1 2 3 4 5 job: artifacts: name: "$CI_JOB_NAME" paths: - binaries/
使用当前分支或tag版本标签名作为工件名称:
1 2 3 4 5 job: artifacts: name: "$CI_COMMIT_REF_NAME" paths: - binaries/
同时使用当前作业名称以及当前分支或tag版本标签名作为工件名称:
1 2 3 4 5 job: artifacts: name: "$CI_JOB_NAME-$CI_COMMIT_REF_NAME" paths: - binaries/
同时使用当前作业阶段名称以及当前分支名称作为工件名称:
1 2 3 4 5 job: artifacts: name: "$CI_JOB_STAGE-$CI_COMMIT_REF_NAME" paths: - binaries/
如果你使用的 Windows系统的Batch批处理脚本 ,则需要把$替换成%:
1 2 3 4 5 job: artifacts: name: "%CI_JOB_STAGE%-%CI_COMMIT_REF_NAME%" paths: - binaries/
如果你使用的 Windows系统的PowerShell脚本 ,则需要把$替换成$env::
1 2 3 4 5 job: artifacts: name: "$env:CI_JOB_STAGE-$env:CI_COMMIT_REF_NAME" paths: - binaries/
artifacts:untracked
artifacts:untracked用于将git未加入版本库的文件作为工件文件。artifacts:untracked将会忽略配置文件.gitignore。
将所有的未跟踪文件打包成工件:
1 2 artifacts: untracked: true
将所有的未跟踪文件以及目录binaries中文件打包成工件:
1 2 3 4 artifacts: untracked: true paths: - binaries/
artifacts:when
artifacts:when用于在作业失败时或者忽略失败时上传工件。
artifacts:when可以设置以下值:
on_success,默认值,当作业成功上传工件。on_failure,当作业失败上传工件。always,无论作业是否成功一直上传工件。
当作业失败时,上传工件:
1 2 3 job: artifacts: when: on_failure
artifacts:expire_in
artifacts:expire_in用于设置工件的过期时间。你可以点击界面上的Keep保持按钮,永久保存工件。
工件到期后,默认情况下每小时删除一次工件(通过cron作业),并且后续不能再访问该工件。
工件默认有效期是30天,可以通过Admin area –>Settings–>Continuous Integration and Deployment设置默认的有效性时间。
如果你不提供时间单位的话,工作有效性的时间是以秒为单位的时间,下面是一些示例:
‘42’
‘3 mins 4 sec’
‘2 hrs 20 min’
‘2h20min’
‘6 mos 1 day’
‘47 yrs 6 mos and 4d’
‘3 weeks and 2 days’
下面示例中工件有效期为一周:
1 2 3 job: artifacts: expire_in: 1 week
artifacts:reports
artifacts:reports用于收集测试报告(report),并在GitLab UI界面中显示出来。无论作业是否成功,都会收集测试报告。
可以通过设置工件的打包路径artifacts:paths添加测试的报告输出文件。
artifacts:reports:junit可以用来收集单元测试的报告,查看JUnit test reports
下面是从Ruby的RSpec测试工具中收集JUnit XML文件的示例:
1 2 3 4 5 6 7 8 rspec: stage: test script: - bundle install - rspec --format RspecJunitFormatter --out rspec.xml artifacts: reports: junit: rspec.xml
提示
如果你的测试报告是多个XML文件,你可以在一个作业中指定多个单元测试报告,GitLab会自动将他们转换成一个文件,可以像下面这样表示报告的路径:
文件匹配模式:junit: rspec-*.xml
文件列表:junit: [rspec-1.xml, rspec-2.xml, rspec-3.xml]
混合模式:junit: [rspec.xml, test-results/TEST-*.xml]
下面是Go语言收集JUnit XML文件的示例:
1 2 3 4 5 6 7 8 9 golang: stage: test script: - go get -u github.com/jstemmer/go-junit-report - go test -v 2 >&1 | go-junit-report > report.xml artifacts: reports: junit: report.xml
下面是C/C++语言使用GoogleTest进行单元测试,收集JUnit XML文件的示例:
1 2 3 4 5 6 7 cpp: stage: test script: - gtest.exe --gtest_output="xml:report.xml" artifacts: reports: junit: report.xml
说明
如果GoogleTest需要运行在多个平台(如x86、x64、arm),需要为每种平台设置唯一的报告名称,最后将结果汇总起来。
还有一些其他的报告关键字,但社区版不可用,忽略不提。
dependencies
dependencies依赖关键字应该与artifacts工件关键字联合使用,允许你在不同作业间传递工件。默认情况下,会传递所有本作业之前阶段的所有工件。
需要在作业上下文中定义dependencies依赖关键字,并指出所有需要使用的前序工件的作业名称列表。 作业列表中不能使用该作业后的作业名称 。
定义空的依赖项,将下不会下载任何工件。
使用依赖项不会考虑前面作业的运行状态。
示例:
1 2 3 4 5 6 7 8 9 10 11 12 13 14 15 16 17 18 19 20 21 22 23 24 25 26 27 28 29 build:osx: stage: build script: make build:osx artifacts: paths: - binaries/ build:linux: stage: build script: make build:linux artifacts: paths: - binaries/ test:osx: stage: test script: make test:osx dependencies: - build:osx test:linux: stage: test script: make test:linux dependencies: - build:linux deploy: stage: deploy script: make deploy
上面示例中,build:osx和build:linux两个作业定义了工件,test:osx作业执行时,将会下载并解压 build:osx的工件内容。相应的,test:linux也会获取build:linux的工件。deploy作业会下载全部工件。
说明
如果作为依赖的作业的工件过期或者被删除,那么依赖这个作业的作业将会失败。
coverage
coverage可以从作业的输出log中提取代码覆盖率。仅支持正则表达式方式获取覆盖率。
字符串的前后必须使用/包含来表明一个正确的正则表达式规则。特殊字符串需要转义。
下面是一个简单的例子:
1 2 job1: coverage: '/Code coverage:\d+\.\d+%/'
如在作业日志中输出了”Code coverage:80.2%”,我们使用上面的正则表达式就可以获取到代码的覆盖率。然后在作业的右上角处就会显示Coverage:80.2%。
retry
retry重试关键字用于配置当作业失败时可以重新执行的次数。当作业失败时,如果配置了retry,那么该作业就会重试,直到允许的最大次数。
如果retry设置值为2,如果第一次重试运行成功了,那么就不会进行第二次重试。
retry设置值只能是0、1、2三个整数。
下面是一个简单的例子:
1 2 3 test: script: rspec retry: 2
为了更好的控制重试次数,retry可以设置以下两个关键字:
max: 最大重试次数when: 何时重试
下面这个例子只有当运行器系统出现故障时才能最多重试两次:
1 2 3 4 5 test: script: rspec retry: max: 2 when: runner_system_failure
如果上面例子中出现的是其他故障,那么作业不会重试。
为了针对多种重试情形,我们可以使用矩阵形式罗列出错误情形,如下示例:
1 2 3 4 5 6 7 test: script: rspec retry: max: 2 when: - runner_system_failure - stuck_or_timeout_failure
when可以是以下值:
always: 一直重试,默认值。unknown_failure:当错误未知时重试。script_failure: 脚本错误时重试。api_failure: API调用错误时重试。stuck_or_timeout_failure: 作业卡信或超时错误时重试。runner_system_failure: 运行器系统错误(如设置工作失败)时重试。missing_dependency_failure: 依赖工件丢失错误时重试。runner_unsupported: 运行器不支持错误时重试。
trigger
trigger关键字用于多项目流水线时,定义下游的流水线工程,由于社区版本不支持此功能,不详细介绍。具体可参考 trigger
include
include包含关键字可以将其他yaml文件载入到当前的.gitlab-ci.yml配置文件中,详情请查看官网指导 include
extends
extends扩展用于定义当前作业从哪里继承。它是使用YAML锚点的替代方案,更加灵活、可读性强。详情请查看官网指导 extends
pages
pages是一项特殊工作,用于将静态内容上传到GitLab,可用于为您的网站提供服务。详情请查看官网指导 GitLab Pages
variables
在.gitlab-ci.yml配置文件中可以通过variables关键字配置全局变量或者作业级的局部变量。
当variables关键字使用在作业层级时,它会覆盖全局变量或预定义变量。
可以在variables关键字中定义非敏感性配置。
全局变量可以在各个作业中作业,而作业级别的局部变量只能在该作业中使用。
可以在GitLab WEB界面定义一些敏感性配置变量,或者可能变动的变量。
在script中使用export可以导出当前可用的变量信息。
作业内部修改全局变量只对当前作用生效,不会影响其他作业。
可以使用赋值语句对全局变量或局部变量进行重新赋值。
下面这个示例定义一个全局数据库的URL地址:
1 2 variables: DATABASE_URL: "postgres://postgres@postgres/my_database"
下面修改bluelog项目的配置文件为如下内容:
1 2 3 4 5 6 7 8 9 10 11 12 13 14 15 16 17 18 19 20 21 22 23 24 25 26 27 28 29 30 31 32 33 34 35 36 37 38 39 40 41 42 43 44 45 46 47 48 49 50 51 52 53 54 55 56 57 58 59 60 61 62 63 64 65 66 67 68 69 70 71 72 73 variables: SQLALCHEMY_DATABASE_URI: 'mysql+pymysql://root:root@localhost:3306/bluelog?charset=utf8mb4' SQLALCHEMY_TRACK_MODIFICATIONS: "False" SQLALCHEMY_ECHO: "True" stages: - build - code_check - test - deploy build1: stage: build variables: SQLALCHEMY_DATABASE_URI: 'mysql+pymysql://root:123456@localhost:3306/bluelog?charset=utf8mb4' SQLALCHEMY_ECHO: "False" script: - export - echo "Do your build here" - cloc --version - echo -e "SQLALCHEMY_DATABASE_URI:${SQLALCHEMY_DATABASE_URI}" - echo -e "SQLALCHEMY_TRACK_MODIFICATIONS:${SQLALCHEMY_TRACK_MODIFICATIONS}" - echo -e "SQLALCHEMY_ECHO:${SQLALCHEMY_ECHO}" tags: - bluelog find Bugs: stage: code_check script: - echo -e "SQLALCHEMY_DATABASE_URI:${SQLALCHEMY_DATABASE_URI}" - echo -e "SQLALCHEMY_TRACK_MODIFICATIONS:${SQLALCHEMY_TRACK_MODIFICATIONS}" - echo -e "SQLALCHEMY_ECHO:${SQLALCHEMY_ECHO}" - SQLALCHEMY_ECHO="Nothing" - echo -e "SQLALCHEMY_ECHO:${SQLALCHEMY_ECHO}" tags: - bluelog test1: stage: test variables: CKEDITOR_SERVE_LOCAL: "True" script: - echo -e "SQLALCHEMY_DATABASE_URI:${SQLALCHEMY_DATABASE_URI}" - echo -e "SQLALCHEMY_TRACK_MODIFICATIONS:${SQLALCHEMY_TRACK_MODIFICATIONS}" - echo -e "SQLALCHEMY_ECHO:${SQLALCHEMY_ECHO}" - echo -e "CKEDITOR_SERVE_LOCAL:${CKEDITOR_SERVE_LOCAL}" tags: - bluelog test2: stage: test script: - echo "Do another parallel test here" - echo "For example run a lint test" tags: - bluelog deploy1: stage: deploy script: - echo "Do your deploy here" tags: - bluelog
查看各阶段的输出内容。
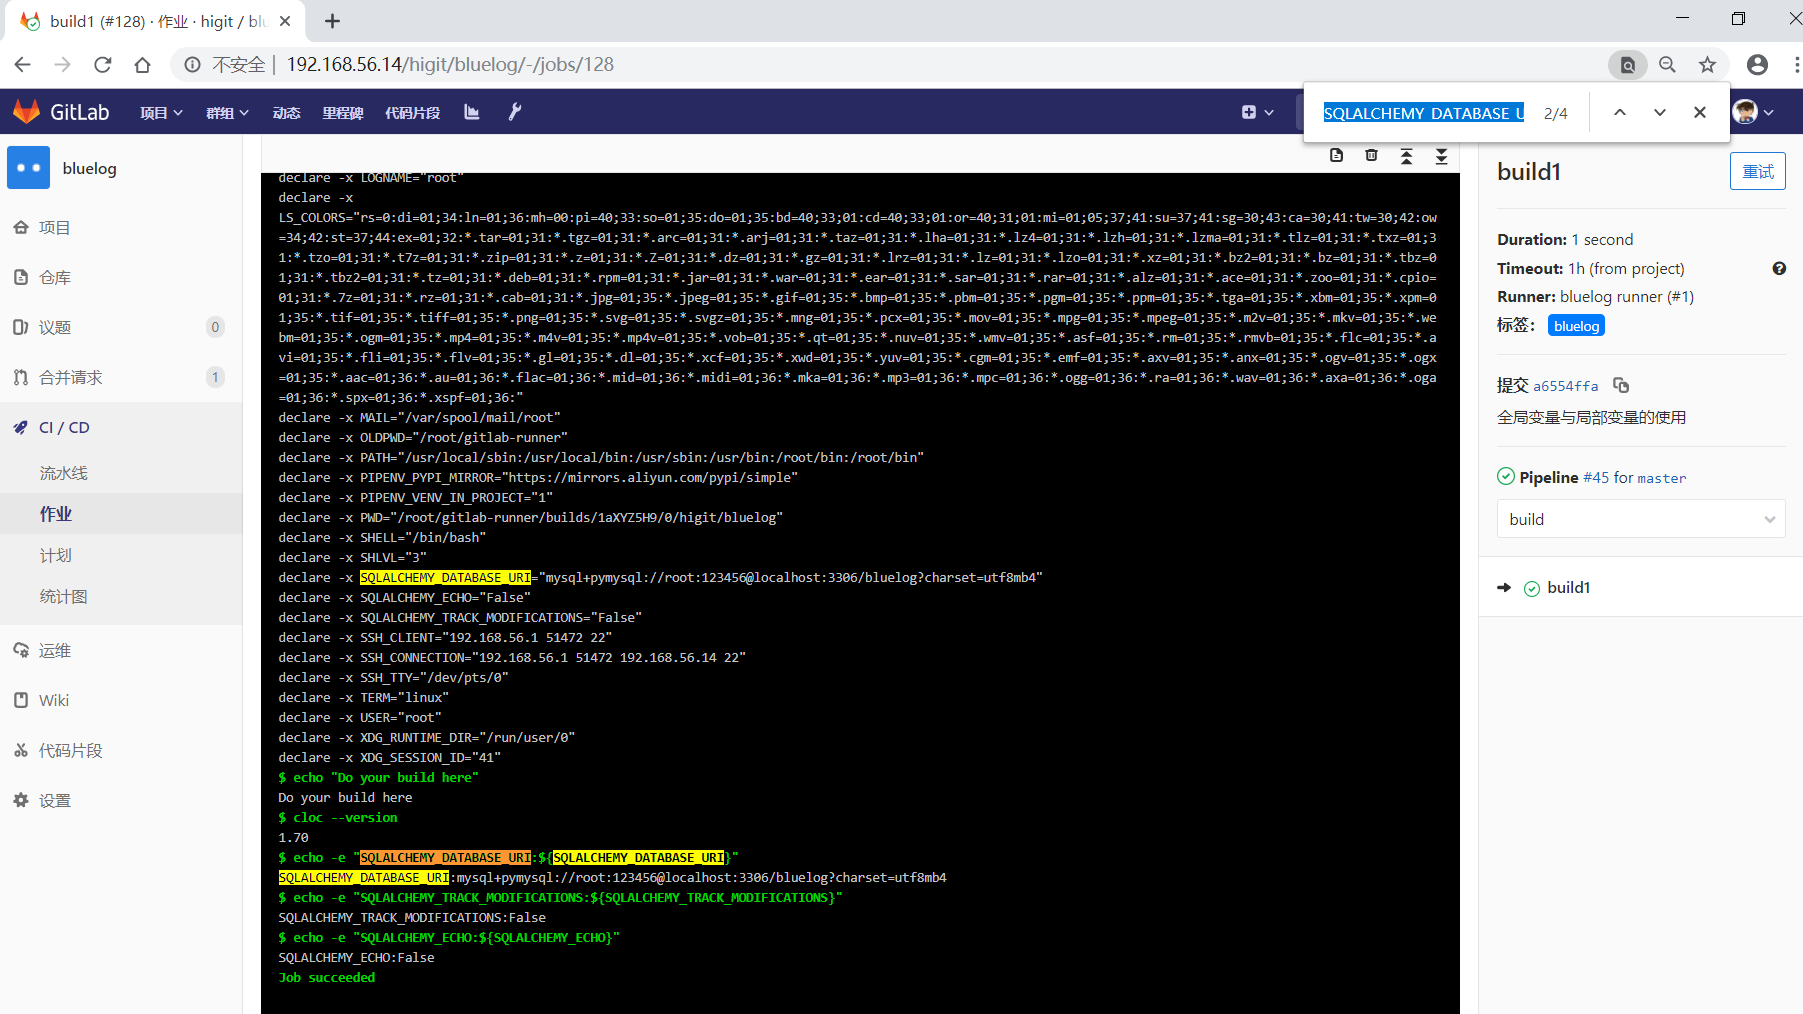
可以看到build1作业中:
SQLALCHEMY_DATABASE_URI已经覆盖了全局定义的SQLALCHEMY_DATABASE_URI,看差异数据库URL中全局是”root:root”,而作业中是”root:123456”。由于作业中并没有定义SQLALCHEMY_TRACK_MODIFICATIONS变量,所以使用的是全局的SQLALCHEMY_TRACK_MODIFICATIONS变量,输出结果是”False”。
作业中定义的SQLALCHEMY_ECHO: "False"将全局的SQLALCHEMY_ECHO: "True"覆盖,最后显示的是”False”。
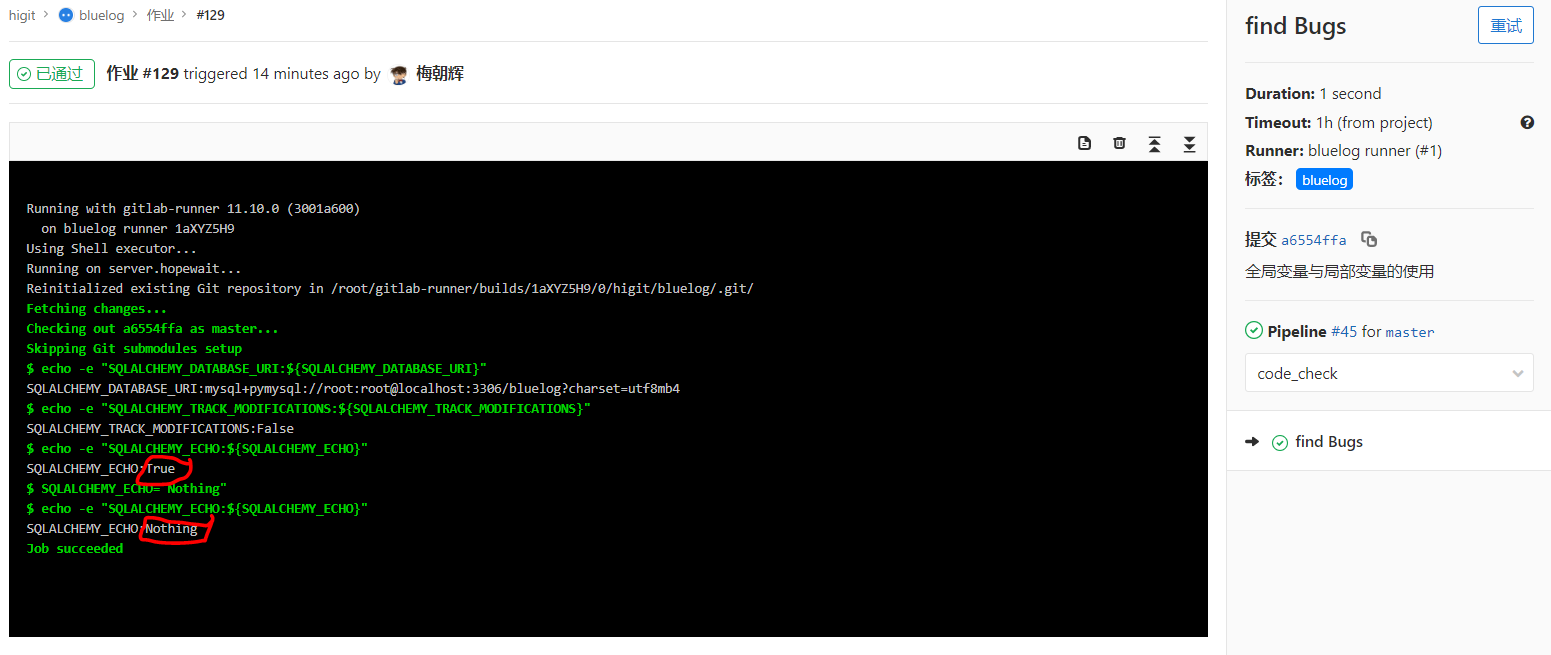
再看find Bugs作业:
因为没有定义variables关键字,这个作用将使用全局变量。
39、40、41三行输出的结果都是全局变量定义的值。
42行的SQLALCHEMY_ECHO="Nothing"对SQLALCHEMY_ECHO全局变量进行的重新赋值,43行打印出了赋值后的新值是”Nothing”。
上面两个作业说明,作业内部修改全局变量只对当前作用生效,不会影响其他作业。
可以使用赋值语句对全局变量或局部变量进行重新赋值。
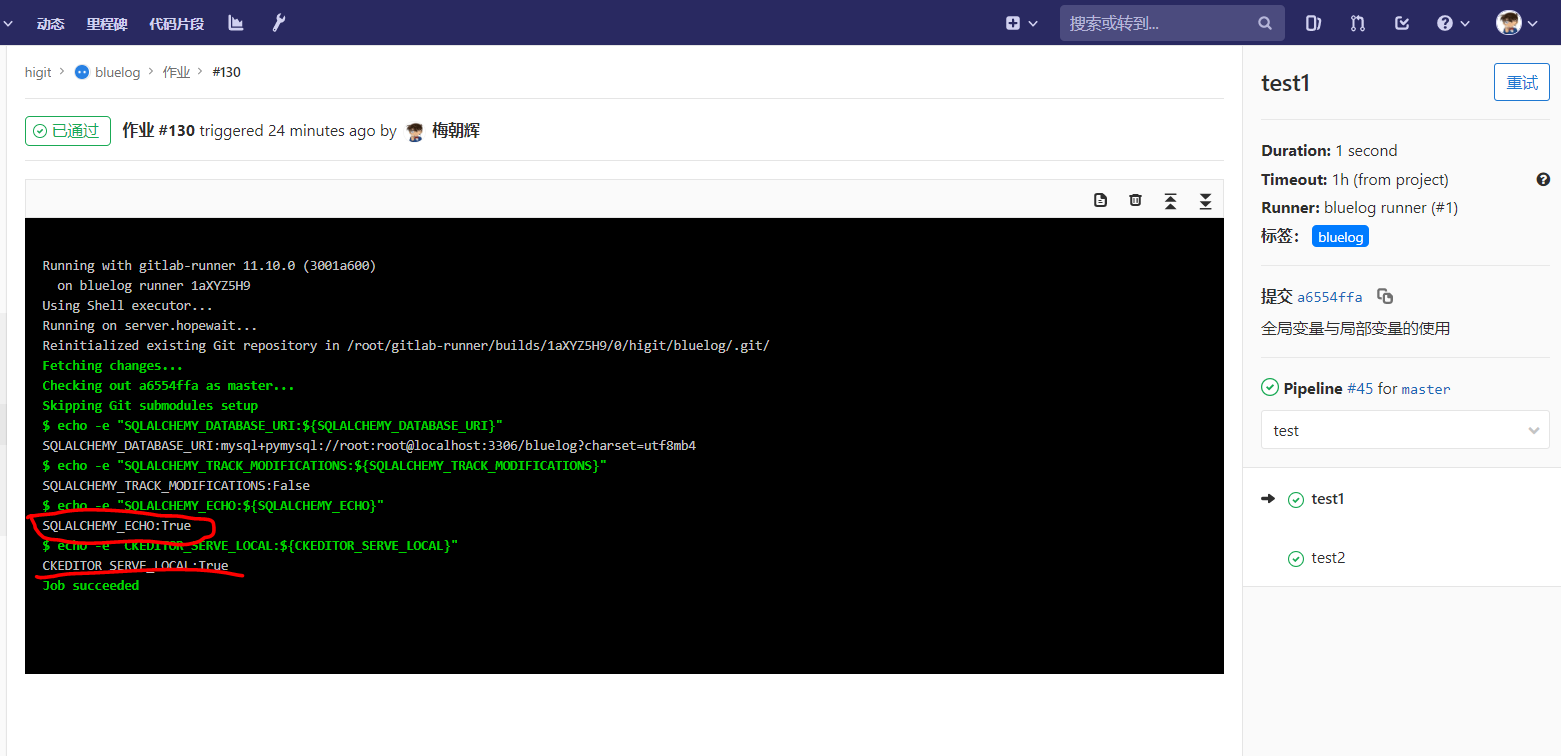
再看test1作业:
该作业定义variables关键字,增加了一个CKEDITOR_SERVE_LOCAL变量。
上一个作业的修改SQLALCHEMY_ECHO="Nothing"对本作业显示SQLALCHEMY_ECHO变量没有影响,仍然会显示全局变量定义的值”True”。再一次证明了作业内部修改全局变量只对当前作用生效,不会影响其他作业。
variables变量的优先级variables变量的优先级参考 Priority of environment variables
原文:
Variables of different types can take precedence over other variables, depending on where they are defined.
The order of precedence for variables is (from highest to lowest):
Trigger variables or scheduled pipeline variables. Project-level variables or protected variables. Group-level variables or protected variables. YAML-defined job-level variables. YAML-defined global variables. Deployment variables. Predefined environment variables.
翻译过来,是这样的:
1 2 3 4 5 6 7 8 9 10 11 不同类型的变量可以优先于其他变量,具体取决于它们的定义位置。
变量中有一些关于git策略的特殊变量,如后续几个小节,当前仅列出,后续详细补充。
使用export导出的变量示例 export的导出示例:
1 2 3 4 5 6 7 8 9 10 11 12 13 14 15 16 17 18 19 20 21 22 23 24 25 26 27 28 29 30 31 32 33 34 35 36 37 38 39 40 41 42 43 44 45 46 47 48 49 50 51 52 53 54 55 56 57 58 59 60 61 62 63 64 65 66 67 68 69 70 71 72 73 74 75 76 77 78 79 80 81 82 83 84 85 86 87 88 89 90 91 92 93 94 95 96 97 $ export declare -x CI="true" declare -x CI_API_V4_URL="http://192.168.56.14/api/v4" declare -x CI_BUILDS_DIR="/root/gitlab-runner/builds" declare -x CI_BUILD_BEFORE_SHA="84f1f0e417d7e340770a4bb05076bf74f3231991" declare -x CI_BUILD_ID="128" declare -x CI_BUILD_NAME="build1" declare -x CI_BUILD_REF="a6554ffa0d2ae67c675fe9768f702f0b1bb65f5a" declare -x CI_BUILD_REF_NAME="master" declare -x CI_BUILD_REF_SLUG="master" declare -x CI_BUILD_STAGE="build" declare -x CI_BUILD_TOKEN="[MASKED]" declare -x CI_COMMIT_BEFORE_SHA="84f1f0e417d7e340770a4bb05076bf74f3231991" declare -x CI_COMMIT_DESCRIPTION="" declare -x CI_COMMIT_MESSAGE="全局变量与局部变量的使用 " declare -x CI_COMMIT_REF_NAME="master" declare -x CI_COMMIT_REF_SLUG="master" declare -x CI_COMMIT_SHA="a6554ffa0d2ae67c675fe9768f702f0b1bb65f5a" declare -x CI_COMMIT_SHORT_SHA="a6554ffa" declare -x CI_COMMIT_TITLE="全局变量与局部变量的使用" declare -x CI_CONCURRENT_ID="0" declare -x CI_CONCURRENT_PROJECT_ID="0" declare -x CI_CONFIG_PATH=".gitlab-ci.yml" declare -x CI_JOB_ID="128" declare -x CI_JOB_NAME="build1" declare -x CI_JOB_STAGE="build" declare -x CI_JOB_TOKEN="[MASKED]" declare -x CI_JOB_URL="http://192.168.56.14/higit/bluelog/-/jobs/128" declare -x CI_NODE_TOTAL="1" declare -x CI_PAGES_DOMAIN="example.com" declare -x CI_PAGES_URL="http://higit.example.com/bluelog" declare -x CI_PIPELINE_ID="45" declare -x CI_PIPELINE_IID="48" declare -x CI_PIPELINE_SOURCE="push" declare -x CI_PIPELINE_URL="http://192.168.56.14/higit/bluelog/pipelines/45" declare -x CI_PROJECT_DIR="/root/gitlab-runner/builds/1aXYZ5H9/0/higit/bluelog" declare -x CI_PROJECT_ID="2" declare -x CI_PROJECT_NAME="bluelog" declare -x CI_PROJECT_NAMESPACE="higit" declare -x CI_PROJECT_PATH="higit/bluelog" declare -x CI_PROJECT_PATH_SLUG="higit-bluelog" declare -x CI_PROJECT_URL="http://192.168.56.14/higit/bluelog" declare -x CI_PROJECT_VISIBILITY="private" declare -x CI_REGISTRY_PASSWORD="[MASKED]" declare -x CI_REGISTRY_USER="gitlab-ci-token" declare -x CI_REPOSITORY_URL="http://gitlab-ci-token:[MASKED]@192.168.56.14/higit/bluelog.git" declare -x CI_RUNNER_DESCRIPTION="bluelog runner" declare -x CI_RUNNER_EXECUTABLE_ARCH="linux/amd64" declare -x CI_RUNNER_ID="1" declare -x CI_RUNNER_REVISION="3001a600" declare -x CI_RUNNER_TAGS="bluelog" declare -x CI_RUNNER_VERSION="11.10.0" declare -x CI_SERVER="yes" declare -x CI_SERVER_NAME="GitLab" declare -x CI_SERVER_REVISION="8a802d1c6b7" declare -x CI_SERVER_VERSION="11.10.6" declare -x CI_SERVER_VERSION_MAJOR="11" declare -x CI_SERVER_VERSION_MINOR="10" declare -x CI_SERVER_VERSION_PATCH="6" declare -x CI_SHARED_ENVIRONMENT="true" declare -x CONFIG_FILE="/etc/gitlab-runner/config.toml" declare -x FF_K8S_USE_ENTRYPOINT_OVER_COMMAND="true" declare -x FF_USE_LEGACY_GIT_CLEAN_STRATEGY="false" declare -x GITLAB_CI="true" declare -x GITLAB_FEATURES="" declare -x GITLAB_USER_EMAIL="mzh.whut@gmail.com" declare -x GITLAB_USER_ID="2" declare -x GITLAB_USER_LOGIN="meizhaohui" declare -x GITLAB_USER_NAME="梅朝辉" declare -x HISTCONTROL="ignoredups" declare -x HISTSIZE="1000" declare -x HOME="/root" declare -x HOSTNAME="server.hopewait" declare -x LANG="en_US.utf8" declare -x LC_ALL="en_US.utf8" declare -x LESSOPEN="||/usr/bin/lesspipe.sh %s" declare -x LOGNAME="root" declare -x LS_COLORS="rs=0:di=01;34:ln=01;36:mh=00:pi=40;33:so=01;35:do=01;35:bd=40;33;01:cd=40;33;01:or=40;31;01:mi=01;05;37;41:su=37;41:sg=30;43:ca=30;41:tw=30;42:ow=34;42:st=37;44:ex=01;32:*.tar=01;31:*.tgz=01;31:*.arc=01;31:*.arj=01;31:*.taz=01;31:*.lha=01;31:*.lz4=01;31:*.lzh=01;31:*.lzma=01;31:*.tlz=01;31:*.txz=01;31:*.tzo=01;31:*.t7z=01;31:*.zip=01;31:*.z=01;31:*.Z=01;31:*.dz=01;31:*.gz=01;31:*.lrz=01;31:*.lz=01;31:*.lzo=01;31:*.xz=01;31:*.bz2=01;31:*.bz=01;31:*.tbz=01;31:*.tbz2=01;31:*.tz=01;31:*.deb=01;31:*.rpm=01;31:*.jar=01;31:*.war=01;31:*.ear=01;31:*.sar=01;31:*.rar=01;31:*.alz=01;31:*.ace=01;31:*.zoo=01;31:*.cpio=01;31:*.7z=01;31:*.rz=01;31:*.cab=01;31:*.jpg=01;35:*.jpeg=01;35:*.gif=01;35:*.bmp=01;35:*.pbm=01;35:*.pgm=01;35:*.ppm=01;35:*.tga=01;35:*.xbm=01;35:*.xpm=01;35:*.tif=01;35:*.tiff=01;35:*.png=01;35:*.svg=01;35:*.svgz=01;35:*.mng=01;35:*.pcx=01;35:*.mov=01;35:*.mpg=01;35:*.mpeg=01;35:*.m2v=01;35:*.mkv=01;35:*.webm=01;35:*.ogm=01;35:*.mp4=01;35:*.m4v=01;35:*.mp4v=01;35:*.vob=01;35:*.qt=01;35:*.nuv=01;35:*.wmv=01;35:*.asf=01;35:*.rm=01;35:*.rmvb=01;35:*.flc=01;35:*.avi=01;35:*.fli=01;35:*.flv=01;35:*.gl=01;35:*.dl=01;35:*.xcf=01;35:*.xwd=01;35:*.yuv=01;35:*.cgm=01;35:*.emf=01;35:*.axv=01;35:*.anx=01;35:*.ogv=01;35:*.ogx=01;35:*.aac=01;36:*.au=01;36:*.flac=01;36:*.mid=01;36:*.midi=01;36:*.mka=01;36:*.mp3=01;36:*.mpc=01;36:*.ogg=01;36:*.ra=01;36:*.wav=01;36:*.axa=01;36:*.oga=01;36:*.spx=01;36:*.xspf=01;36:" declare -x MAIL="/var/spool/mail/root" declare -x OLDPWD="/root/gitlab-runner" declare -x PATH="/usr/local/sbin:/usr/local/bin:/usr/sbin:/usr/bin:/root/bin:/root/bin" declare -x PIPENV_PYPI_MIRROR="https://mirrors.aliyun.com/pypi/simple" declare -x PIPENV_VENV_IN_PROJECT="1" declare -x PWD="/root/gitlab-runner/builds/1aXYZ5H9/0/higit/bluelog" declare -x SHELL="/bin/bash" declare -x SHLVL="3" declare -x SQLALCHEMY_DATABASE_URI="mysql+pymysql://root:123456@localhost:3306/bluelog?charset=utf8mb4" declare -x SQLALCHEMY_ECHO="False" declare -x SQLALCHEMY_TRACK_MODIFICATIONS="False" declare -x SSH_CLIENT="192.168.56.1 51472 22" declare -x SSH_CONNECTION="192.168.56.1 51472 192.168.56.14 22" declare -x SSH_TTY="/dev/pts/0" declare -x TERM="linux" declare -x USER="root" declare -x XDG_RUNTIME_DIR="/run/user/0" declare -x XDG_SESSION_ID="41"
强调
不要将敏感信息,如用户密码、Token等信息放在.gitlab-ci.yml配置文件中定义变量。
敏感信息可以WEB配置界面添加变量,并将变量设置为Protected受保护或者Masked,设置为Masked的变量不会直接显示在作业日志信息中。
关闭全局层级定义的变量
如果你要在作业层级关闭全局层级定义的变量,可以给variables关键字定义一个空的hash。
如下示例:
1 2 job_name: variables: {}
变量定义时使用其他变量
可以在变量定义时,使用其他的变量,需要使用$$进行转义。
看下面的示例:
1 2 3 4 5 variables: LS_CMD: 'ls $FLAGS $$TMP_DIR' FLAGS: '-al' script: - 'eval $LS_CMD'
克隆策略Git strategy GIT_STRATEGY
你可以通过设置GIT_STRATEGY变量来指定GitLab Runner运行作业时使用什么样的方式来获取最新的代码,可以在全局级或作业级进行设置。
GIT_STRATEGY变量可以设置为fetch、clone、none。clone是最慢的方式,这种方式会从头开始克隆仓库。fetch相对来说更快一点,如果本地项目空间中存在远程仓库的克隆,只用从远程获取最新到本地,而不用从头开始克隆整个仓库(如果本地项目空间不存在远程仓库的克隆的话,则此时等同于clone,从头开始克隆远程仓库)。none也是利用本地项目空间中的文件,但不会从远程获取到最新的修改数据,本地数据不是最新的。
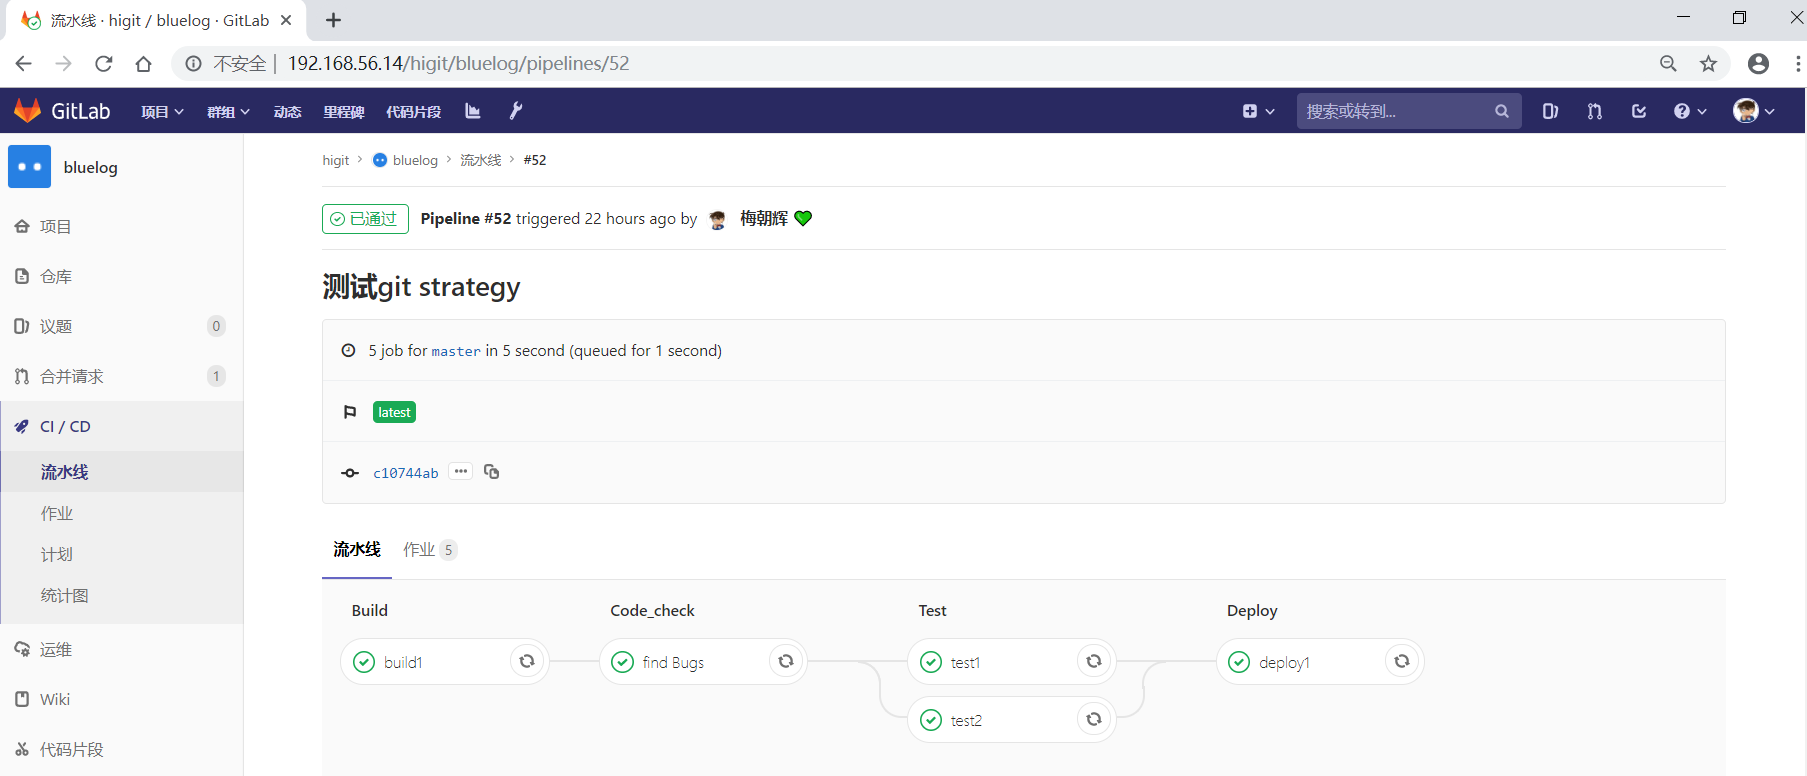
下面我们通过修改.gitlab-ci.yml配置文件来查看这个现象:
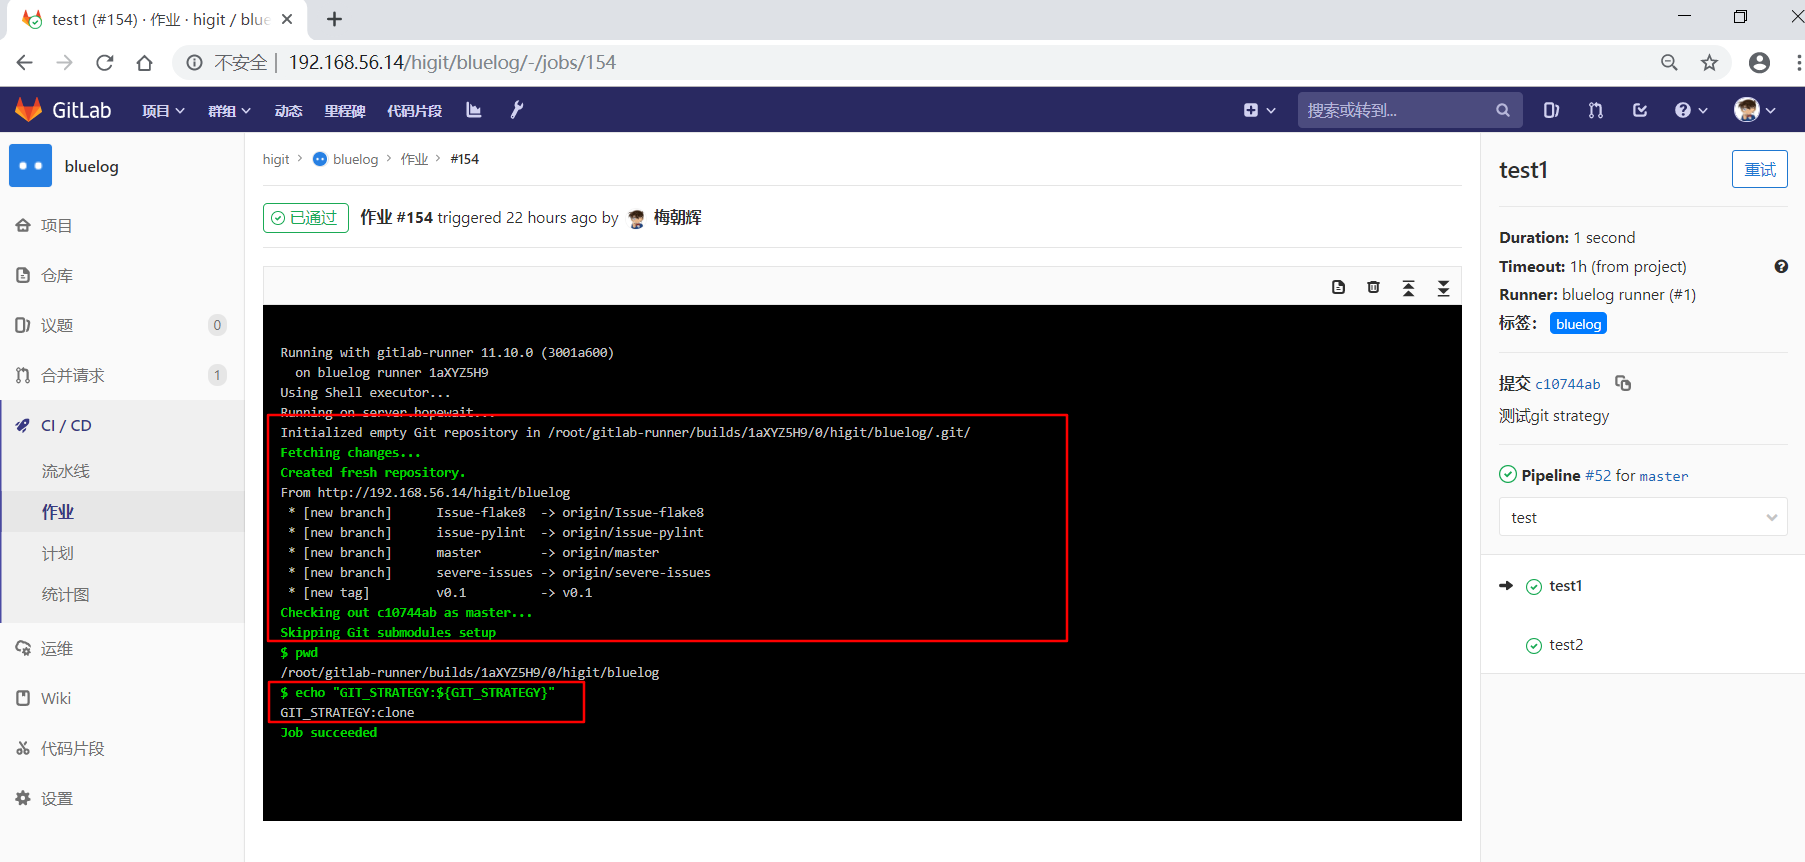
1 2 3 4 5 6 7 8 9 10 11 12 13 14 15 16 17 18 19 20 21 22 23 24 25 26 27 28 29 30 31 32 33 34 35 36 37 38 39 40 41 42 43 44 45 46 47 48 49 50 51 52 53 54 stages: - build - code_check - test - deploy build1: stage: build script: - pwd - export - echo "Do your build here" - echo "GIT_STRATEGY:${GIT_STRATEGY}" tags: - bluelog find Bugs: stage: code_check variables: GIT_STRATEGY: "fetch" script: - pwd - echo "GIT_STRATEGY:${GIT_STRATEGY}" tags: - bluelog test1: stage: test variables: GIT_STRATEGY: "clone" script: - pwd - echo "GIT_STRATEGY:${GIT_STRATEGY}" tags: - bluelog test2: stage: test variables: GIT_STRATEGY: "none" script: - echo "GIT_STRATEGY:${GIT_STRATEGY}" tags: - bluelog deploy1: stage: deploy script: - echo "Do your deploy here" tags: - bluelog
提交后,流水线触发了:
我们检查一下每个作业的log日志信息:
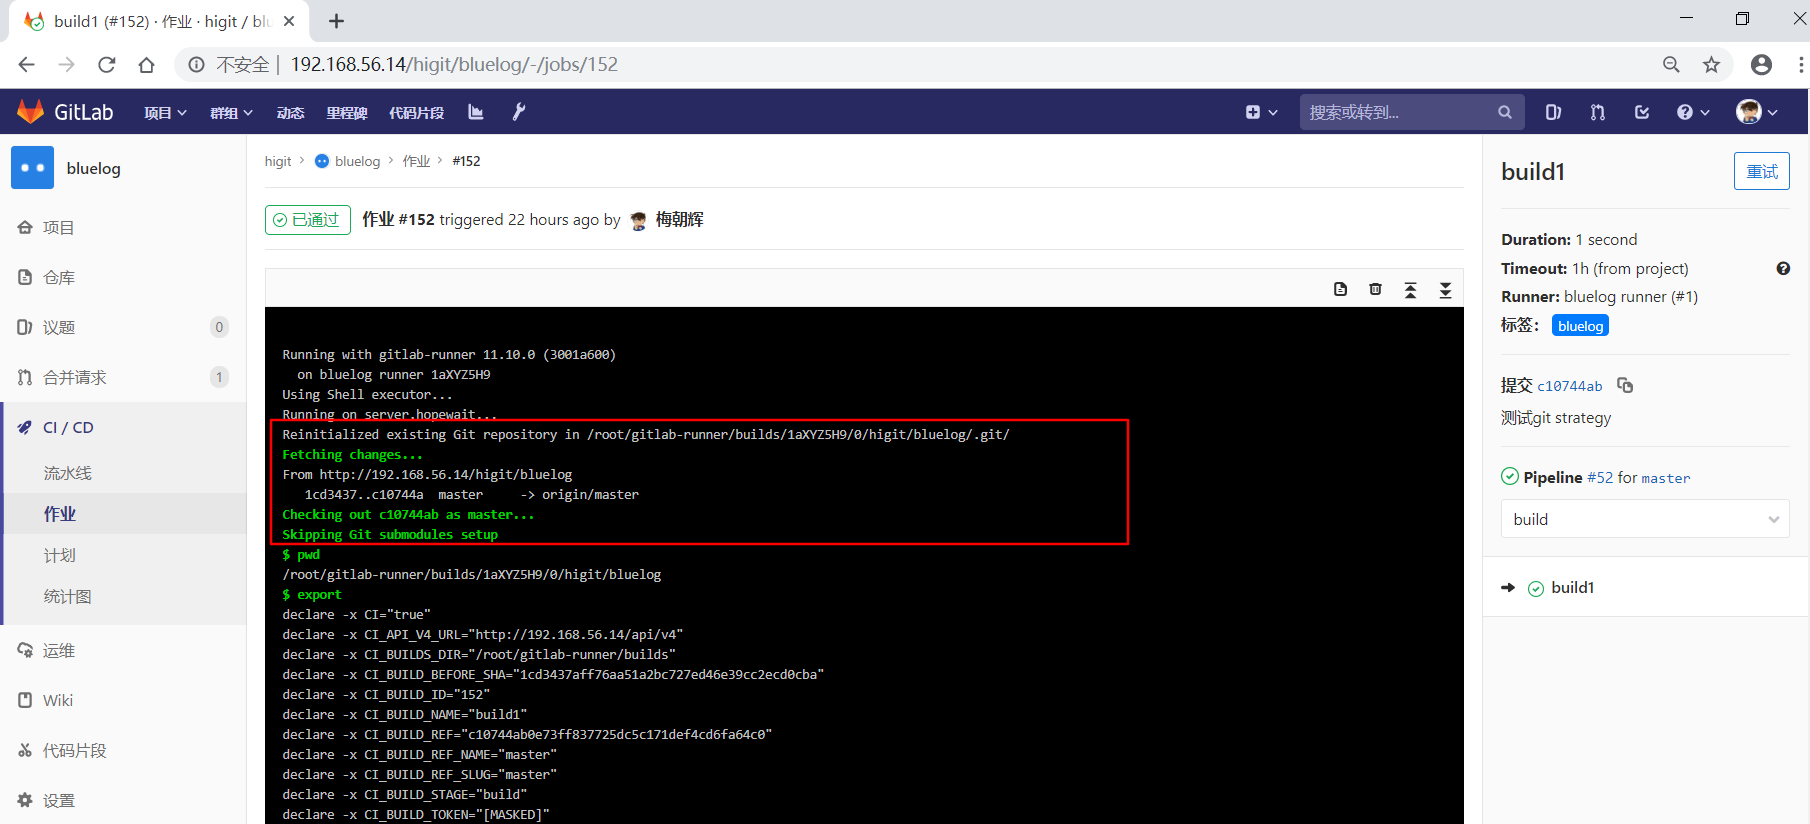
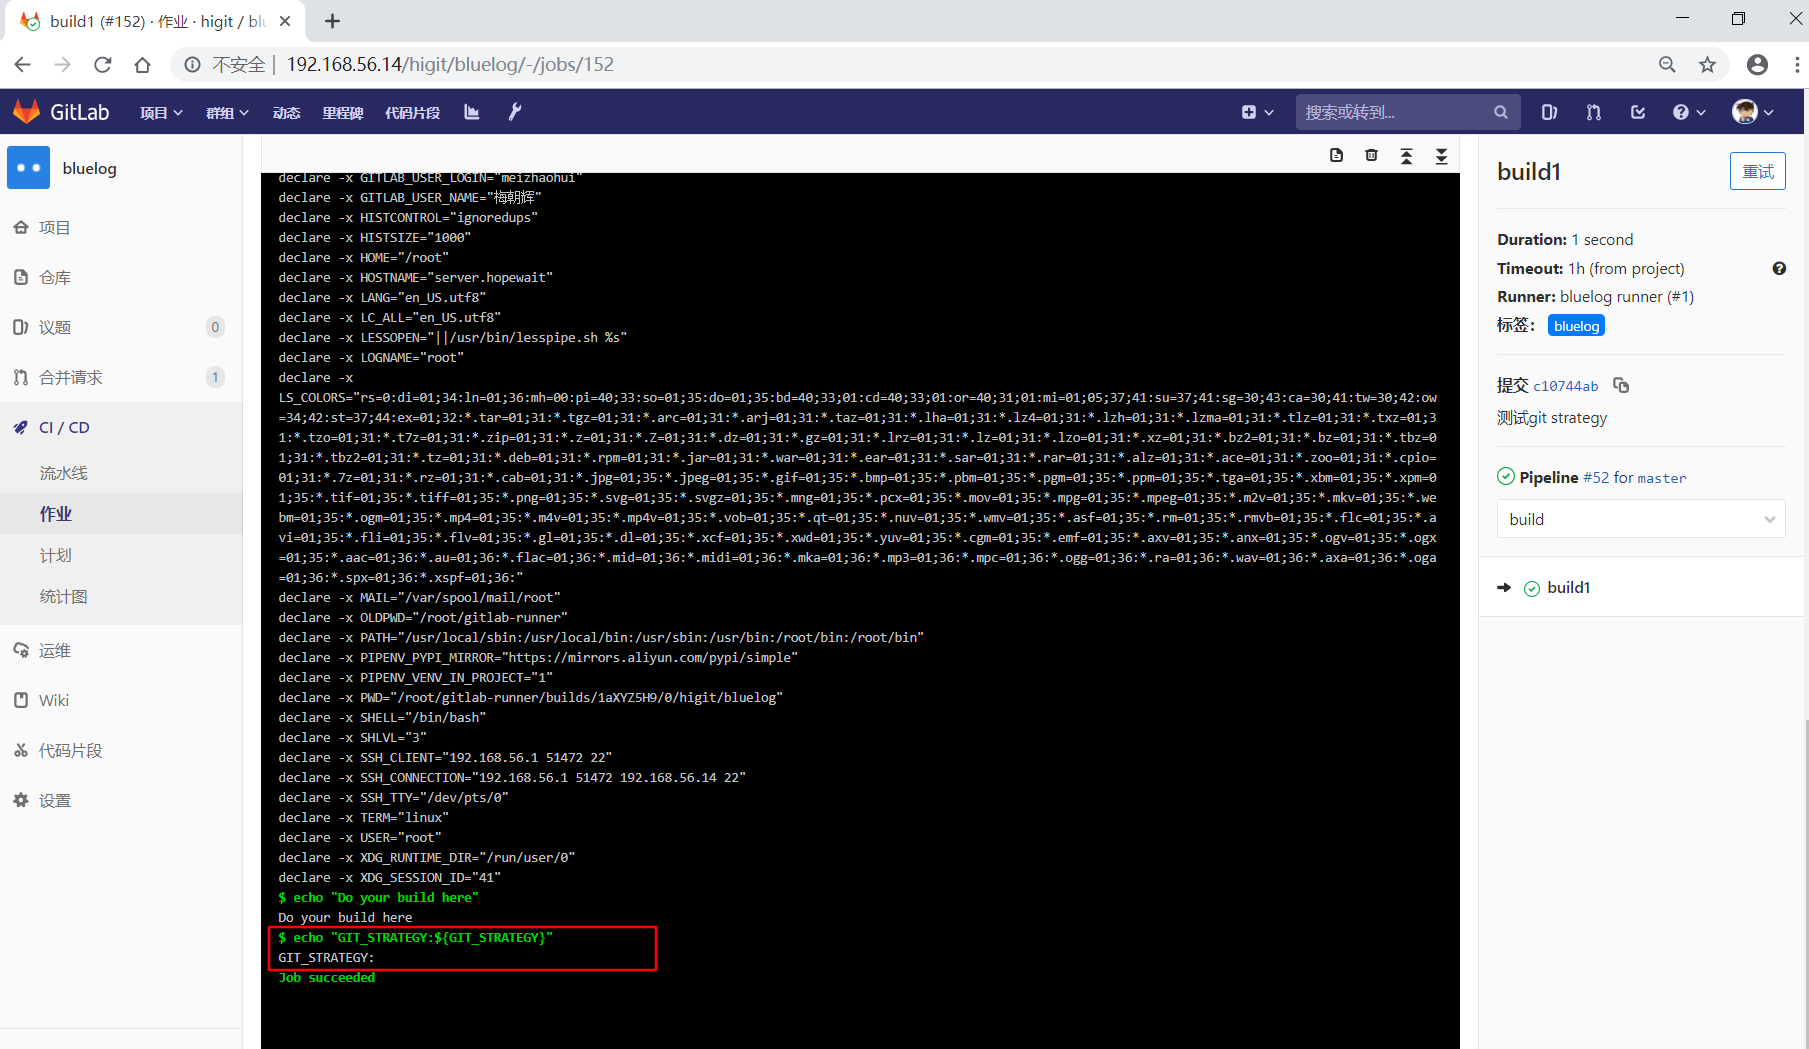
先看build1作业:
可以看到默认情况下,会使用git fetch方式来获取最新的修改,并且echo "GIT_STRATEGY:${GIT_STRATEGY}"打印${GIT_STRATEGY}变量为空,也就是默认情况下GitLab并不会设置GIT_STRATEGY变量。
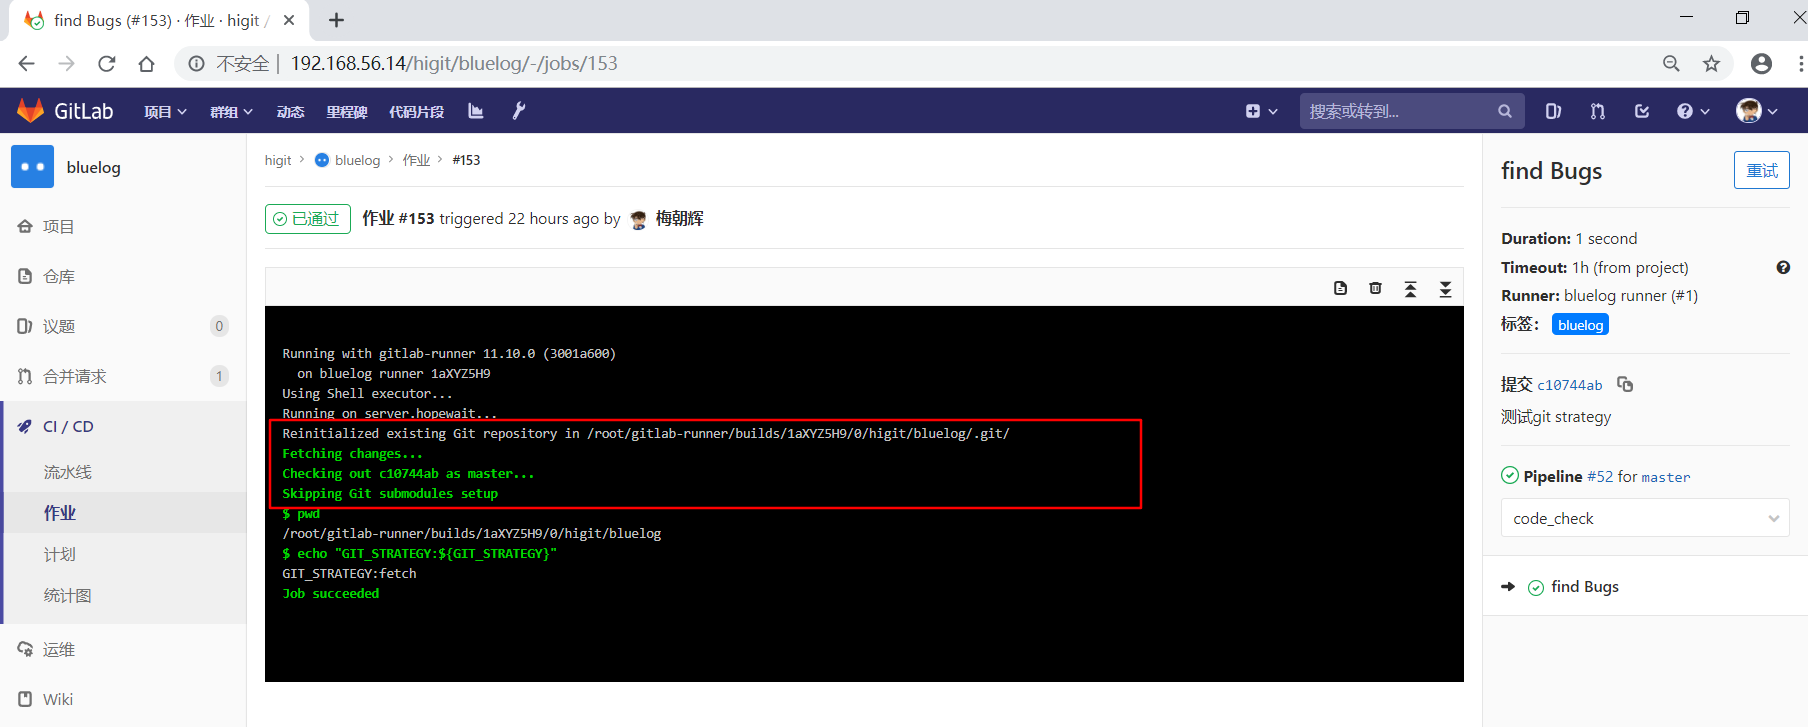
再看一下find Bugs作业:
此处也是直接使用现有项目空间里面的本地仓库,使用git fetch方式来获取最新的修改,由于在作业级中设置了GIT_STRATEGY变量,最后打印出打印${GIT_STRATEGY}变量的值为fetch。
再看一下test1作业:
因为设置了GIT_STRATEGY: "clone",这个时候GitLab Runner会从头开始克隆远程仓库,最后打印出打印${GIT_STRATEGY}变量的值为clone。
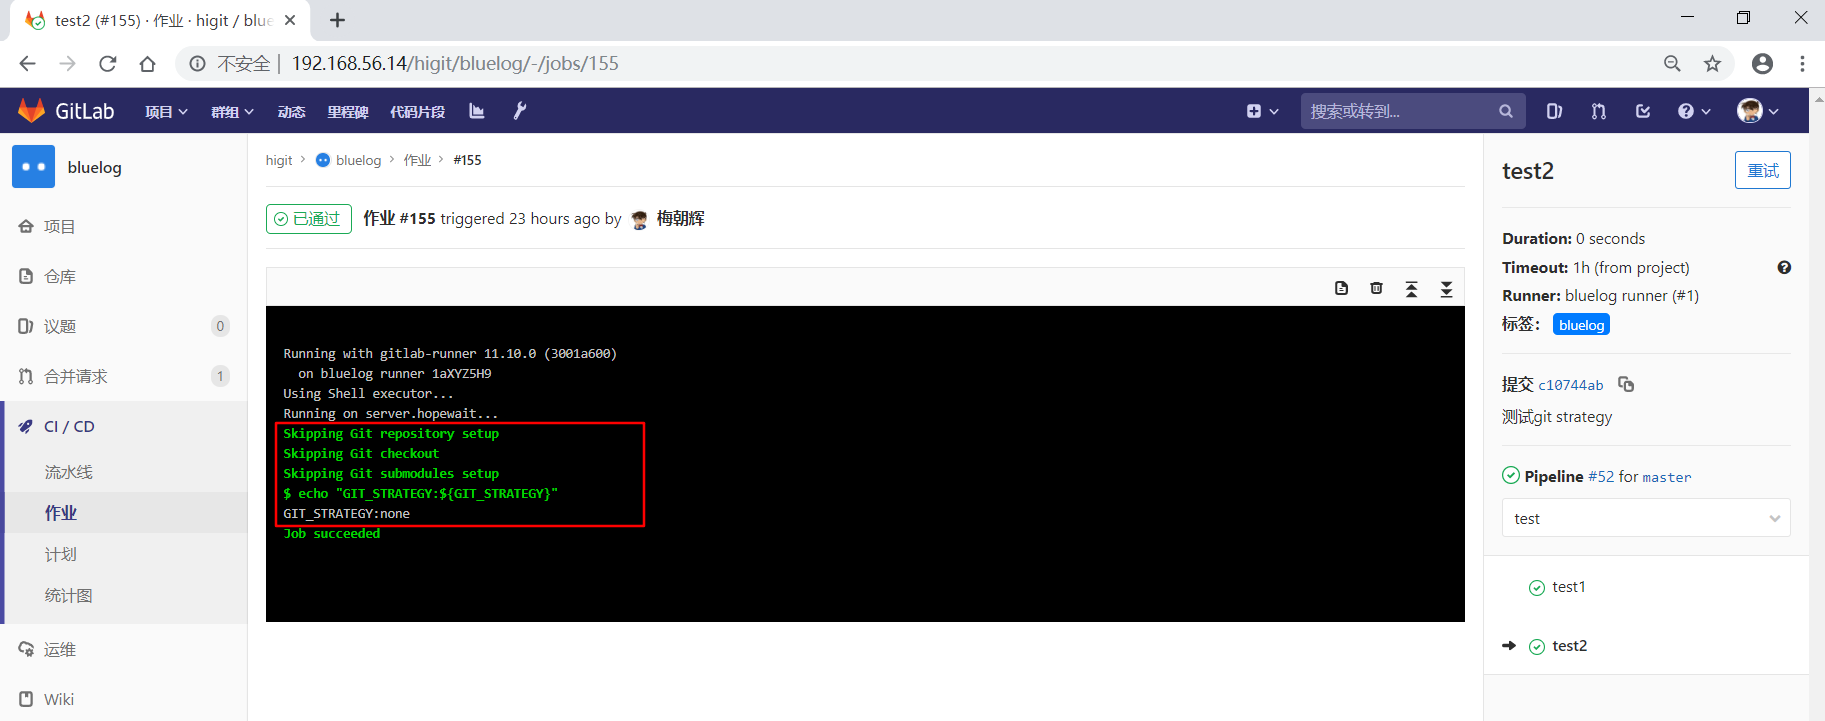
再看一下test2作业:
因为设置了GIT_STRATEGY: "none",这个时候GitLab Runner什么也不做,不会获取最新的修改,最后打印出打印${GIT_STRATEGY}变量的值为none。
我们再修改一下配置文件为下面的内容:
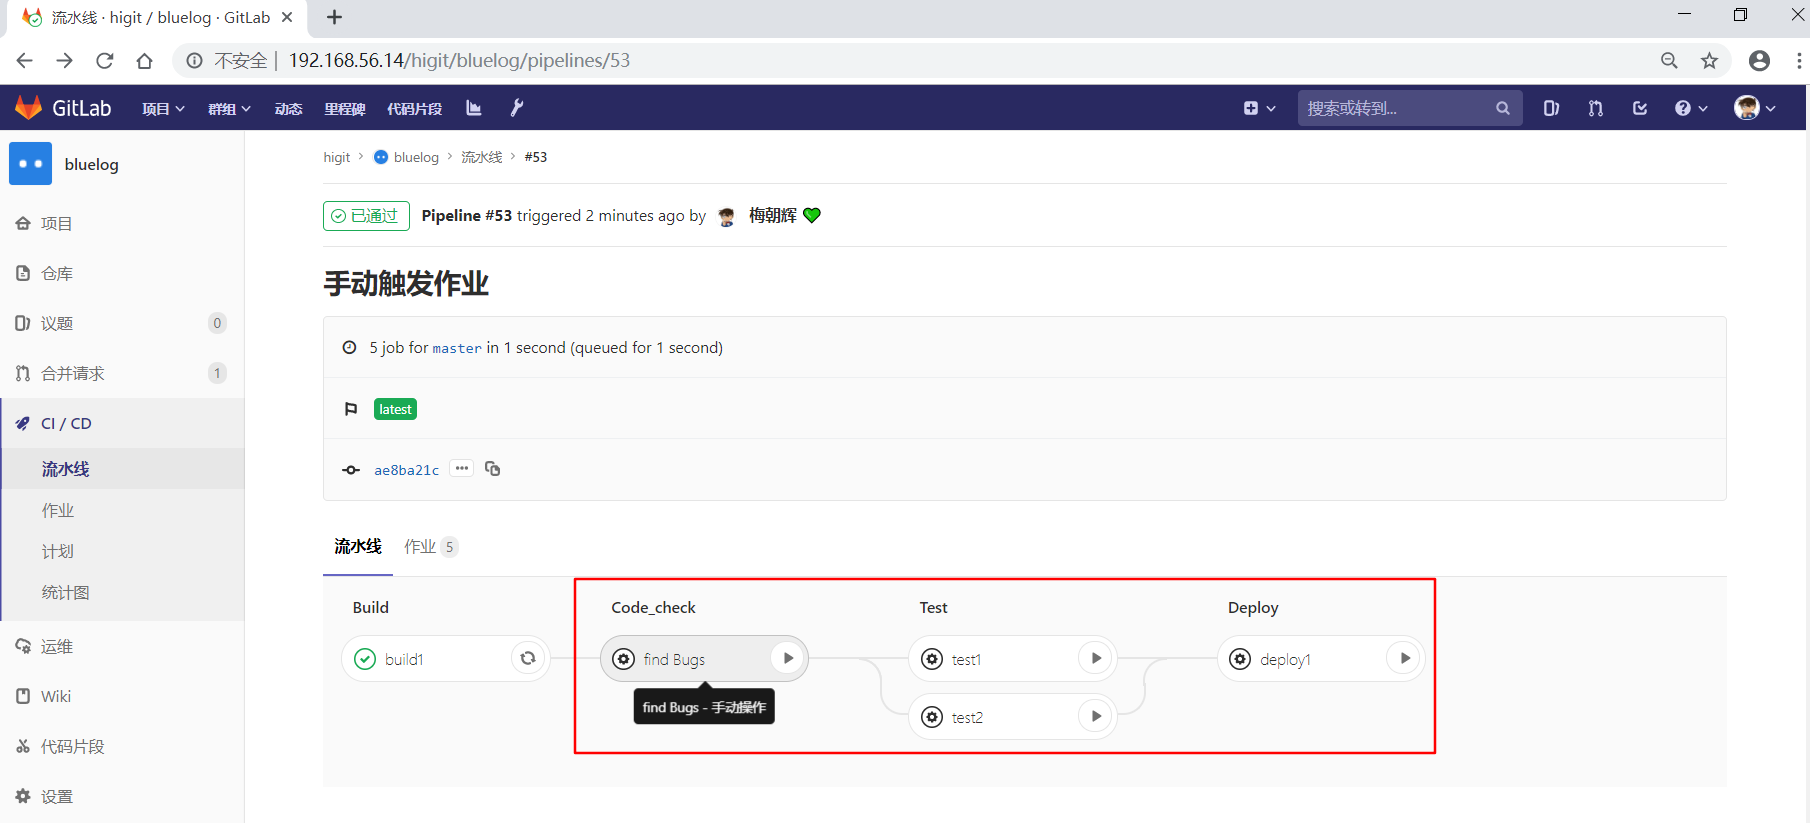
1 2 3 4 5 6 7 8 9 10 11 12 13 14 15 16 17 18 19 20 21 22 23 24 25 26 27 28 29 30 31 32 33 34 35 36 37 38 39 40 41 42 43 44 45 46 47 48 49 50 51 52 53 54 55 56 57 58 59 60 61 62 63 64 65 66 67 68 stages: - build - code_check - test - deploy build1: stage: build script: - pwd - export - echo "Do your build here" - echo "GIT_STRATEGY:${GIT_STRATEGY}" - du -sh - ls -lah README.md tags: - bluelog find Bugs: stage: code_check variables: GIT_STRATEGY: "fetch" script: - pwd - echo "GIT_STRATEGY:${GIT_STRATEGY}" - du -sh - ls -lah README.md when: manual tags: - bluelog test1: stage: test variables: GIT_STRATEGY: "clone" script: - pwd - echo "GIT_STRATEGY:${GIT_STRATEGY}" - du -sh - ls -lah README.md when: manual tags: - bluelog test2: stage: test variables: GIT_STRATEGY: "none" script: - echo "GIT_STRATEGY:${GIT_STRATEGY}" - du -sh - ls -lah README.md when: manual tags: - bluelog deploy1: stage: deploy script: - echo "Do your deploy here" - du -sh - ls -lah README.md when: manual tags: - bluelog
提交后,流水线触发了,但有build1作业后面的作业需要手动执行:
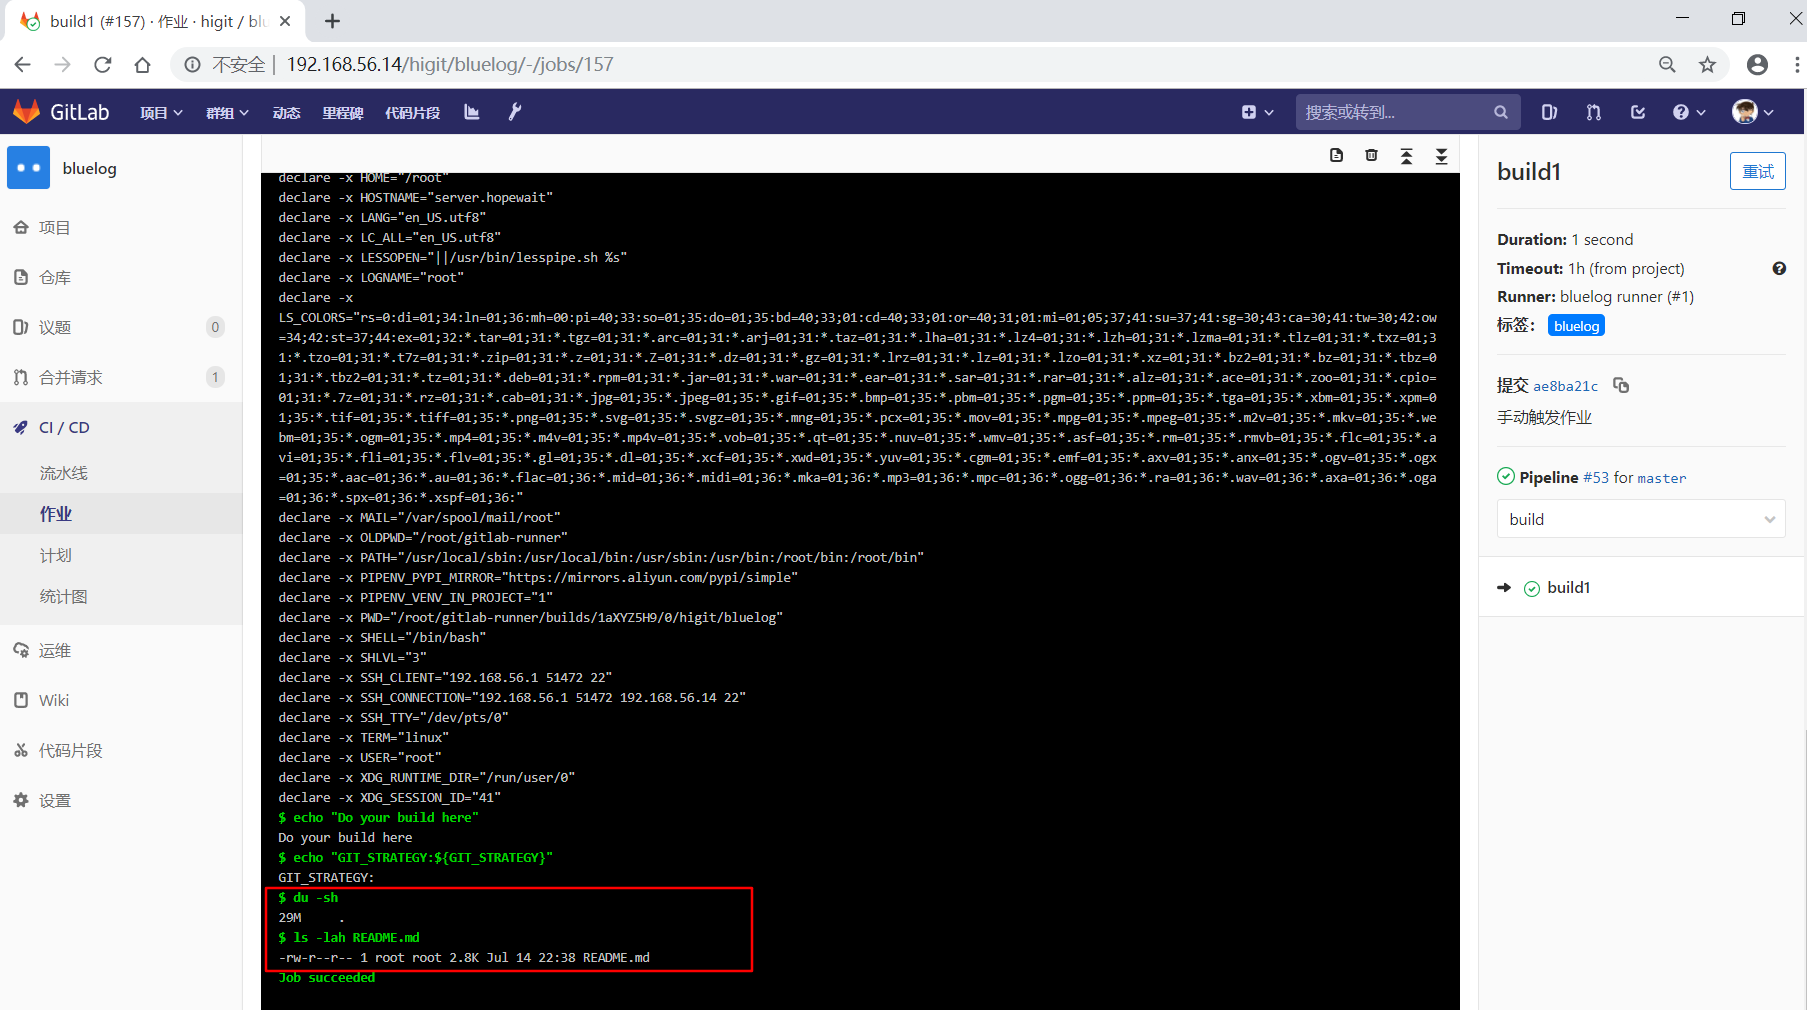
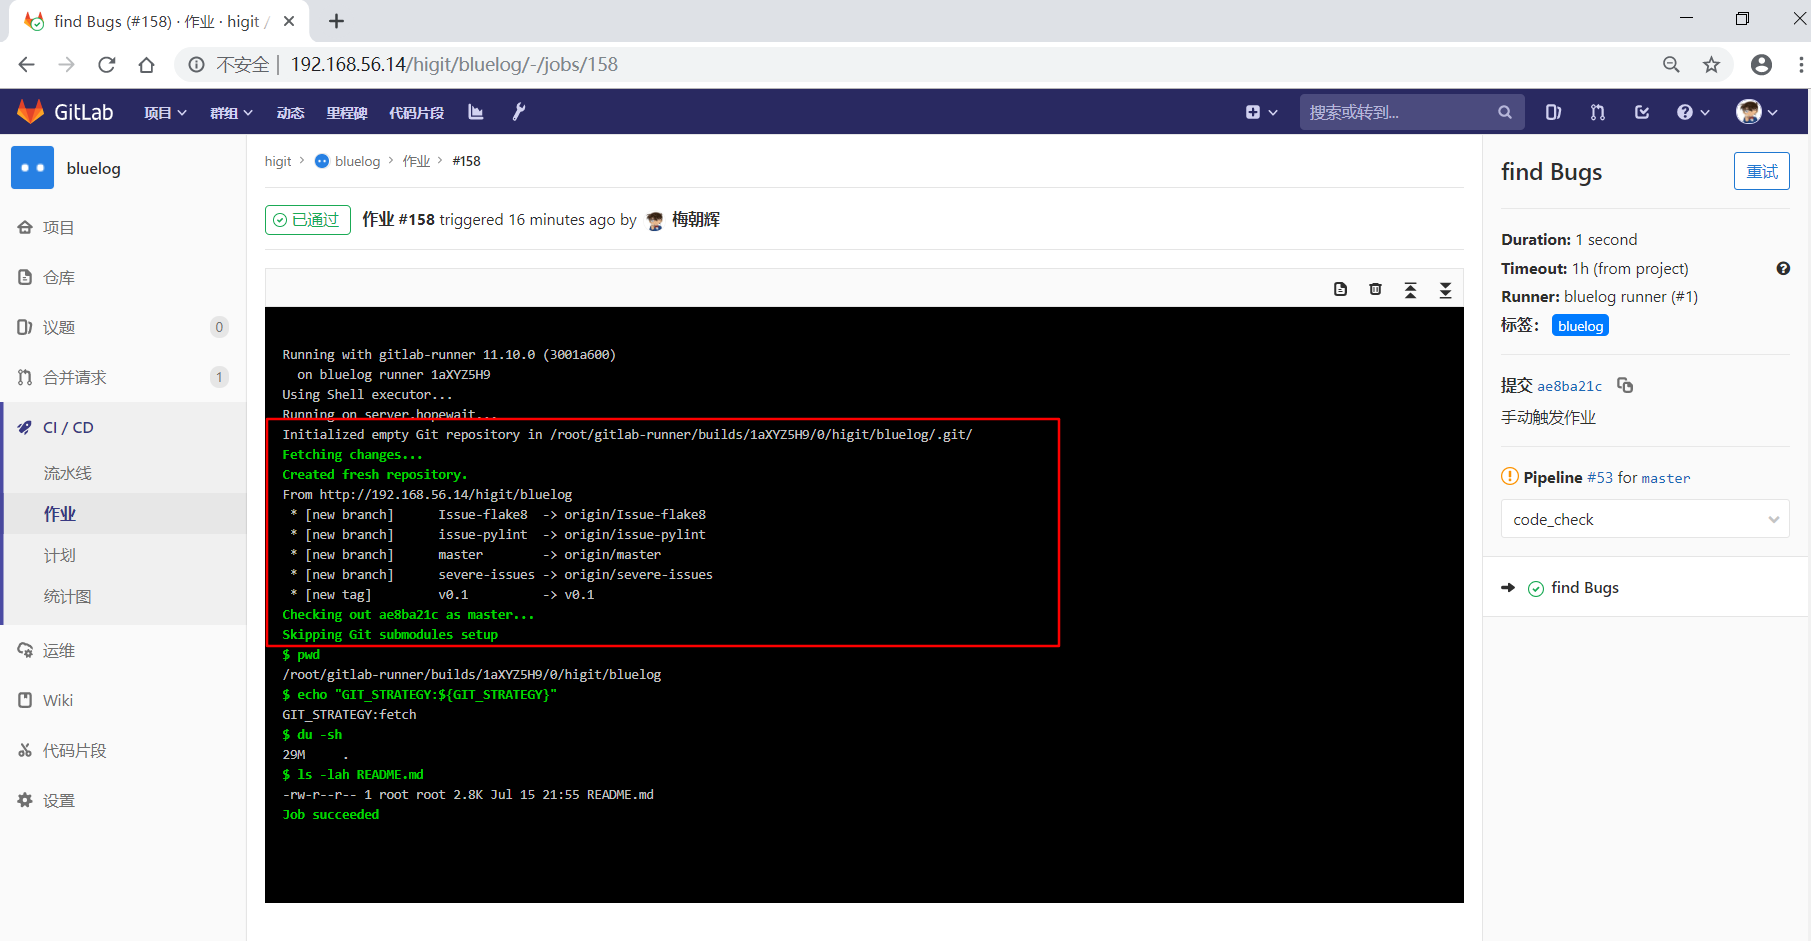
我们检查build1作业:
可以获取到整个仓库的大小,也可以读取到仓库中”README.md”文件。
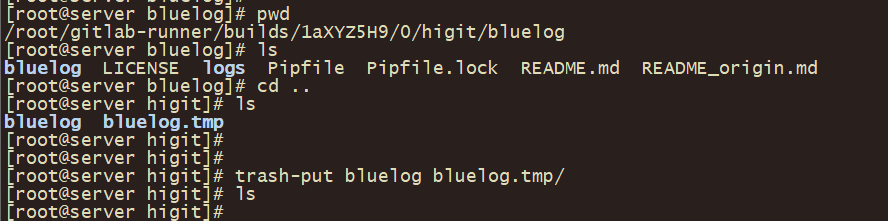
假设我们此时在服务器端将/root/gitlab-runner/builds/1aXYZ5H9/0/higit/bluelog和/root/gitlab-runner/builds/1aXYZ5H9/0/higit/bluelog.tmp目录删除,并触发find Bugs作业运行:
因为设置了GIT_STRATEGY: "fetch",但因为我把项目空间里面的本地仓库内容都删除了,这个时候GitLab Runner发现本地并没有远程仓库的文件,只能从头开始克隆远程仓库,最后打印出打印${GIT_STRATEGY}变量的值为fetch。
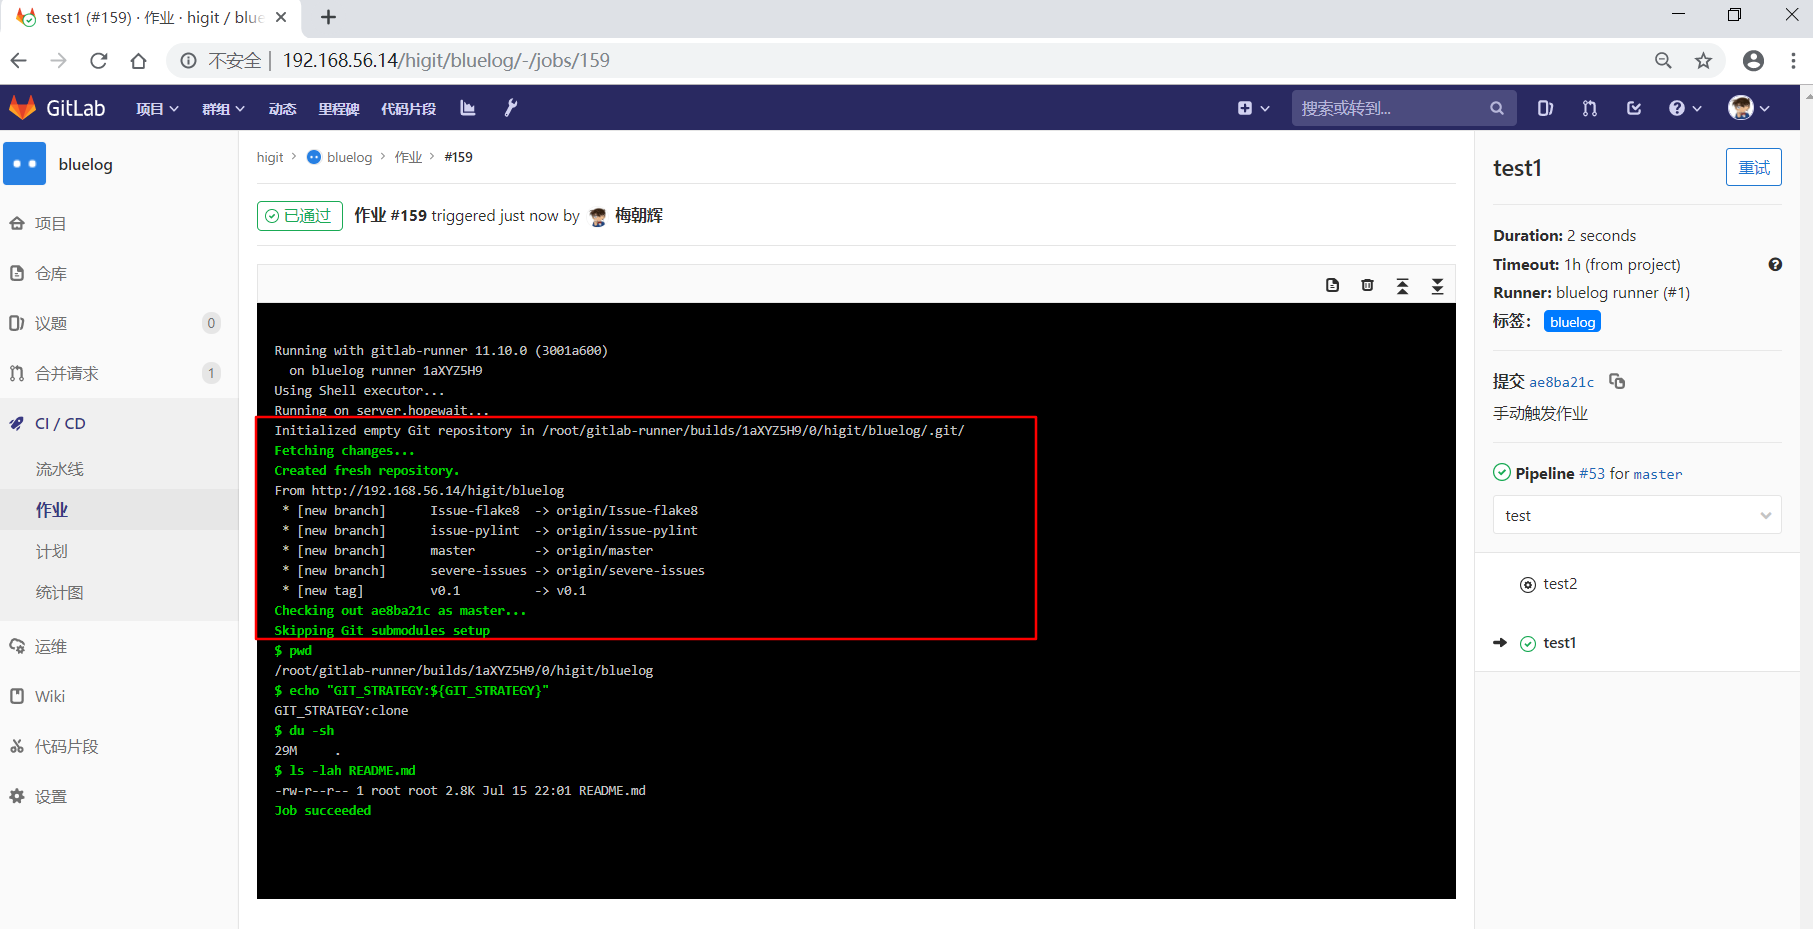
再触发test1作业运行,还是从头开始下载远程仓库:
关键一步,我们再次删除工作空间中的/root/gitlab-runner/builds/1aXYZ5H9/0/higit/bluelog和/root/gitlab-runner/builds/1aXYZ5H9/0/higit/bluelog.tmp目录:
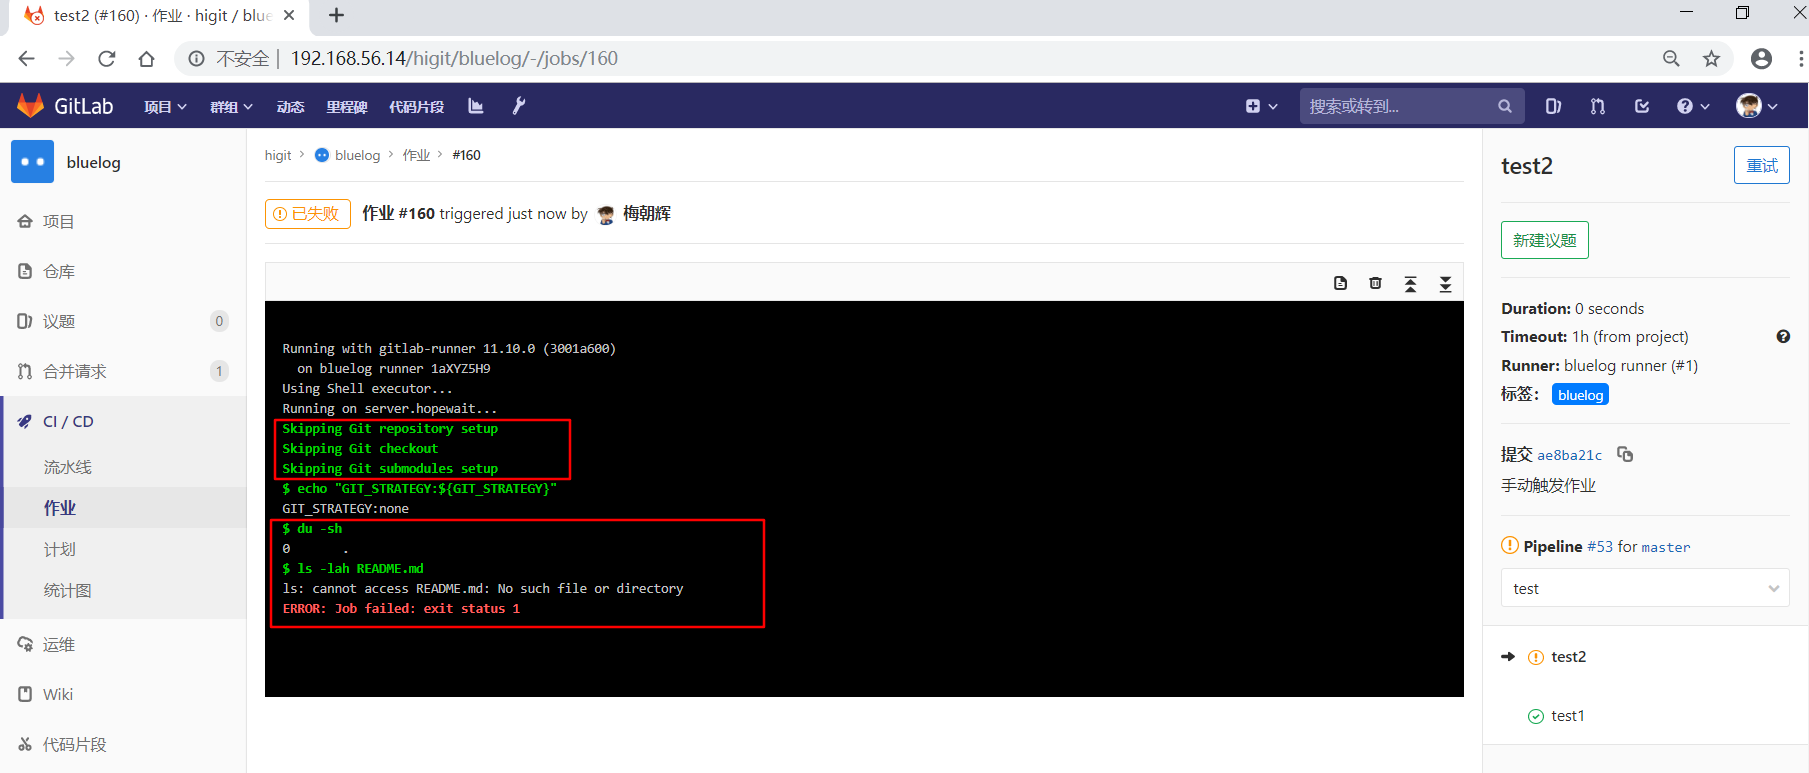
再触发test2作业运行:
此时发现,GitLab Runner仅仅创建了一个目录bluelog,但不从远程获取数据,这个时候我们获取仓库目录数据大小为0,也查看不到README.md文件的详情,由于没有README.md文件,执行命令就报错。
可以看出设置GIT_STRATEGY: "none"可能会遇到意想不到的情况!
为了加快流水线工程的执行,建议使用fetch模式。
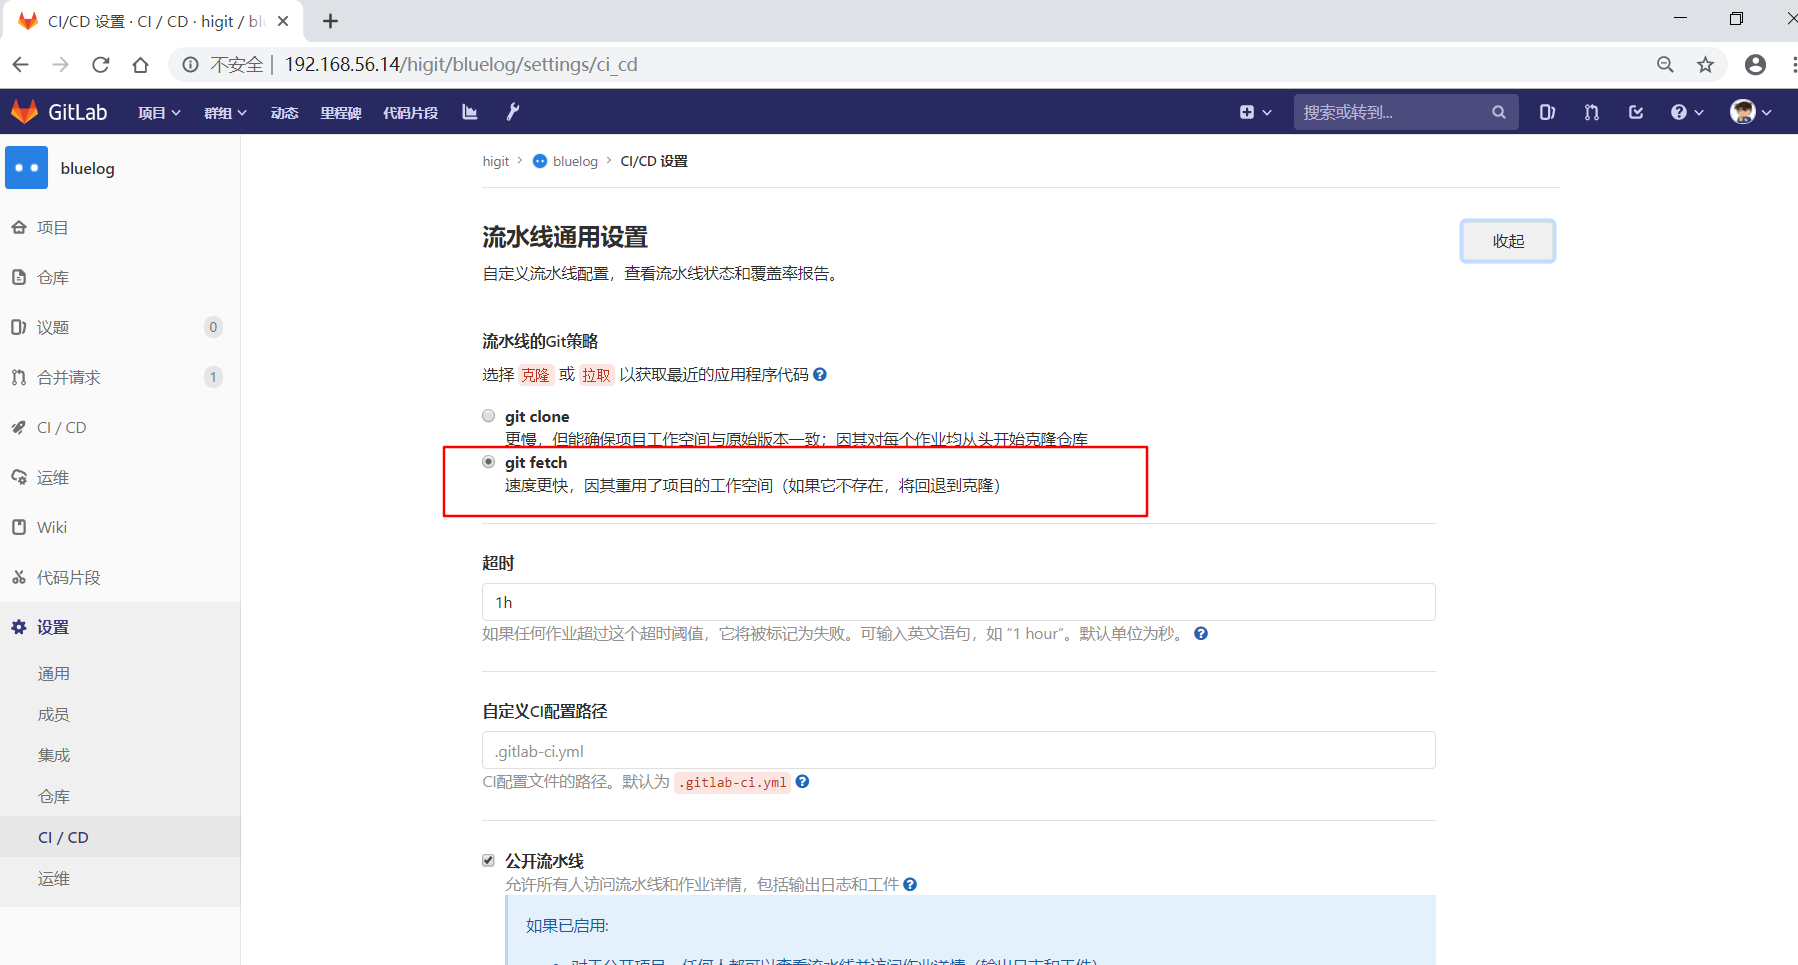
流水线的Git策略默认是git fetch模式。
流水线的默认Git策略,可以在项目的流水线通用设置中查看:
子模块策略Git submodule strategy GIT_SUBMODULE_STRATEGY
GIT_SUBMODULE_STRATEGY类似于GIT_STRATEGY,当你的项目需要包含别的项目代码时,可以将别的项目作为你的项目的子模块,这个时候就可以使用GIT_SUBMODULE_STRATEGY。GIT_SUBMODULE_STRATEGY默认取值none,即拉取代码时,子模块不会被引入。GIT_SUBMODULE_STRATEGY可取值normal,意味着在只有顶级子模块会被引入。GIT_SUBMODULE_STRATEGY可取值recursive,递归的意思,意味着所有级子模块会被引入。
子模块需要配置在.gitmodules配置文件中,下面是两个示例:
场景:
你的项目地址:https://gitlab.com/secret-group/my-project,你可以使用git clone git@gitlab.com:secret-group/my-project.git检出代码。
你的项目依赖https://gitlab.com/group/project,你可以将这个模块作为项目的子模块。
子模块与本项目在同一个服务上,可以使用相对引用:
1 2 3 [submodule "project" ]path = project url = ../../group/project.git
子模块与本项目不在同一个服务上,使用相对绝对URL:
1 2 3 [submodule "project-x" ]path = project-x url = https://gitserver.com/group/project-x.git
详细可参考 Using Git submodules with GitLab CI
检出分支设置Git checkout GIT_CHECKOUT
当GIT_STRATEGY设置为fetch或者clone时,可以通过GIT_CHECKOUT变量设置是否需要做git checkout操作,如果未指定该参数,默认值为true,即需要做git checkout操作。
可以在全局级或作业级进行设置。
如果GIT_CHECKOUT变量设置为true,GitLab Runner都会将本地工作副本检出并切换到当前流水线相关的修订版本分支上。
如果GIT_CHECKOUT变量设置为false,那么运行器操作如下:
fetch操作时,更新仓库并在当前版本上保留工作副本。clone操作时,克隆仓库并在默认分支中保留工作副本。
下面示例不进行自动切换到分支:
1 2 3 4 5 6 variables: GIT_STRATEGY: clone GIT_CHECKOUT: "false" script: - git checkout -B master origin/master - git merge $CI_COMMIT_SHA
清理工作Git clean flags GIT_CLEAN_FLAGS
可以使用GIT_CLEAN_FLAGS变量来控制在检出源码后git clean的默认行为,可以在全局级或作业级进行设置。
GIT_CLEAN_FLAGS变量接受 git clean命令的所有参数。如果指定了GIT_CHECKOUT: "false",那么git clean将不可用。
git-clean: Remove untracked files from the working tree,即删除未跟踪的文件。git clean命令用来从你的工作目录中删除所有没有tracked过的文件,git reset --hard用于删除跟踪文件的修改记录。git clean -n命令列出将被删除的文件。git clean -f命令删除当前目录下所有没有跟踪过的文件。git clean -d命令删除当前目录下所有没有跟踪过的目录。git clean -e <pattern>命令排除(--exclude=<pattern>) 某文件或目录,即不删除模式匹配的文件。git clean -ffxd命令删除当前目录(包括由其他git仓库管理的子目录)下所有没有跟踪过的目录和文件。GIT_CLEAN_FLAGS变量未指定时,git clean命令的参数是-ffxd。GIT_CLEAN_FLAGS变量指定为none时,git clean命令不会执行。
下面示例用于删除未被跟踪文件和目录,但排除cache目录及目录下的文件:
1 2 3 4 variables: GIT_CLEAN_FLAGS: -ffdx -e cache/ script: - ls -al cache/
作业重试次数 Job stages attempts
您可以设置正在运行的作业尝试执行以下每个阶段的尝试次数。可以在全局级或作业级进行设置。
涉及三个变量GET_SOURCES_ATTEMPTS、ARTIFACT_DOWNLOAD_ATTEMPTS、RESTORE_CACHE_ATTEMPTS。
GET_SOURCES_ATTEMPTS变量设置获取源码的尝试次数。ARTIFACT_DOWNLOAD_ATTEMPTS变量设置下载归档文件的尝试次数。RESTORE_CACHE_ATTEMPTS变量设置重建缓存的尝试次数。默认是1次尝试。
示例:
1 2 variables: GET_SOURCES_ATTEMPTS: 3
浅克隆 Shallow cloningGIT_DEPTH
GitLab 8.9中引入了试验性的特征浅克隆,在将来的版本中有可能改变或者完全移除。
可以通过设置GIT_DEPTH克隆深度,不详细介绍,可参考Shallow cloning
废弃的关键字types和type
关键字types和type已经废弃。
使用stages阶段定义关键字代替types。
使用stage作业所处阶段关键字代替type。
使用GIT_CLONE_PATH自定义构建目录
在默认情况下,自定义构建目录只有在GitLab Runner运行器配置文件中定义了custom_build_dir为enabled开启状态时才可使用。
docker、kubernetes运行器默认开启了此功能,而其他运行器默认不会开启此功能。默认情况下,GitLab Runner运行器将仓库克隆到$CI_BUILDS_DIR目录下的一个名称唯一的子目录中,但有时候你的项目可能需要指定一个特殊的路径用来保存下载的仓库,这个时候就可以使用GIT_CLONE_PATH变量来指定克隆文件的存放目录。
GIT_CLONE_PATH 必须是$CI_BUILDS_DIR的子目录,$CI_BUILDS_DIR目录各个运行器可能不同。
我们尝试在我们的SHELL运行器上去设置GIT_CLONE_PATH目录。
下面是官方给出的一个示例:
1 2 3 4 5 6 variables: GIT_CLONE_PATH: $CI_BUILDS_DIR/project-name test: script: - pwd
我们仿照这个示例修改.gitlab-ci.yml配置文件,并进行提交,修改后的内容如下:
1 2 3 4 5 6 7 8 9 10 11 12 13 14 15 16 17 18 19 20 21 22 23 24 25 26 27 28 29 30 31 32 33 34 35 36 37 38 39 40 41 42 43 44 45 46 47 48 49 50 51 52 53 54 55 56 57 58 59 60 61 62 63 64 65 66 67 68 69 70 71 72 73 74 75 76 77 78 79 80 variables: SQLALCHEMY_DATABASE_URI: 'mysql+pymysql://root:root@localhost:3306/bluelog?charset=utf8mb4' SQLALCHEMY_TRACK_MODIFICATIONS: "False" SQLALCHEMY_ECHO: "True" GIT_CLONE_PATH: $CI_BUILDS_DIR/global_folder stages: - build - code_check - test - deploy build1: stage: build variables: SQLALCHEMY_DATABASE_URI: 'mysql+pymysql://root:123456@localhost:3306/bluelog?charset=utf8mb4' SQLALCHEMY_ECHO: "False" GIT_CLONE_PATH: $CI_BUILDS_DIR/sub_folder script: - pwd - export - echo "Do your build here" - cloc --version - echo -e "SQLALCHEMY_DATABASE_URI:${SQLALCHEMY_DATABASE_URI}" - echo -e "SQLALCHEMY_TRACK_MODIFICATIONS:${SQLALCHEMY_TRACK_MODIFICATIONS}" - echo -e "SQLALCHEMY_ECHO:${SQLALCHEMY_ECHO}" tags: - bluelog find Bugs: stage: code_check script: - pwd - echo -e "SQLALCHEMY_DATABASE_URI:${SQLALCHEMY_DATABASE_URI}" - echo -e "SQLALCHEMY_TRACK_MODIFICATIONS:${SQLALCHEMY_TRACK_MODIFICATIONS}" - echo -e "SQLALCHEMY_ECHO:${SQLALCHEMY_ECHO}" - SQLALCHEMY_ECHO="Nothing" - echo -e "SQLALCHEMY_ECHO:${SQLALCHEMY_ECHO}" tags: - bluelog test1: stage: test variables: CKEDITOR_SERVE_LOCAL: "True" script: - pwd - echo -e "SQLALCHEMY_DATABASE_URI:${SQLALCHEMY_DATABASE_URI}" - echo -e "SQLALCHEMY_TRACK_MODIFICATIONS:${SQLALCHEMY_TRACK_MODIFICATIONS}" - echo -e "SQLALCHEMY_ECHO:${SQLALCHEMY_ECHO}" - echo -e "CKEDITOR_SERVE_LOCAL:${CKEDITOR_SERVE_LOCAL}" tags: - bluelog test2: stage: test script: - echo "Do another parallel test here" - echo "For example run a lint test" tags: - bluelog deploy1: stage: deploy script: - echo "Do your deploy here" tags: - bluelog
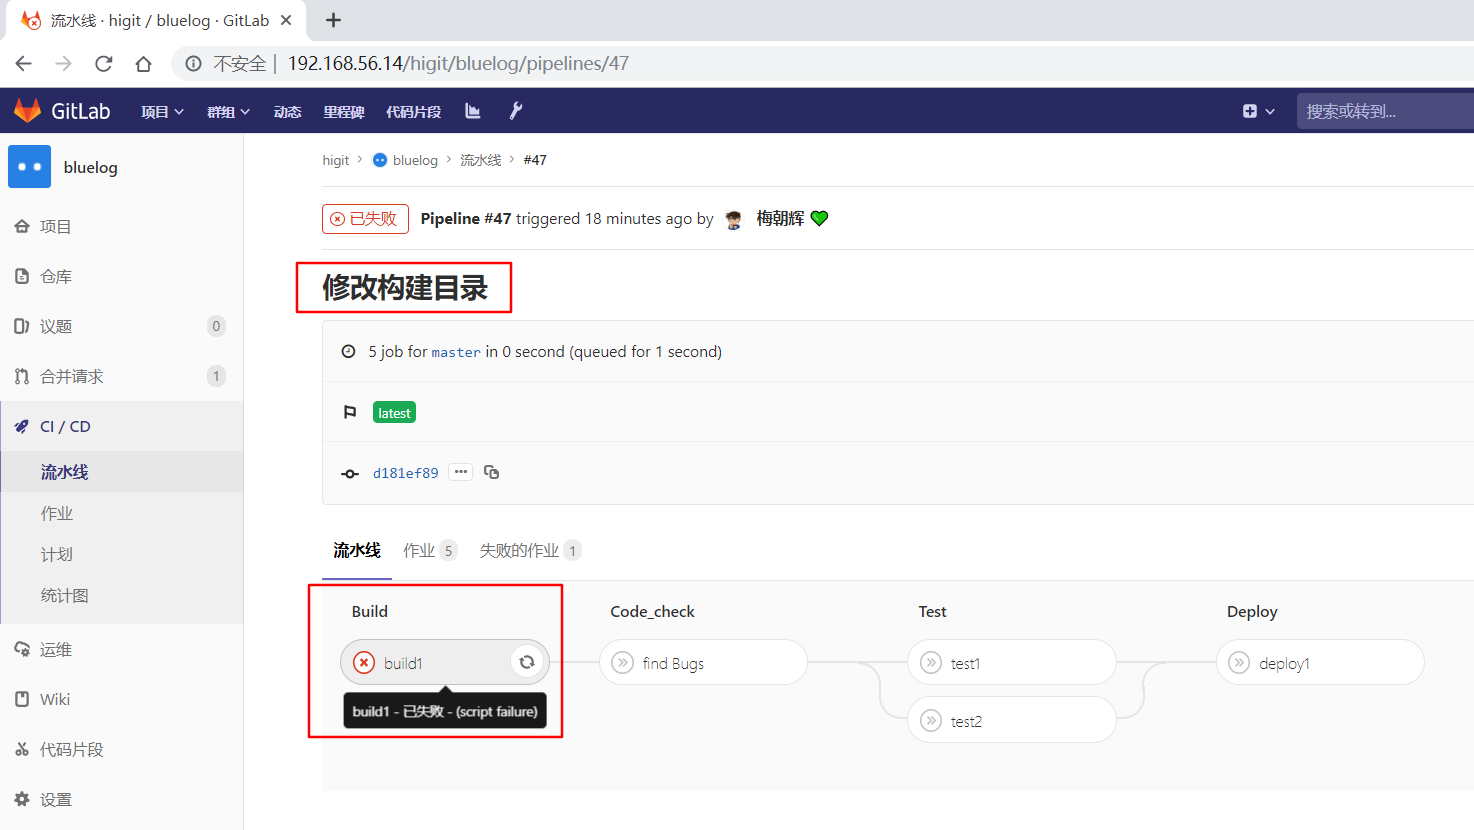
提交修改构建目录后,流水线执行失败:
查看作业详情:
可以看到提示”ERROR: Job failed: setting GIT_CLONE_PATH is not allowed, enable custom_build_dirfeature”
意思是说不允许设置GIT_CLONE_PATH变量,需要设置custom_build_dir属性。
我们参考 The runners.custom_build_dir section
来设置custom_build_dir属性。
我们查看一下GitLab Runner的配置文件内容:
1 2 3 4 5 6 7 8 9 10 11 12 13 14 15 16 [root@server ~]"bluelog runner" "http://192.168.56.14/" "1aXYZ5H9n2y8oauWkz7D" "shell"
我们参考示例:
1 2 [runners.custom_build_dir]
开启custom_build_dir属性,修改后配置文件内容如下:
1 2 3 4 5 6 7 8 9 10 11 12 13 14 15 16 17 [root@server ~]"bluelog runner" "http://192.168.56.14/" "1aXYZ5H9n2y8oauWkz7D" "shell" true
重新触发”build1”作业,看看效果。
此时可以看到,作业开始运行了,并且在/root/gitlab-runner/builds目录下生成了四个folder相关的目录:
1 2 3 4 5 6 7 [root@server builds]
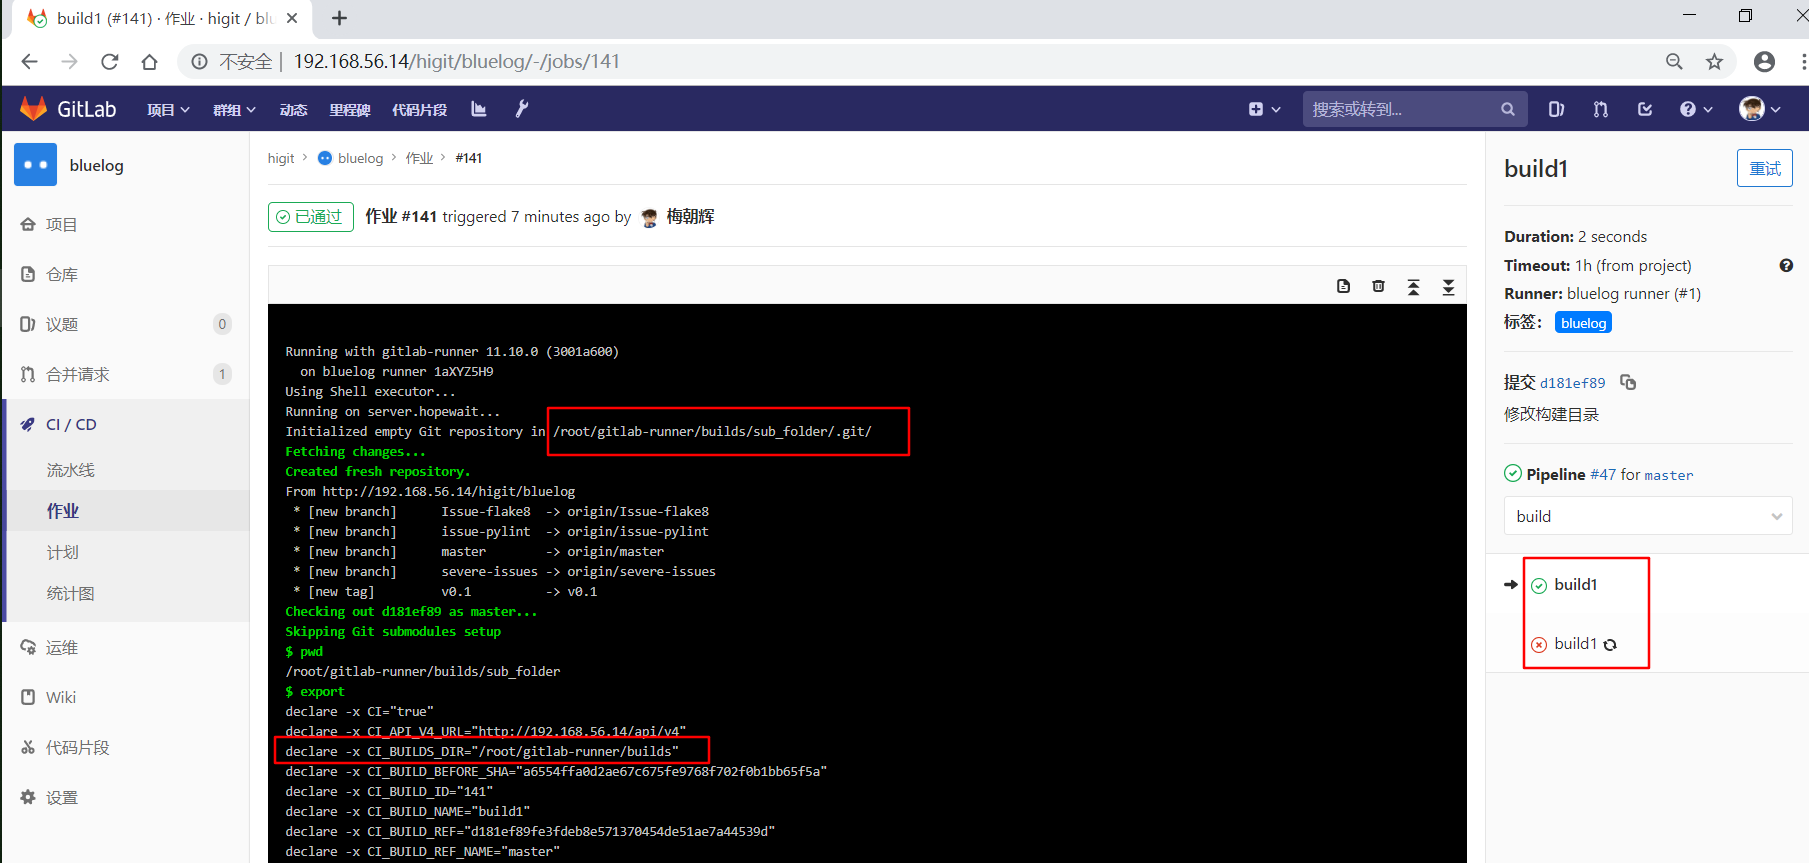
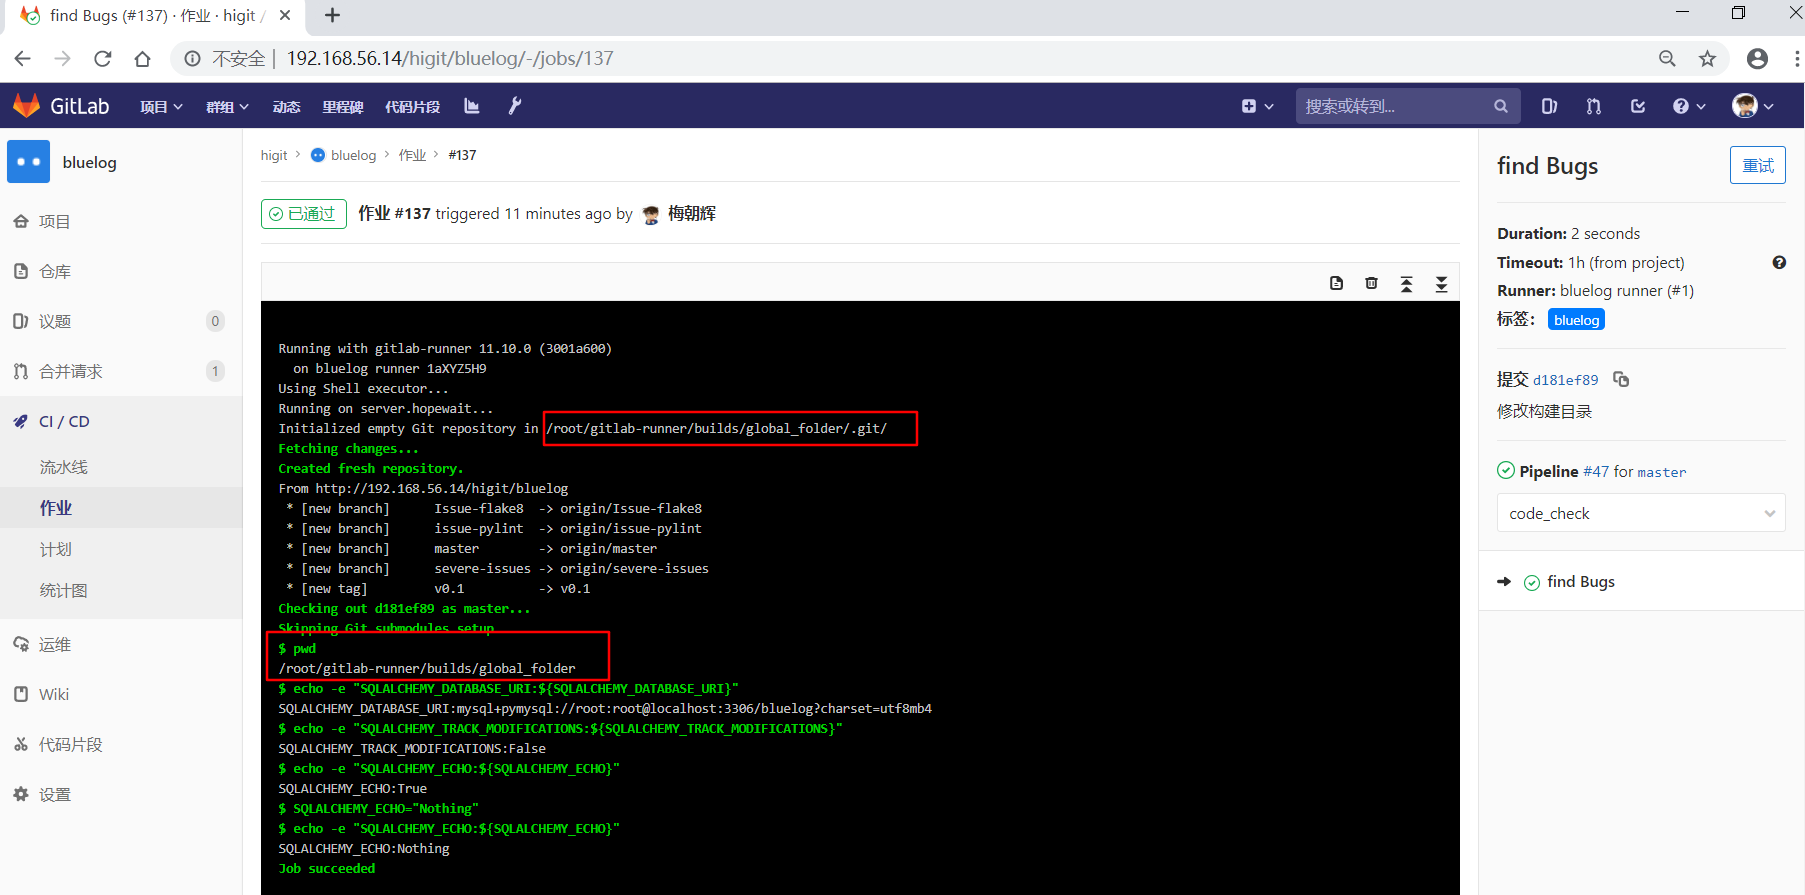
查看”build1”和”find Bugs”作业的详情:
可以看到”build1”作业使用作业级定义的GIT_CLONE_PATH: $CI_BUILDS_DIR/sub_folder,仓库会被下载到/root/gitlab-runner/builds/sub_folder目录下。
可以看到”build1”作业使用全局级定义的GIT_CLONE_PATH: $CI_BUILDS_DIR/global_folder,仓库会被下载到/root/gitlab-runner/builds/global_folder目录下。
当执行器配置并发数concurrent大于1时,有可能导致作业运行失败,因为有可能多个作业都运行在相同的目录上,GitLab Runner运行器并不会去阻止这种情形,管理员和开发人员必须遵守Runner配置的要求。
要避免这种情况,您可以在$CI_BUILDS_DIR中使用唯一路径,因为Runner公开了另外两个提供唯一并发ID的变量:
$CI_CONCURRENT_ID:给定执行程序中运行的所有作业的唯一ID。$CI_CONCURRENT_PROJECT_ID:在给定执行程序和项目中运行的所有作业的唯一ID。在任何场景和任何执行器中都应该运行良好的最稳定的配置是在GIT_CLONE_PATH中使用$CI_CONCURRENT_ID。
例如:
1 2 3 4 5 6 variables: GIT_CLONE_PATH: $CI_BUILDS_DIR/$CI_CONCURRENT_ID/project-name test: script: - pwd
GIT_CLONE_PATH变量最多只能扩展一次,不支持嵌套的变量路径。
下面定义了两个变量:
1 2 3 variables: GOPATH: $CI_BUILDS_DIR/go GIT_CLONE_PATH: $GOPATH/src/namespace/project
GIT_CLONE_PATH变量扩展一次后,变量成了$CI_BUILDS_DIR/go/src/namespace/project,这个时候在路径中有一个变量,而GIT_CLONE_PATH变量不会再次扩展$CI_BUILDS_DIR导致作业运行失败。
特殊的YAML功能 可以使用特殊的YAML功能,如锚点(&),别名(*)和合并(<<),这将使您大大降低.gitlab-ci.yml的复杂性。
隐藏关键字或作业 如果我们想暂时禁用某个作业,我们可以将该作业的所有行都注释掉,如下示例:
更好的方法是,我们在作业名称前面增加一个点号(.), 这样GitLab CI流水线就会自动处理忽略掉.hidden_job作业。
改成下面这样:
1 2 3 .hidden_job: script: - run test
锚点可以让你容易复制文档内容,锚点可以用来复制或继承某些属性,锚点与隐藏作业一起使用可提供作业模板。
下面的例子使用锚点和合并创建了两个作业,test1和test2,两个作业都是继承自隐藏作业.job_template,并且都有他们自己独有的工作脚本定义:
1 2 3 4 5 6 7 8 9 10 11 12 13 14 15 .job_template: &job_definition image: ruby:2.1 services: - postgres - redis test1: <<: *job_definition script: - test1 project test2: <<: *job_definition script: - test2 project
&用于设置锚点名称为job_definition,也就是给隐藏作业设置一个锚点job_definition。<<合并,将锚点定义的模板内容复制到当前作业的当前位置来。*包含锚点的名称job_definition。
扩展后的配置文件变成下面这样:
1 2 3 4 5 6 7 8 9 10 11 12 13 14 15 16 17 18 19 20 21 .job_template: image: ruby:2.1 services: - postgres - redis test1: image: ruby:2.1 services: - postgres - redis script: - test1 project test2: image: ruby:2.1 services: - postgres - redis script: - test2 project
再看另外一个示例:
1 2 3 4 5 6 7 8 9 10 11 12 13 14 15 16 17 18 19 20 21 .job_template: &job_definition script: - test project .postgres_services: services: &postgres_definition - postgres - ruby .mysql_services: services: &mysql_definition - mysql - ruby test:postgres: <<: *job_definition services: *postgres_definition test:mysql: <<: *job_definition services: *mysql_definition
扩展后是这样的:
1 2 3 4 5 6 7 8 9 10 11 12 13 14 15 16 17 18 19 20 21 22 23 24 25 26 27 .job_template: script: - test project .postgres_services: services: - postgres - ruby .mysql_services: services: - mysql - ruby test:postgres: script: - test project services: - postgres - ruby test:mysql: script: - test project services: - mysql - ruby
可以看到隐藏的关键字或者作业可以方便地用作为模板。
Triggers触发器
当使用触发器令牌触发流水线运行时,触发器可用于强制重建特定分支,标记或提交,并使用API调用。
触发器使用可参考 参数详解 。
忽略CI检查
当你提交的commit日志信息中包含[ci skip]或者[skip ci](忽略大小写),提交可以成功但是会忽略流水线的执行。
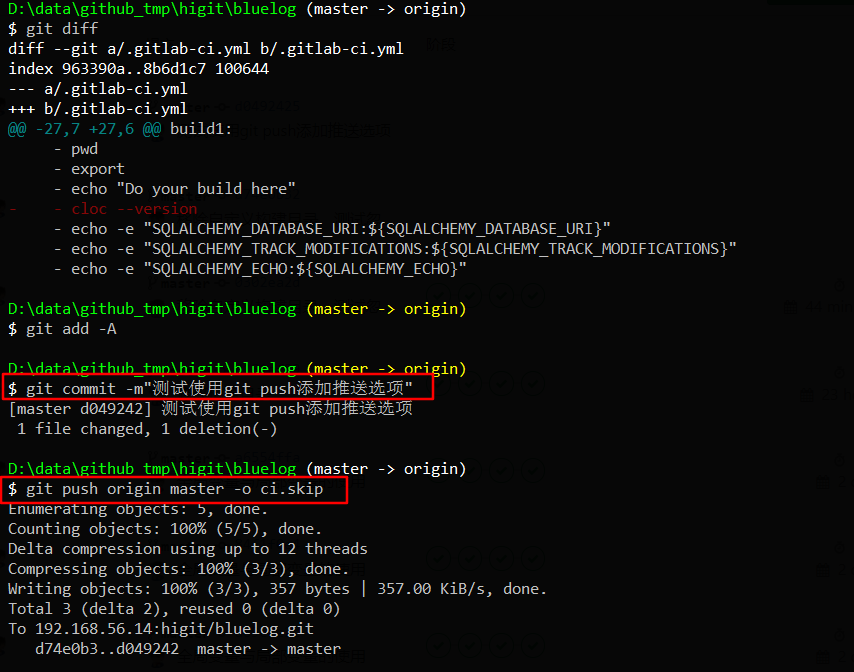
或者,在git push时添加推送选项,如git push -o ci.skip。
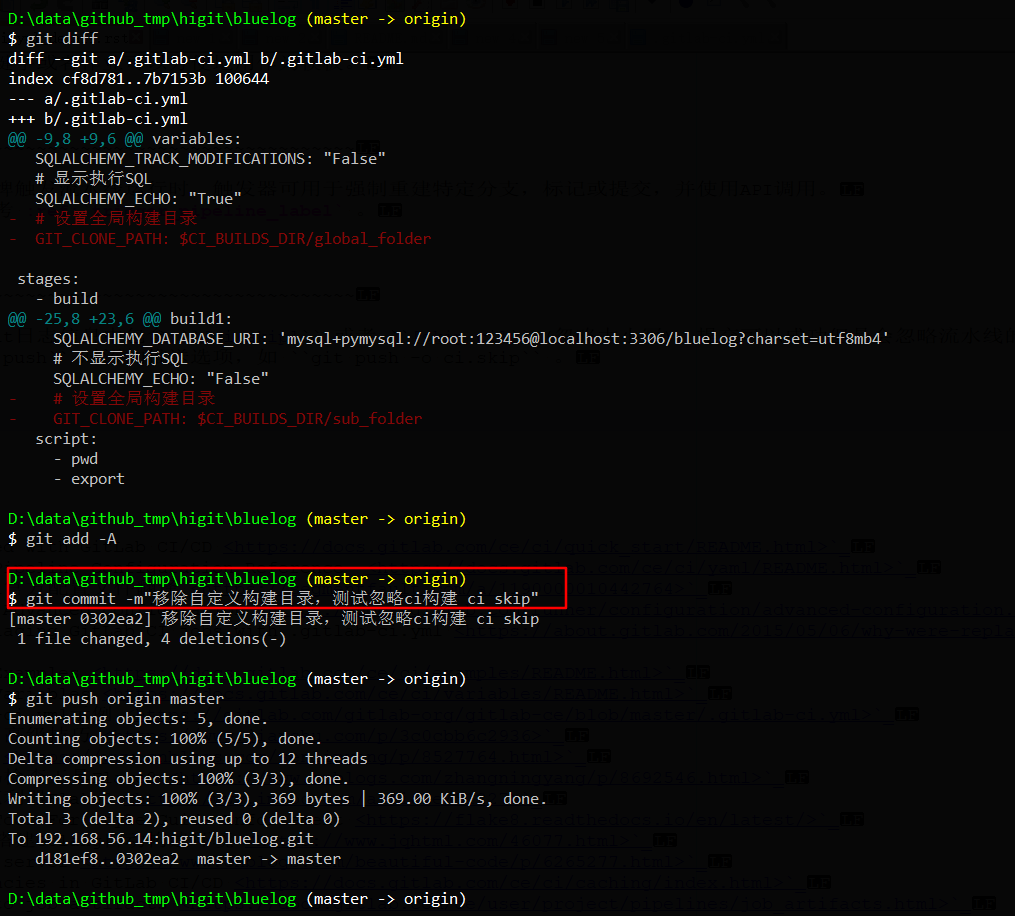
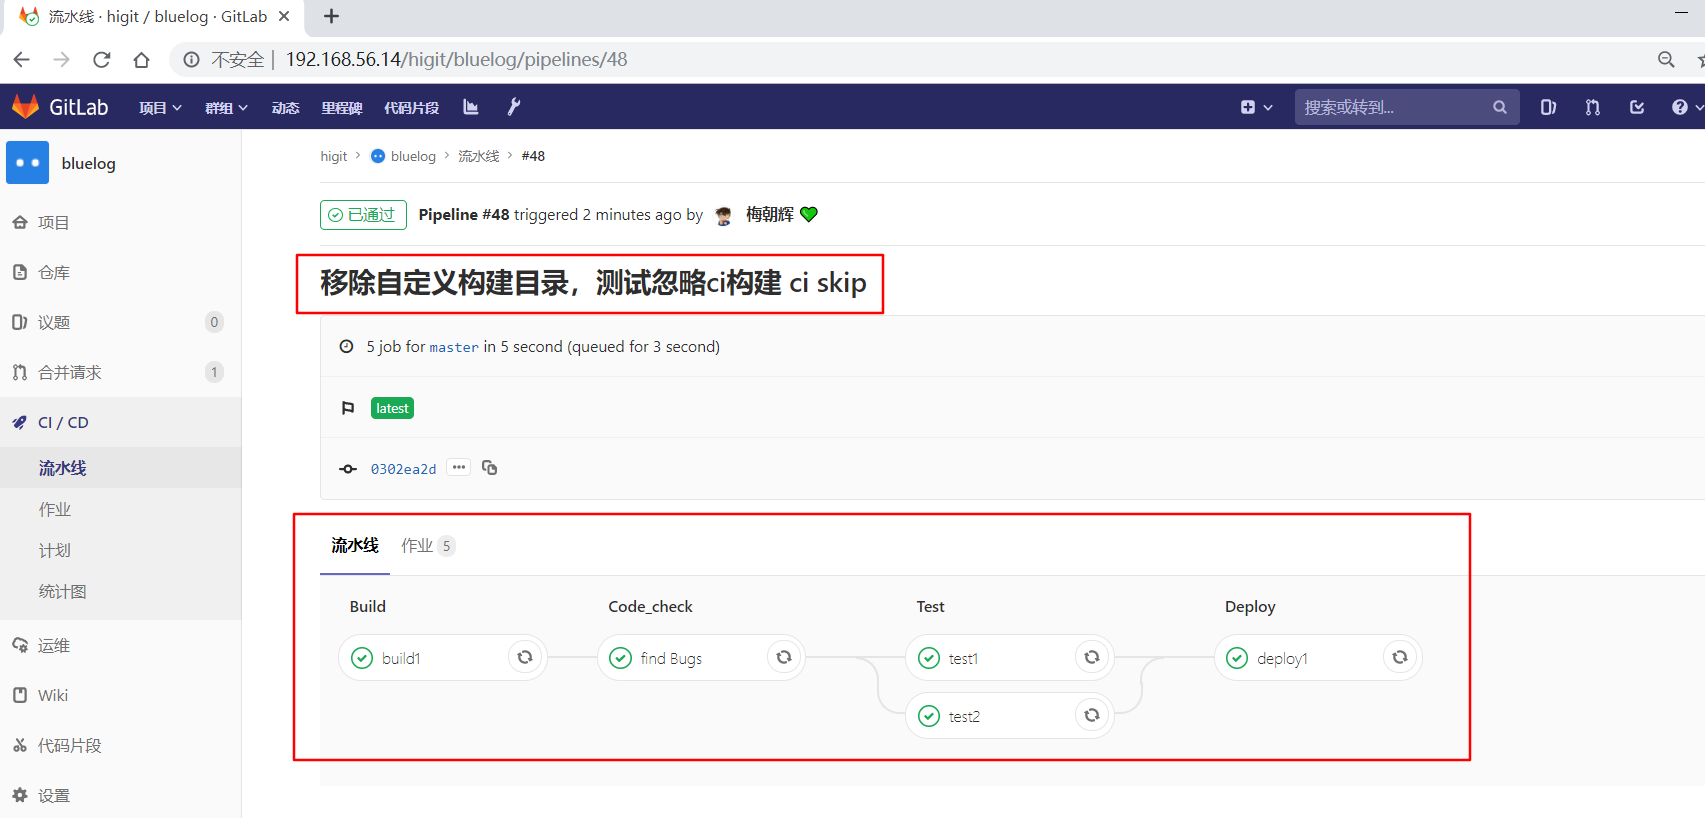
我们第一次修改配置文件,commit日志为”移除自定义构建目录,测试忽略ci构建 ci skip”,包含有ci skip关键字,但是没有左右中括号,进行提交:
但是发现流水线被触发了,正常运行了:
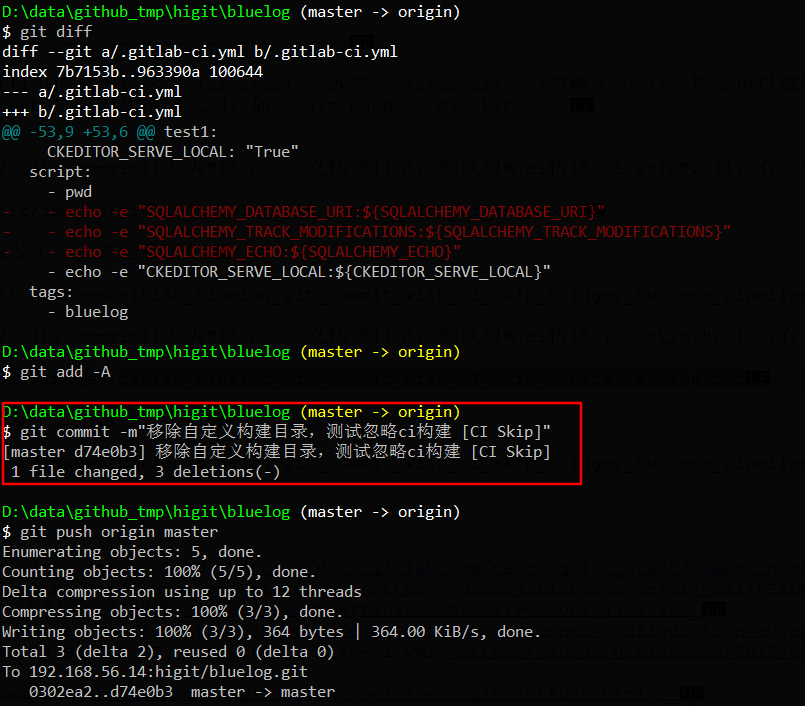
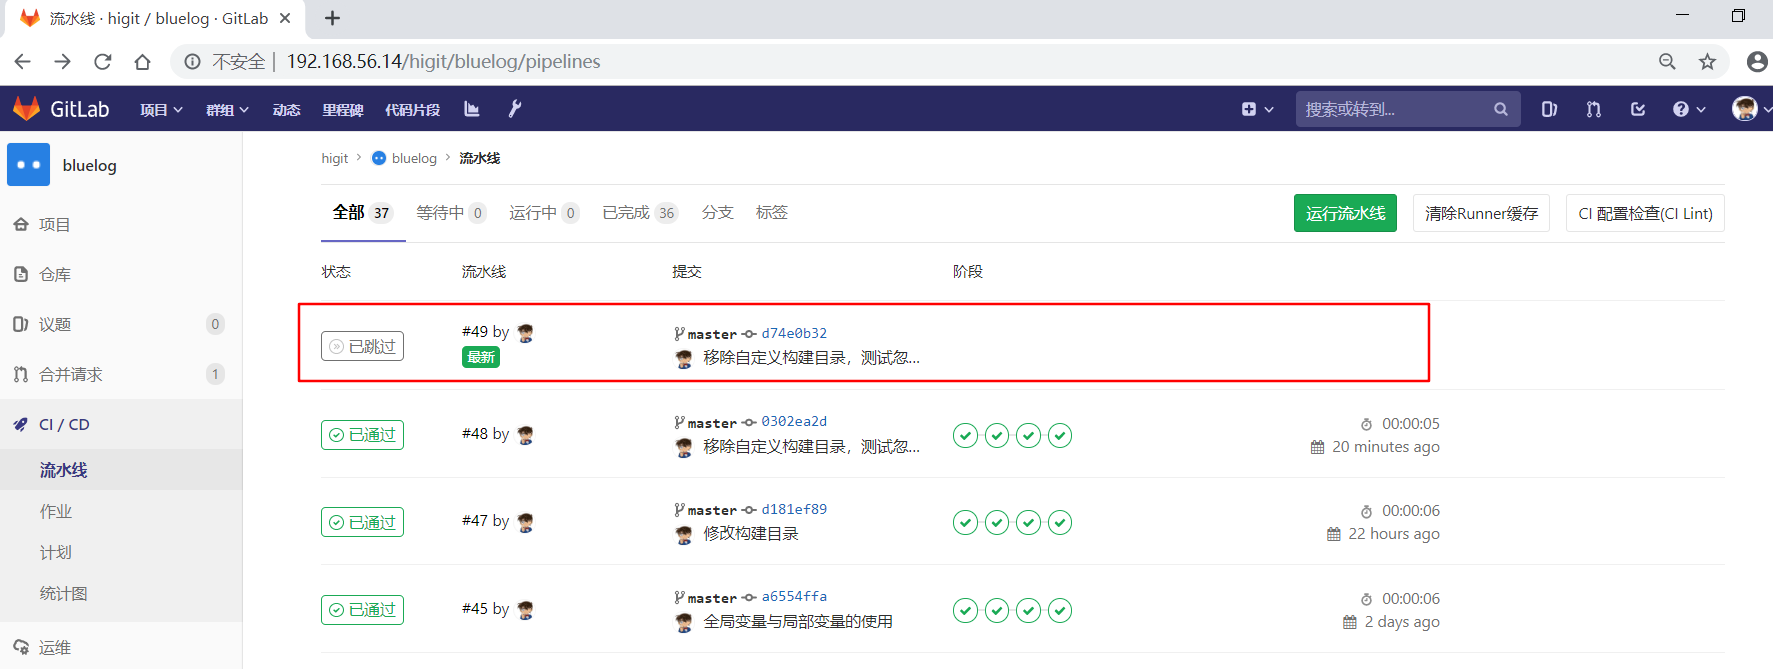
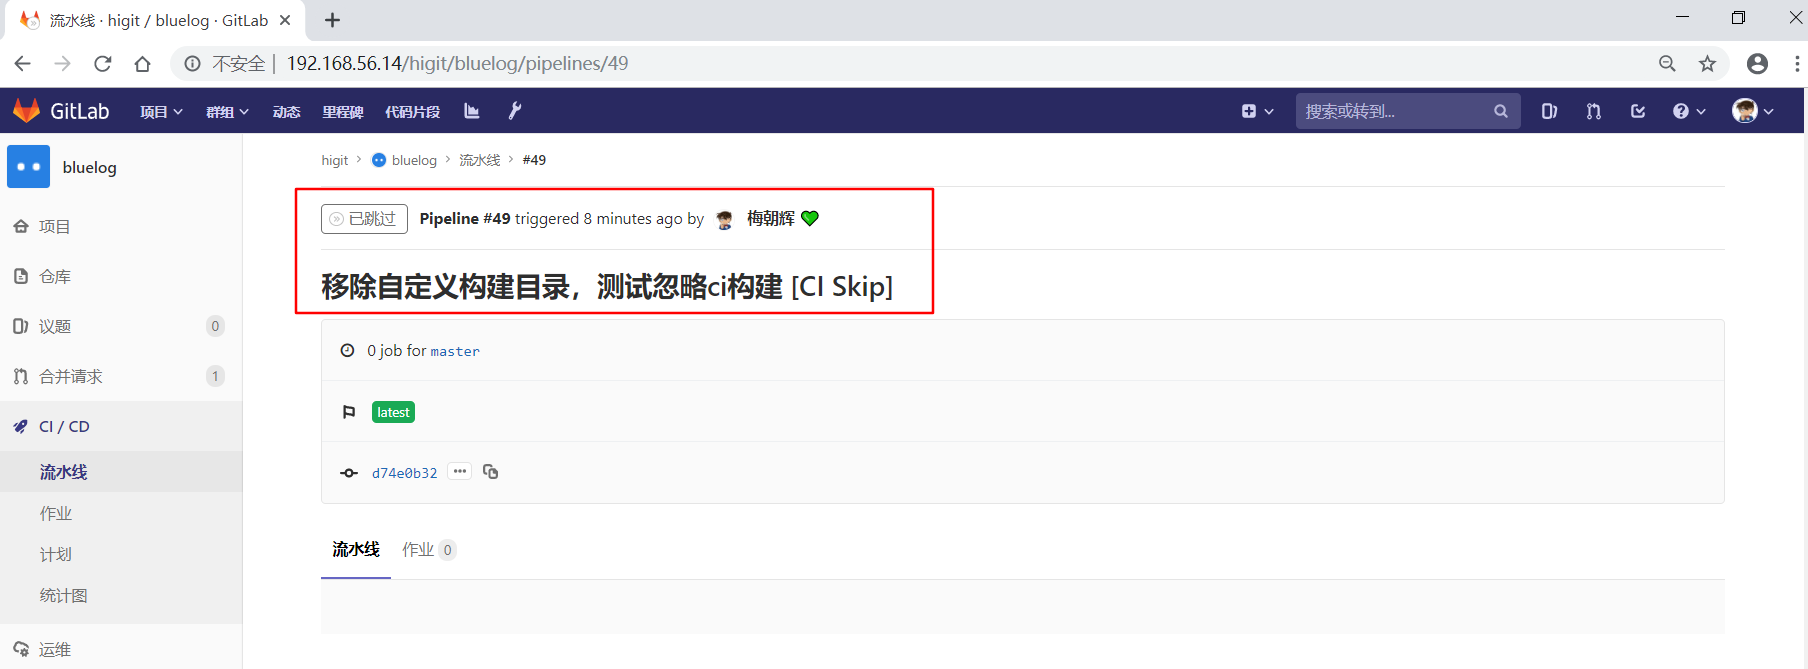
我们第二次修改配置文件,commit日志为”移除自定义构建目录,测试忽略ci构建 [CI Skip]”,包含有[CI Skip]关键字,进行提交:
可以发现流水线没有被触发,但是提交已经创建成功了:
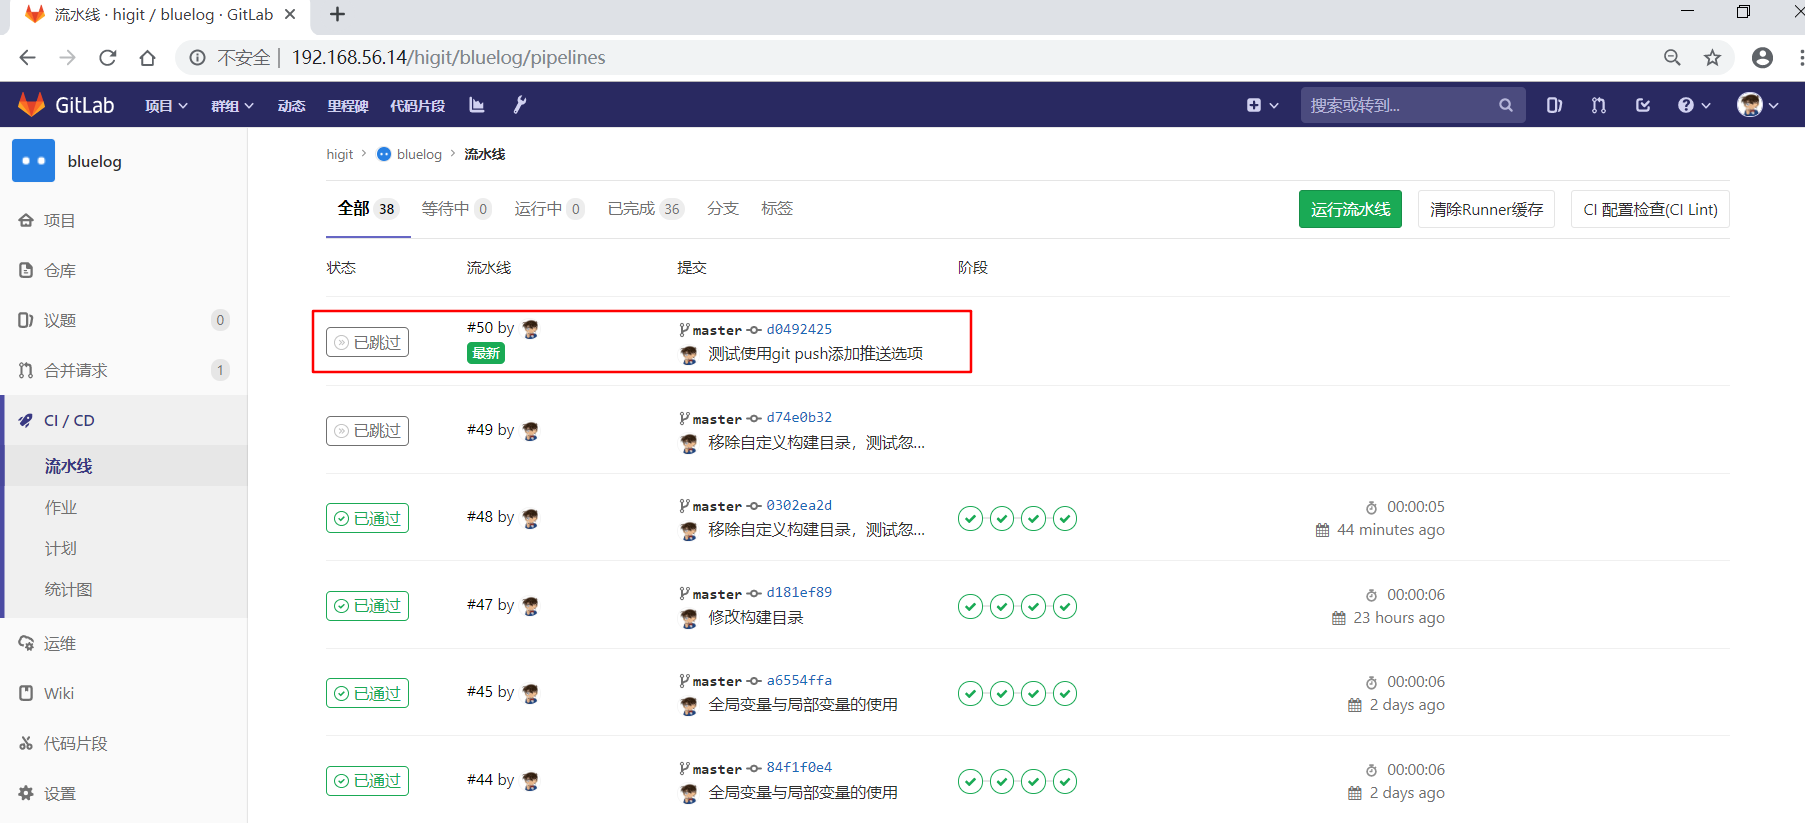
我们第三次修改配置文件,commit日志为”测试使用git push添加推送选项”,进行提交:
可以发现流水线没有被触发,但是提交已经创建成功了:
.gitlab-ci.yml配置文件各个关键字的使用就介绍到这里。
参考: